FREE DESIGNS AND ESTIMATES

13 Big Ideas for Small Bathrooms


Small Bathrooms1.jpg

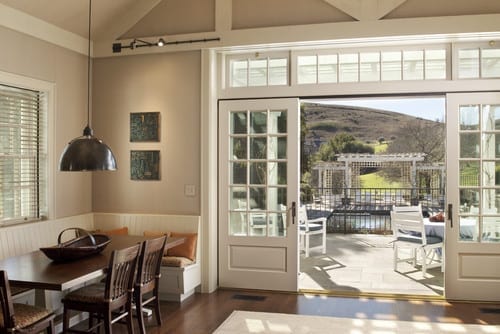
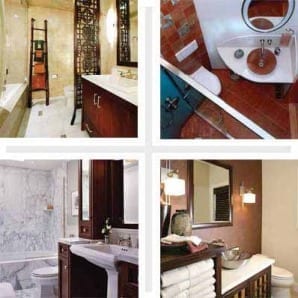
Photo: via TOH. A few things all old house lovers are familiar with: drafty windows, less-than-perfect plumbing, squeaky floors – and small bathrooms. While new home baths have nearly doubled in size over the past 30 years, old home bathrooms average about 5- by 8-feet.

Not to worry, though: you can combat the claustrophobia by scaling down to physically save space. (Pedestal sink, anyone?) And, with the right colors and lighting, you can create the illusion of a roomy bath

Here, we dig into the National Kitchen & Bath Association (NKBA) Design Competition archives to deliver great ideas from Certified Kitchen Designers that you can use in your next remodel. 

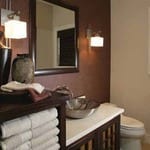
Photo: via TOH | Designer: Debbie R. Gualco, California

#1 Rich, Asian-Inspired Design

This homeowner wanted to bring her home out of the 1980s with contemporary Asian design, so the powder room vanity was inspired by a Japanese kaidantansu (stepped chest), which contributes fluidity of design in the cramped quarters. The use of rich and dark colors makes the walls of the small space recede.

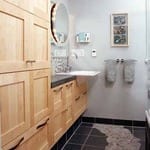
Photo: via TOH | Designer: Erica S. Westeroth, Ontario

#2 Day at the Beach

These homeowners opened up their space by getting rid of two small closets and adding task and ambient lighting to help create the illusion of a larger room. Little width remained after incorporating the tub and toilet, so a shallow cabinet was incorporated. Our favorite detail? The playful “dry riverbed” of stones in the floor. 

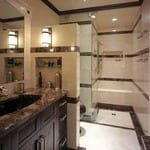
Photo: via TOH | Designer: Gary Hentges, Illionis

#3 His-and-Her Bath

The use of continuing horizontal lines, a large, frameless mirror, and well-placed task lighting helps to create the illusion of a larger space. The marble-clad dividing wall lends modesty to the toilet area, while creating a recessed storage opportunity. A must in every small bath, the shower has a curbless entry to eliminate demarcation of the limited footprint. 

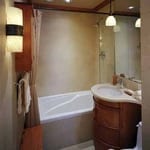
Photo: via TOH | Designer: Gary Henteges, Illionis

#4 Small and Simple

These homeowners wanted to “keep it simple and do it well.” This cherry and limestone bath replaced a tiny, cluttered space meant for guest use. The curved-front vanity maximizes usable space with two deep drawers on double extension drawer slides.

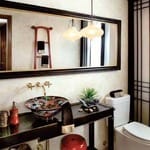
Photo: via TOH | Designer: Holly Rickert, New Jersey

#5 Zen Escape

The size of this room called attention to an eyesore: an off-center, aluminum-framed window. A floor-to-ceiling Shoji screen took care of that by concealing the flaw, while letting light through. A 7-foot framed mirror, hung horizontally, spans the entire length of the room and reflects the ladder towel rack, which adds storage without taking up floor space. 

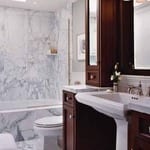
Photo: via TOH | Designer: Keri Davis, Oregon

#6 Small Spa Retreat

This bathroom was constrained by bedrooms on either side, so it wasn’t possible to increase square footage. To make the space feel roomier, white marble tile and several mirrored surfaces wrap the room. Floor-to-ceiling cabinets add height, while a glass shower wall eliminates the visual barrier of a shower curtain or doors. Rich wood tones add warmth and create balance. 

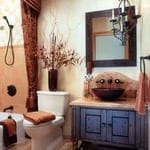
Photo: via TOH | Designer: Leslie Ann Cohen, California

#7 Hacienda-Style Bath

This guest bath features a custom miniature sideboard topped with a rich red travertine counter and copper vessel sink. Rich shower draperies and handmade tiles add to the charm of this space, showing that patterns used selectively as accents will not overwhelm a small room.

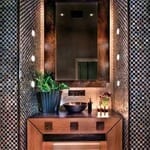
Photo: via TOH | Designer: Lori Carroll, Arizona

#8 Tone and Texture

It’s not uncommon to create attention-commanding focal points in compact spaces. This powder room vanity is crafted with smooth, flaxen veneer and is topped with a cast bronze basin and patina counter. Recessed lighting around the large mirror illuminates any reflection.

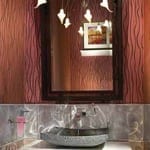
Photo: via TOH | Designer: Leslie Thompson, Florida

#9 Modern Makeover

This vanity continues the lesson of creating a bold focal point in a small space. The upper walls of this ultra-feminine retreat are upholstered in padded silk, but the stainless steel backsplash adds a rugged accent.

Photo: via TOH | Designer: Margie Little

#10 Compact Commode

This teeny, tiny full bath features a wall hung toilet; the tank is hidden inside the 2×6 stud wall, allowing for 9 inches of extra space in the center of the room. Clear glass shower doors eliminate visual barriers and a skylight floods the space with natural light.

Photo: via TOH | Designer: MaryLou Kalmus

#11 Glass Grandeur

A curved glass countertop provides a sense of spaciousness, while hand-applied 1-inch Bizazza glass tiles mimic the swooping curves of the fixtures. The high ceiling features a deep amethyst color wash to visually lower the height of the room, which felt “like a tunnel” to the homeowers.

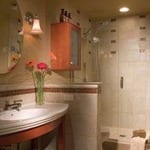
Photo: via TOH | Designer: Sheila K. Tilander, Washington

#12 Retro Redo

This homeowner wanted a nostalgic style with a contemporary twist. Trumpet-shaped sconces flank an oval mirror that conceals a medicine cabinet. A frameless shower door extends the visual expanse of the space, while allowing unobstructed views of oversized subway and amber glass tilework. 

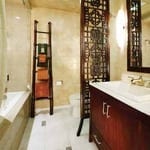
Photo: via TOH | Designer: Tiffany De Tomasi, California

#13 Eastern Oasis

A freestanding vanity with elongated fixtures, a custom bamboo mirror, and ladder towel rack create the illusion of vertical space in this small guest bath. A soft color palette accented with dark woods, balances the space. Artistic relief panels add visual interest without completely walling off light. 

(You are reading an article originally posted on This Old House)

Spring Decor: Season Change, and so Can Accessories

If you’re like me, skin-tingling excitement occurs as you pull the box of summer clothes out of the storage, and put away the sweaters for the season. Spring, summer, it’s like the whole world comes alive. Leaves sprout, flowers bloom, the laughing of kids playing in the streets returns. 


traditional-family-room.jpg

Photo Credit: Traditional Family Room by San Francisco Architect Gast Architects

This year, consider projects that allow you to bring the changing seasons indoors. Think “convertible decor”. With smartly-chosen palettes for draperies, pillows and accessories; you can bring summer out of storage in a big way.

“Oh look. Summer. Time to pull the other pillow cases out, put the other curtains up, and…”

It’s great to clean seasonally. Freshen the place up, get rid of clutter. Wash those decorative pillowcases and get the dust out of draperies. Why not change them up at the same time?

Transforming Spaces with Accessories Colors

Depending on wall colors and other surroundings, you have a lot of accessory choices. Maybe in hectic summer months you want light, cool pastels in simple designs without flashy bold patterns. 

Maybe in winther when you’re more likely to be walloped by oppressive weather, you might want to embrace boldness and brightness, to liven up your indoors since you know you’ll be stuck behind the windows more often.

Think of what the seasons mean to you. Do you need a winter pick-me-up? Is summer about relaxing? Imagine what colors and designs might be appealing to you.

Love Affair with Your Home

I bought end-of-season items before Christmas so I could get a fresh look when the spring came around. My director’s chairs on my deck have been given the Caribbean treatment and my living room pillows are soon getting bright florals for summer.

Convertible room schemes aren’t about impressing your guests or staying up with the times. It’s about making your space bright, fresh, fulfilling, and keeping things interesting. It’s about keeping the love affiar with your home alive and fun.

You don’t need to blow your wad on expensive pillowcases or drapes, since we all know they’re even more enjoyable when you score them on sale. They just have to be attractive, work together and offer a nice change of scene. Go ahead, keep them for more than a single season’s use, as they’ll feel “new” when you take them out after six months of hiding. It’s not like the trend police will beat down your door because you’re using 2012’s look.


contemporary-living-room.jpg

Photo Credit: Contemporary Living Room by Dublin Architect Optimise Design

Accessory Swap

The accessory-swap is a smarter way to go than redecorating every couple of years. It’s budget-friendly, environmentally friendly and you can always easily donate or sell pieces you tired of.

If you’ve got convertibility in mind, you need to pick a great paint color that isn’t going to disappear from the market after a season (like when teal or orange have been “the color of the year” and then you can’t find a thing made with those palettes after the season passes).

An interesting neutral or classic tone on the wall will be the backdrop to a world of patterns and color combinations for your accessorizing. This doesn’t mean only using “shades of beige”. Olive green has been a popular color since the ’70s. So have shades of blues and earth tones and pastels. Is it a color that’ll work for the next five years and that you see fabrics and accessories in regularly? Then great. It’ll do.

Seasonal Artwork Framing and Area Rugs

There are other places you’d be best off remaining neutral, too. Like when you’re framing artwork. Getting vibrant mats or frames that play off the artwork rather than simply defining the art may wind up working against your being able to easily transform the look of your space by switching out pillows, drapes, and other accessories.

An area rugs’ flexibility is also a consideration when you’re making a rug purchase. Sure it goes with your stuff now, but will it be easily adapted to other schemes down the line?

If you’d like to be able to swap your space as seasons arrive, a mix of ongoing neutrals can act as a nice foil for a variety accessory looks is the way to maximize your paint choices and investment pieces for the long-haul while never getting stuck with just one look year-round. 

Don’t just live in your space, love it. Have fun by keeping things fresh and embracing change every few months. 

(You’re reading Spring Decor: Seasons Change, And So Can Accessories originally posted on Build Direct Blog)

Design 101: Common Kitchen Shapes That Blend Beauty and Function

We all want our kitchens to be both beautiful and functional. And while you may have an idea of how you want your new kitchen to look, balancing proportion and scale to achieve a harmonious whole is critical. However you’ll also want to understand the factors that impact how it feels to be in the space. Here, we’ve gathered some information on kitchen shapes, optimizing functionality and how to ensure a layout works for you and your family.

Your Lifestyle and Your Home Will Influence Your Kitchen’s Shape

Are you an aspiring cook? Do you like to entertain? Is counter space a premium? These are just some of the considerations that will determine which kitchen shape is right for you.

Photo Credit: Omega | MasterBrand Cabinets, Inc.

U-SHAPED

Popular with many cooks because of its efficiency, the U-shaped kitchen offers generous counter space and provides an efficient workflow by creating a compact work triangle. It can however make the cook feel apart from a group when entertaining, as most movement will be facing one of the three walls.

Photo Credit: Omega | MasterBrand Cabinets, Inc.

L-SHAPED

The L-shaped kitchen offers flexibility for both large and small homes. This shape utilizes only two kitchen walls, providing an open sensibility. The L-shape minimizes traffic through the kitchen and, typically, features larger expanses of countertops, allowing ease of preparation at mealtime.

L-SHAPED WITH AN ISLAND

An L-shaped kitchen with an island is ideal for entertaining. The ample counter space along the “L”of the kitchen becomes the primary work area, while the island allows guests or other family members to gather, to help prepare or just visit… AND to stay out of the way of the cook!

Photo Credit: Omega | MasterBrand Cabinets, Inc.

G-SHAPED

A modified “U” shape, the G shaped kitchen is very efficient. However, unless one or more of the walls are designed as half or “pony” walls, this kitchen shape can feel confining for today’s cook.

SINGLE WALL

This layout positions all of the appliances on a single wall, and would typically be found in a studio apartment or other very small space.

Photo Credit: Omega | MasterBrand Cabinets, Inc.

GALLEY

Open on both ends, the Galley requires a minimum corridor width of 48″ so that the cook can easily maneuver during meal preparation. Typically, appliances are near one another which is convenient, but due to the corridor shape of the kitchen, all of the household traffic will pass through the space.

Efficiency Has a Shape: The Triangle

The basic work triangle is comprised of an imaginary line drawn between the kitchen’s primary work areas:

  1. food storage (refrigerator)
  2. food preparation (stove)
  3. clean up (sink)

For maximum efficiency, the sum total of the triangle should be 26 linear feet, with the sink being the center point.

What You Can Expect From Your Designer

In addition to offering guidance on door style, wood type and color selections; a professional kitchen designer will typically prepare three types of documents for your review:

  1. floor plan
  2. elevations of all the wall that receive cabinetry
  3. perspective view from one of more vantage points within the room

Availability of these documents to the consumer is usually contingent on a contractual agreement and/or down payment.

FLOOR PLAN

A floor plan shows the wall layout from above, and an outline of all the components that will fill the space, such as base, wall and tall cabinetry. Sometimes lighting and electrical detailing are also shown on this plan.

Photo Credit: Omega | MasterBrand Cabinets, Inc.

ELEVATION

A “flat” drawing that shows each wall of cabinetry as if you were standing and facing it head on. The elevation view is good for seeing the detail of the cabinetry components that aren’t visible in the floor plan view. It is also good for establishing heights of components within the room.

Perspective

A perspective drawing is one that is “3D” or dimensional. It shows the room as it would be actually seen from the viewpoint of a person 5′-6″ in height. Perspective drawings provide details such as areas that are increased or reduced in depth, a dimensional quality that elevation drawings don’t offer.

Testing the Fit

It is a good idea to layout the proposed kitchen in the actual space. If the space is empty, this is easily accomplished a couple of different ways. Refer to the completed floor plan utilizing a tape measure and masking tape to indicate where cabinets and appliances will be located. Newspaper can be folded to adjust its size and then moved around within the space – perfect for determining just how big that island should be! If there is an existing kitchen in place, you’ll have to improvise a bit. Both tape and newspaper can be used to outline new cabinets or appliances, helping you visualize your new space.

April Checklist for a Smooth-Running Home

Spring has arrived! Wake up your home and prepare for the season ahead by deep cleaning, sprucing up outdoor areas and simplifying your living areas, one shelf at a time. And when you are finished, pour yourself a nice glass of something cold to drink and toast your lovely, freshly cleaned home.

Freshen patios and porches.

The lengthening days never fail to draw people outdoors onto porches, patios and decks to savor the longer-lasting light. Make sure your outdoor spaces are ready for the season by cleaning away cobwebs and leaves, washing floors and refreshing outdoor furniture.

Clean the exterior and inspect window screens for tears.

Increasing your home’s curb appeal is as easy as turning on the hose(or a pressure washer) and giving the siding a quick blast to remove accumulated dirt and debris. Also be sure to check window screens for small tears that can let bugs in, and repair or replace the screens as needed.

Clean ceiling fans and overhead light fixtures.

Grab a tall ladder and (carefully!) get to work. Use a duster or soft rags to remove dust from fans and light fixtures – wet rags will only make the dust harder to remove. For caked on grime, start with a dry duster or microfiber cloth and then move on to a fresh damp cloth if needed.

Deep clean the kitchen and prep for seasonal meals. 

Give your kitchen a fresh spring start with a thorough cleaning. In addition to your usual cobweb clearing and floor mopping, wipe down walls and doors and vacuum behind the fridge and stove. Encourage healthy seasonal eating by cleaning out the fridge and pantry, and stocking the space with fresh local produce and other healthy picks.

Organize one shelf.

If an organized home is a goal you want to reach this year, set yourself up for success by starting small. Working on a single shelf, drawer or cupboard at at time will help you build momentum. Try starting with the spice rack, a bedside table or a frequently used desk drawer.

Simplify the living room.

Pare down books and media to create a more relaxing space. Donate used books, movies and music to your local library or sell them. Organize what’s left, hiding anything unsightly (gaming, equipment, I’m lookat at you) behind closed doors. To keep things from getting out of hand in the future, pencil in a date about a month from your paring-down date to spend an afternoon culling unwanted media.

Streamline files.

Since you will likely be digging through your old paperwork this month as you prepare taxes (ugh, I know), take the time to toss junk as you come across it rather than stuffing everything back into the files. A slimmed-down file drawer will make it easier to find what you need, so it’s worth the extra effort now. 

Lighten up tablescapes.

If you’ve had the same arrangements on your tables for months, now is a good time to shake things up. There is no need to spend money – simply look around your home and see what can be moved or repurposed from another room. Try displaying flowers on the dining table in vintage tea tins or jelly jars, or put fresh herbs in your vases instead of flowers. Streamline the decorative objects you choose to keep out, and store the rest to rotate in at a future date.

12 Great Kitchen Styles – Which One’s for You?

Style is easier to recognize with your eyes than with words: You know it when you see it, and the photo that inspires you most can often surprise you. Think you know your kitchen style? Check out these guides to a dozen favorite kitchen design themes, then tell us which one takes the cake.

#1 – Farmhouse Kitchens

Warm and homey farmhouses anchored a life on the land, and they still offer great functionality and comfort. Their open shelving, wide sinks, classic flooring and big kitchen table make them easy to work in and easy to love. 

#2 – Rustic Kitchens

“Worn”, “distressed” and “rough hewn” may not be the first words that come to mind when we think of kitchens. But today rustic kitchens rival the classic white kitchen in popularity – thanks to their timber, stone, brick, vintage appliances and fireplaces. 

#3 – Modern Kitchens

Definitions of “modern” vary widely, but when we think of modern kitchen designs, we often think of frameless cabinets, sleek and simple hardware, strong horizontal lines and a lack of ornamentation, with the natural beauty of the materials shining through. 

#4 Traditional Kitchens

Traditional kitchens are defined by their details, which can include arches, decorative moldings and corbels, raised-panel cabinets, a mix of antique finishes and furniture-like turned legs – even a chandelier. Whether they have a classic American or old-world flavor, they still carry the stamp of their owners’ personal style.

#5 Contemporary Kitchens

Contemporary kitchens can be very sleek, but while a purely modern kitchen often celebrates structure and grid, a contemporary kitchen is often more playful in form and finishes, including elements of other styles and creating its own reflection of the times.

#6 Transitional Kitchens

Think of a transitional kitchen as the great moderator. With the warmth and welcome of traditional design and the clean, simple lines of contemporary style, transitional spaces project balance and harmony. Because they offer a great deal of flexibility, they’re a great choices for homeowners whose taste spans the two.

#7 Craftsman Kitchens

Craftsman style arose in the early 20th century as a reaction to the mass-produced fussiness of the Victorian era. Its rich woods, built-ins, handcrafted tiles and well-made simplicity continue to charm us.

#8 Cottage Kitchens

Cozy, happy and unpretentious, a cottage kitchen harks back to simpler times and evokes a sense of easy, carefree living. Beadboard, soft colors, vintage hardware, wood floors and colorful accents and curtains will infuse your kitchen with cottage comfort. 

#9 Paris Bistro Kitchens

If you long for a sugar-laced café au lait on Rue Monmartre, why not bring a little Parisian style into your house? Intimate kitchen lighting, pretty cookware on display, tile floors and a striped awning ought to do it.

#10 Classic Kitchens

What is classic? The answer is as varied as cooks are. Still, white or cream kitchen cabinets, simple architectural details and black accents offer a blank slate that homeowners can personalize with contemporary, traditional and eclectic touches as they see fit.

#11 Mediterranean Style Kitchens

Flared hoods, hand-painted tile, warm wood cabinets, beamed ceilings and arched cooking alcoves are just some of the features that put Spanish revival kitchens on the most-wanted list.

#12 Eclectic Kitchens

Do you rebel against styles and refuse pigeonholes? It’s your housel you can mix and match for your own distinct kitchen style however you please. The trick: be a rebel with a cause. Get ideas for a very personal kitchen, with touches of modern and rustic styles, well-traveled flair, humor and irreverence.

How to Work With a Kitchen Designer

Whether your kitchen needs a minor face lift or a complete gut job, soliciting help from a certified kitchen designer can be well worth the investment. The rule of thumb: if a kitchen project costs more than a few hundred dollars, it may be time to call a pro.

Not only do kitchen designers have access to planning tools and technology that most homeowners don’t, but they have the inside scoop on trends, new materials, building codes and technical quirks. And their kitchen remodel expertise can save you a lot of time, money and frustration. Use our tips to help the process flow smoothly from start to finish. 


Kitchen Island

Photo: American Cabinet & Flooring | Designer: Randy Wilson

Know the different types of kitchen designers

If you’re ordering cabinetry and more through a national chain or other retailer, there likely will be designers on staff who can help you plan. The main advantage: often, there’s no additional cost for their services, although some charge a percentage of the total sale or work under another fee structure. Other designers work independently at an hourly or per-project rate. Because they’re not affiliated with a particular store or brand, they can sometimes be more objective about materials. 

If you choose an independent professional, ask for recommendations from friends an others in your community, and browse the Houzz professionals directory or the National Kitchen and Bath Association website for reputable designers in your area.

In any case, request to see examples of the designer’s previous work and ask for client references in order to ensure that he or she is a good match for your needs.

Note the ups and downs of your existing space

Perhaps your kitchen operates just fine, but the finishes are long past their prime. Or maybe you’re planning a soup-to-nuts renovation and have no idea how to retool the space. Be prepared to share with the kitchen designer what you like and what you hope to change to give a firm place to start.

Do your research…

Your initial meeting with the designer will go more smoothly if you have a general idea of the look, flow and equipment you want. Browse decorating websites and magazines for kitchen design photos that speak to you, and how them to your designer. A picture can communicate clearly what you may struggle to capture in words. 

…but stay flexible

The kitchen designer may spot holes in your wish list or mix materials that won’t work for you no matter how much you love them. Conversely, he or she may introduce you to options you’d never considered. And he or she will keep you from sacrificing function for beauty, which is a recipe for misery down the road. Be open to suggestions – after all, expertise is why you recuirted a designer. 

Know your budget

Have a firm idea of what you want to, and are able to, spend to avoid a disconnect between plans and reality. If you have the means for pro-grade appliances and high-end finished, your kitchen designer can work those into the scheme from the beginning. If you don’t, make it known upfront. Although miracles mau not happen on a shoestring, a designer has the experience and the know-how to stretch your dollars as far as they’ll possible go. 

Settle on a time line and a number of draft plans

Kitchen designers don’t expect to nail it on the first try – some back and forth is usually built into the process. Agree upon how many drafts of the plan you’ll see before you sing a contract and part with any cash. you should also confirm a time line for the work, though circumstances beyond anyone’s control can throw even the best-orchestrated jobs off schedule.

Keep changes minimal

Depending on how far along in the process you are, change orders can be anything from a mild nuisance to a major issue. Not only will they hold up progress, but they’ll also put a dent in your wallet. That said, if there’s a change that must be made for you to enjoy and use your revamped kitchen the way you intend, it’s better to speak up than to end up dealin with the flaw on a daily basis.

Be patient

A good kitchen plan takes time to create, and so does bringing it to life. Putting in effort on the front end, from choosing finishes to thinking through the work zone, will pay off in the long run. And the last thing you want is a rushed construction job, so don’t hurry the contractors – no matter how anxious you are to put your new kitchen to work.

10 Popular Home Design Trends | Timely or Timeless?

Weigh in on whether these of-the-moment decorating elements will have staying power or become a memory of these times.

It’s hard to know what’s going to stick and what’s going to go down in history as the next macramé plant holder. Interior design trends come and go and come again, to be sure.

In the ’50s, people ripped out Victorian details and claw-foot tubs in favor of vinyl and plastic and elements with the sleek, modern aesthetic of the atomic age. in the ’70s and ’80s, Danish modern pieces and other icons of the ’50s were eschewed as symbols of a stuffy, bygone era. Now they are sought-after treasures with giant price tags. 

In the last decade, we’ve seen some new decorating trends emerge. Some will have staying power, and some will go down with macramé plant hangers. We may see them in 20 years and think, “That is so 2012.” But which is which? I have my predications.

What are yours?

Moroccan Poufs

Image Source: Bungalow1a (blog)I am a huge fan of Moroccan poufs. They are great extra seating. They are great foot rests. They are both exotic and modern, and they come in a rainbow of colors.

They’re modern looking, but with just the right amount of flourish. Not too sleek, not too busy.

And they go with any decor:

  • Modern

  • Traditional

  • Boho

  • Eclectic

But are they here to stay? I’m not sure.

Woods Wallpaper

This beautiful and serene pattern hit its apex in about 2010, when it was absolutely everywhere.

It’s simple, symmetrical and classic.

But that may have been what whoever put up the wallpaper of cartoonish bathing ladies in my childhood bathroom thought.

Image Source: Piet Hein Eek Wood Wallpaper via Charlie and Caroline (blog)

Mid-Century Modern Wallpaper

Image Source: UltraswankI love wallpaper, and I love the big, graphic patterns inspired by mid-century designs. But they’ve already done their comeback circle and I’m betting that in a few more years they are going to fall out of favor again. 

In 1990 no one would have put this in their home. Now everyone is. What about in 2025?

Same goes for mid-century textured wallpaper. Trend.

Mid-Century Starburst Mirrors

A starburst mirror is to my mom what a salmon and seafoam room is to me: a design trend from my youth that now seems horribly misguided. She cannot imagine why anyone would want this in a home. 

But many, many people do want starburst mirrors in their homes. You see them in all sorts of different styles. Does that make them a classic or are they just enjoying one last moment of favor?

Image Source: Bright Bazaar (blog)

Mid-Century Everything

Image Source: Jay Johnson | Examiner Home DesignAll the mid-century design icons have made a huge resurgence in the past decade:

  • Eames

  • Saarinen

  • Nelson

  • Bertoia

You can’t turn around without hitting your shin on a Tulip Chair.

Mid-century modern design had real beauty and a very recognizable aesthetic. It is grounded in the philosophy of its time, which sought a sleek simplicity and an integration with the outdoors.

The ideas and designs of that time will never fade away. But the trend of creating a period-piece room will. We will always have Danish modern and Nelson lights, but I don’t think there will be quite so many rooms that look like Mad Men sets in 20 years.

Butterflies

Butterflies are the insect of choice for everything from little girls’ rooms to sophisticated dining rooms. In the early aughts it was birds; now it’s butterflies.

Nature never goes out of style, and we’ve been stealing its designs since we first wrote on cave walls. But will butterflies scream “2012” in five years? 

Image Source: Etsy via Aliette | The Hand Made Home (blog)

Old Globes

Image Source: Longwood Eduation (blog)These are another staple of modern, eclectic design. Just try to score a cheap out-of-date globe at a garage sale. There is no such thing, such is the demand. 

Old globes do have an innate loveliness. They are bright and round and colorful. They represent exploration and mystery.

But will the old globe’s current ubiquitousness be its undoing? Ten years from now, will you be able to score one at a garage sale for next to nothing?

Fake Taxidermy

This is another big one in eclectic modern design. It’s funny and winking and ironic – very much a product of the time. 

But animal heads fashioned out of cardboard, plaster and ceramic have a limited shelf life.

Image Source: Etsy via For Each Wind That Blows (blog)

‘For Like Ever’ Posters

Image Source: Style Files, Plush Palate, Coco & Kelley via CreamyLife (blog)Already dated. They were just too popular for their own good. 

It’s always possible that they will make a nostalgic comeback in 20 years when all the children of today recall them from their childhoods. But they will never be a classic.

Wall Decals

They are great for people who can’t or don’t want to commit to wallpaper. And they are certainly a lot less expensive than art. But does the wall decal mural have a future?

I think wall decals might be here to stay for short-life rooms like nurseries, but their best days are behind them for adult spaces. 

Kitchen Space and the Organized Homeowner

The war against clutter is not just about keeping objects in your space in line. It’s about the emotional pay-off of having a space that is easy to move around in. And no room in your home demonstrates this benefit more than your kitchen.

To explore this, guest writer Jenney Maria is here to present a few ideas on de-cluttering and organizing your kitchen.

Photo: American Cabinet & Flooring | Designer Clay Bernard

The kitchen is the central part of every house, as the whole family gathers here to prepare food, enjoy the meal and to entertain friends. It is also the most frequently used portion of your house which needs to be organized on a daily basis. If you utilize your kitchen space effectively, food preparation and cleaning up becomes very efficient and comfortable. Here are some tips that will help you a lot in organizing your kitchen in an efficient manner.

Kitchen space, the wheat and the chaff

First of all, it is very important to make a list of all the items that you will need in the kitchen. You should only include items that you use on a daily basis and try to avoid any unnecessary items. After preparing the list assess the situation, which is, what you actually have and which items you’ll have to purchase. 

Zones and your kitchen

Once you have all the things you need; now you can start organizing your kitchen. Divide your kitchen into different zones, e.g. cooking – eating – and washing. Your kitchen can be organized very easily if you arrange things accordingly. Designate a small area for your family members to sit and eat in the kitchen. A well-organized kitchen will give you a pleasant feeling every time you enter and will make your kitchen tasks quite easy and hassle-free.

The right kitchen tools to have

The next step is to place all the routine tools and appliance near you. You must have an easy access to all these items because while working in the kitchen, you have to perform multiple tasks. You should place your cooking utensils in a storing container so that you can save the drawer space. Make use of the cabinet doors by placing cook books, or other type of reading materials that you require while cooking, inside. 

Kitchen space organization

Finally, it’s time to position things. Ensure that you have placed the things that work together near each other. For example pots, pans, whisks, spatulas and also ladles should be placed near the stove; bowls, measuring glasses and appliances should also be in the cooking zone. Small appliances, sharp tools and cleaning chemicals should be carefully placed in secured storage areas so that children are not able to reach them. Hardly used tools and appliances should be placed on the top shelf.

Simplify your life in your kitchen

By following these simple tips you can easily utilize your kitchen space and make your life much easier. Dividing the kitchen area according to your work will help you find whatever you require as it’s needed and will save your time and energy. Having a well-organized kitchen could make your task movement smooth, and your time in the kitchen will be more enjoyable and comforting.

Decorate With Intention: Nourish Your Creativity at Home


going home to roost.jpg

Photo: Going Home To Roost. Whether you knit, sew, paint, write or craft, chances are that you find it challenging to squeeze in as much creative time as you would like. It is all too easy to allow our schedules to be filled to the brim with obligations to others, but the fact remains that when we take the time to do the things that feed our creative spirits, we feel better. When fall approaches, and the coziness of home beckons once again, it’s the perfect time to take up your chosen craft (or try something new).

These 11 ideas and beautiful, inspiring spaces will help spark your creativity, get you out of any ruts and support your craft side.

No more excuses! Avoid distraction and make the most of limited time

Even if you can set aside only 10 or 15 minutes, if you make them count – and repeat daily – you will be amazed at what you can accomplish. While it’s true that some projects require a few longer dedicated work times, if we are being honest, mostly “I have no time” is just another way to procrastinate.

If creating is important to you, you probably can find the time. Set yourself up for success by avoiding easy access to the Internet and turning off all of your devices during dedicated creative work times – and let those you live with know how important this this time is to you.

If you need a big, open space, make it happen

If what you really need is an expansive surface to spread out on and you don’t have a dedicated place with one, don’t let that stop you. It’s perfectly all right to call dibs on the dining room or kitchen table between meals, provided you can clear your work to the side relatively easily. Keeping a cabinet or drawers nearby will make it easy to sweep things off the table in a hurry.

Feeling stuck? Take a time-out for exercise

The next time a creative block hits, try taking a brisk walk, settling into a few yoga poses or lifting weights – anything to get your blood pumping. Exercise gives your mind a rest from actively thinking about your creative problem while improving circulation (and likely your mood). The best ideas can bubble up spontaneously during these time-outs, pulling you out of your rut in a much shorter time than if you had been trying to force an idea to come. 

Find a corner to call your own

Whether it is a small table pulled up to a sunny window, a closet that can be curtained off from the rest of the space, a tiny unused nook or a cabinet with a work surface hidden inside, it is important to find somewhere that lets you fully commit to your creative practice. There will be times when you must leave your work in the middle of a project, and it is so helpful if you can leave some of your materials out rather than needing to clean up completely every time. Don’t fret if the only space you can find is a bit out of the way – sometimes a desk with a spectacular view is not as conductive to good work as a tiny nook, where you can focus your energy on the task at hand.

Make sure you have easy access to your materials

If you need to hunt and dig every time you want to work on your craft project, chances are that it’s not going to happen as often as you would like. It’s not necessary to keep every last item on display, but putting frequently used tools in an easy-to-grab spot is key. Fill an open-top bin or basket with your materials and store it in the room where you like to work.

Let your entire space reflect your creative passions

There is something to be said for having an entire studio devoted to your art (of course), but for most of us, finding creative space within the rest of our home is just how it goes. But that doesn’t mean you must confine your creativity to one zone – in fact, the more you can integrate mini creativity spots throughout your space, the more likely it is you’ll be tempted to make something. Try displaying your guitar on a stand in the living room, keeping pretty fabrics or luscious yarns in open cubbies, and stashing a stack of fresh notebooks and nice pens near your favorite chair.

Know when you need privacy

This tip is especially pertinent for those living with kids or roommates. Even if you have a large space, if others are constantly interrupting to ask you questions or chat, you need to find somewhere more private. Taking over part of your own bedroom with a worktable and an inspiration board could be the ideal solution. If you want to be really tricky, you can even pretend you are still sleeping – and squeeze in a little creative time first thing in the morning before anyone knows you are up.

Mood matters: Your creative space should inspire you

While it is true you should minimize distractions during creative time, that doesn’t necessarily mean you ought to work in a completely unadorned room, either. Tap into what fuels your creativity and bring more of that into your space. Consider a small stereo if you enjoy music while you work, textiles or vintage objects that spark your imagination, an inspiration board where you can collect your ideas, and book you love; even fun wallpaper or a vibrant wash of paint can enhance your mood and help juice your creative spirit.

Entice yourself with inspiring quotes

I am a big believer in the power of words, and an apt quote has helped me out of a creative rut many times. Keep a rotating selection of favorite quotes, says, song lyrics and lines of poetry on a chalkboard or pin board, or simply taped to your wall for a quick boost whenever you need it.

Know that moments of humor in your decor make creativity flow

Keep the mood light in your creative space with a cheeky, fun touch like a decorated or “dressed” sculpture, a cheapo vintage portrait that you have drawn a mustache on or any object that brings a smile to your face.

Be open to creativity in all areas of your life

Creativity permeates everything we do, from our conversations with friends to preparing dinner for our families. Approaching everyday tasks with a creative outlook makes our daily life richer and more satisfying.

Choose Paint Colors With a Color Wheel

Color Wheel Guide


Big-Wheel.jpg

Photo: The Color Wheel Co.

Picking out paint colors can be a confusing experience, leaving you racked with indecision as you peruse swatches from paint companies intent on re-creating all of the 7 million colors distinguishable to the human eye. Trying to figure out which of those colors will mix harmoniously on your living room wall is enough to make you turn straight to the ecru-and-eggshell-white family and never leave.

One way to go, however, is to use a complementary color scheme. Proving the rule that opposites attract, these pairings can always be found at opposite ends from each other on a paint color wheel. When put together, they bring out the best in each other, making both colors look cleaner and brighter than if either were mixed with, say, a neutral gray or a different shade of the same hue.

An essential tool for paint pros everywhere, the color wheel is constructed to help you see the relationships between different hues. The bases are thre primary colors: red, blue and yellow. These are then combined to make the three secondary colors: orange, green, and purple. Finally, the remaining six colors on the wheel are known as tertiary colors and are mixes of the secondary colors, including such hues as red-orange and blue-green.

Familiarizing yourself with the color wheel can help you understand how to best mix and match a cool color with a warm one, for a naturally balanced room. Here are some examples of how to use these color pairings effectively.


red-green.jpg

Photo: Deborah Whitlaw-Llewellyn

Complements: Red and Green

When considering paint colors, remember to figure in the finish of any woodwork in the room. In this rustic Colonial-style kitchen, the green hues brushed onto the walls and lower cabinets complement the red tones of the mahogany beadboard and upper cabinets. 


red-orange-blue-green.jpg

Photo: Mark Lund

Complements: Red-Orange and Blue-Green

The two colors you choose don’t have to have equal prominence in the room to work. You can use one as the main color as an accent, or bring small colored accessories into an already painted room to see how you feel about the pairing. Here, the energetically bright orange-red towel and glass pop against the cool, blue-green walls without overwhelming the soothing hue.


blue-orange.jpg

Photo: Laura Moss

Complements: Orange and Blue

Keep the furniture you already have in mind when considering a new paint color. The cool blue milk paint on this wall accentuates the bright burst of orange on the blank chest in front of it – a scheme echoed in a more muted fashion in the bedroom rug beyond the doorway.


yellow-orange-blue-violet.jpg

Photo: Laura Moss

Complements: Yellow-Orange and Blue-Violet

Bright colors can breathe new life into traditional woodwork and work especially well in casual living areas. Here, glossy violet-blue pantry doors in a mudroom pop against the yellow-orange of the adjacent wall. When working with more saturated hues, remember that the colors will often appear more intense on the walls than they do on the strip. 


yellow-violet.jpg

Photo: Laura Moss

Complements: Yellow and Violet

If you’re a bit timid about suddenly splashing a couple of cans of color onto your walls, consider using two complementary colors as accents in the same room. In this 1950s kitchen the yellow window casing and violet countertop show nicely against the neutral beadboard and white cabinets. 


yellow-green-red-violet.jpg

Photo: Gregg Segal

Complements: Yellow-Green and Red-Violet

Make sure the intensities of the tones you use are balanced. In this kitchen, the pale yellow-green trim and pantry door meet their match in the subdued reddish-violet paint on the walls.