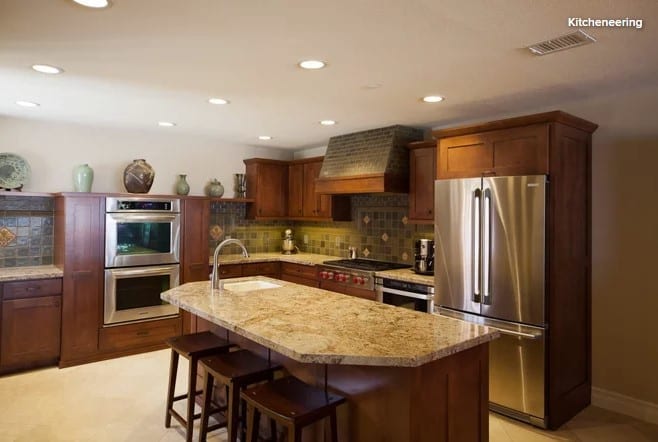
Granite is one of the most elegant choice for a kitchen countertop. It is very easy to clean and will make you proud of your kitchen. Granite countertops add a touch of elegance to any space. This natural material is exceptionally durable, and fits any décor style. The challenge in selecting the right material is that there are so many styles, patterns, and colors that it can be difficult to choose. There are several factors to consider when selecting the right granite countertop. Here are a few reason you’ll want to consider granite for your next project.
Kitchen
Hygienic Solid Surface Countertops
Solid surface countertops might be the perfect choice for your next kitchen or bath remodel. Let’s look at some of its health-promoting properties.
Solid surface has been around for more than 50 years. It is being used more and more in healthcare, restaurant, and hospitality settings because of its hygienic properties. With the rise of the pandemic and other health concerns, cleanliness and good hygiene are on everyone’s minds. To ease these concerns, solid surface might just be the perfect choice for your next kitchen or bath remodel. Let’s take a look at some of the benefits of solid surface countertops.
Your Guide to 6 Kitchen Island Styles
By Sam Ferris
There are plenty of reasons to include an island in your kitchen — extra storage, seating and workspace, for example. But there are also several reasons why you might want to choose one island shape and style over another. This guide to six popular kitchen island styles will help you determine which one is right for you.

1. L-Shaped
This type of island can ebb and flow with the shape of your kitchen or fill in the blank space with more storage and prep space.
Pros. L-shaped islands tend to be large with correspondingly generous storage. Their sprawling design ensures that workspace isn’t crowded, a huge perk for households with avid chefs or more than one cook. You won’t have an issue finding room for bar-style seating. If you aren’t a fan of clean lines, L-shaped islands bring some intrigue to the table.
Cons. While L-shaped islands may be larger and provide more prep space, they aren’t exactly open-concept. They can chop up your kitchen design, which can hamper efficiency during meal prep. The shape may be too spread out for some homeowners, and it doesn’t always maximize storage space since corners tend to decrease accessibility.
2. Galley
With fewer frills and a straightforward design, galley islands are built to be workhorses. They can be a good fit for any type of kitchen layout, assuming that there’s enough space for one.
Pros. Often considered the quintessential island design for open-concept kitchens, galley islands ensure that your space has flow and remains efficient with their streamlined design. They usually maximize storage space because there aren’t any corners or curves. Appliances and stored items are always accessible. The design also favors bar-style seating.
Cons. Yes, galley islands are simple and efficient, but some homeowners may think they’re boring. They certainly won’t wow the eye unless they’re larger than life or have an intricate exterior. Sometimes they’re too small to comfortably fit an appliance, which can create problems with your layout.
3. Circular or Curved
If you’re looking to add personality to your kitchen layout, a circular island may be for you. The design can go full circle or feature a half-moon.
Pros. Circular and curved islands add an interesting visual dynamic to kitchens. They’re a go-to option if you don’t want a run-of-the-mill island design. Like L-shaped islands, they’re packed with prep space. There’s more than enough room to operate during meal prep. Circular designs can incorporate expansive seating areas that leave enough room for four-plus guests to comfortably eat and socialize.
Cons. Prep and storage space aren’t always efficient with circular islands. Your counter is spread out and curved, which can limit the way you cook. Storage units can be harder to access in some designs (they may be underneath a countertop overhang, for instance). Plan on wasted storage space unless your cabinets are customized to include creative options.
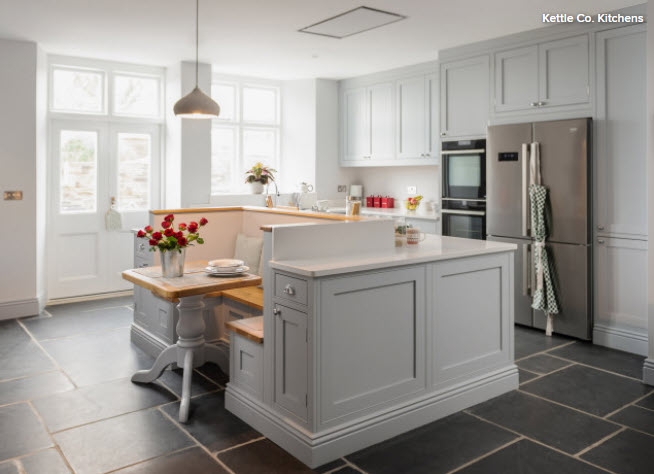
4. Furniture-Style
An unconventional choice, furniture islands can make your kitchen feel like your home’s premier hangout spot. Wide-ranging options can include a custom piece designed by a local carpenter and an antique table or chest of drawers.
Pros. It doesn’t matter if it’s custom-built, an age-old heirloom or store-bought — a furniture piece adds character to your kitchen. It’s one way to put your personal touch on your space and make it your own. The detail and decorative nature of the furniture will catch the eye of guests. These pieces usually aren’t bulky and fit seamlessly within your kitchen. Open-style designs can create fine displays for your decor.
Cons. Furniture pieces weren’t always built for storage, so that antique you had to have may not hold much of your cookware. There’s also the issue of durability. Older pieces may not last in the hustle and bustle of a modern kitchen. Wear and tear can take their toll. Furniture tops can’t take a beating the way granite or quartz can.
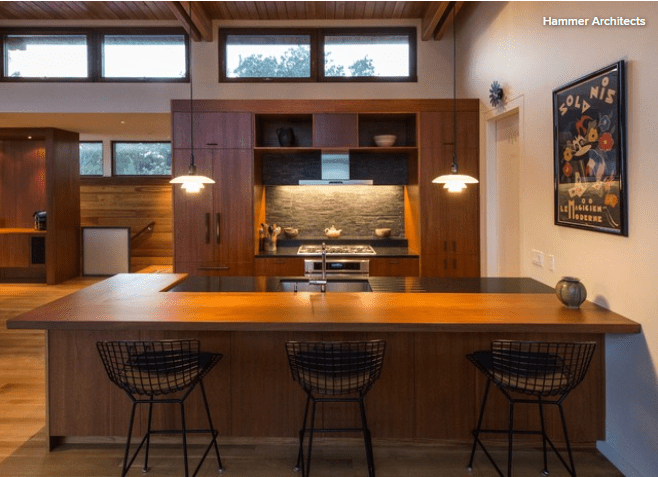
5. U-Shaped
U-shaped islands may be a chef’s dream. Three walls of cabinetry and appliances are enough to increase the efficiency of any kitchen.
Pros. Both highly functional and spacious, U-shaped islands are perhaps the largest and most accommodating. Extra storage space? Check. More workspace? You got it. Room for seating? There’s even that too. They can house more than one appliance if they’re big enough. You may not have to leave your island when you’re prepping food.
Cons. Their sheer size can also be the U-shaped islands’ biggest downfall. Some homeowners may find cooking and cleaning less efficient and may hate going the distance from one side to the other. These islands are bulky and can close off your kitchen from the rest of your home. The double corners will sacrifice accessible storage space unless they feature a Lazy Susan or swing-out device.
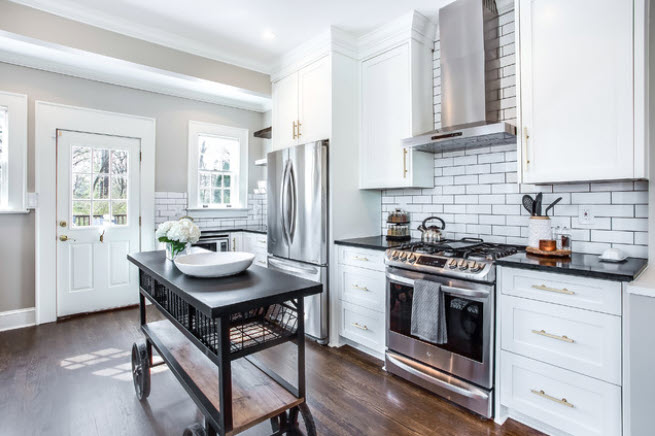
6. Rolling
No room for a built-in island? No problem. Rolling islands are a convenient alternative. You can whisk them around as you roam your kitchen and then tuck them neatly aside when you’re finished cooking.
Pros. Rolling islands are the crème de la crème in versatility. A godsend for smaller kitchens that lack adequate prep space, they can function as a worktop, food tray or a spare surface to place your ingredients. Depending on their size, they’re easy to stow and move. Best of all, they’re extremely affordable compared with cabinetry
Cons. Whipping up meals on wheels isn’t for everyone. Rolling islands are compact, which simply won’t work for some homeowners, even ones who are short on space. They can be a hassle to roll out during meals or to store. Bigger designs may be hard to move for some homeowners. They offer little to no storage.
The 5 Layers of a Well-Lit Kitchen
Develop a layered lighting plan to create a functional, adaptable and illuminated kitchen
By: David Warfel
When planning a lighting scheme for a client’s kitchen, I like to think about cake. Let me explain. On my birthday, a red velvet cake always comes my way, and it includes four layers with a cherry and icing on top. Just like that cake, a well-lit kitchen should also have four layers for different lighting needs. I call these light layers: “doing,” “knowing,” “feeling” and “changing.”
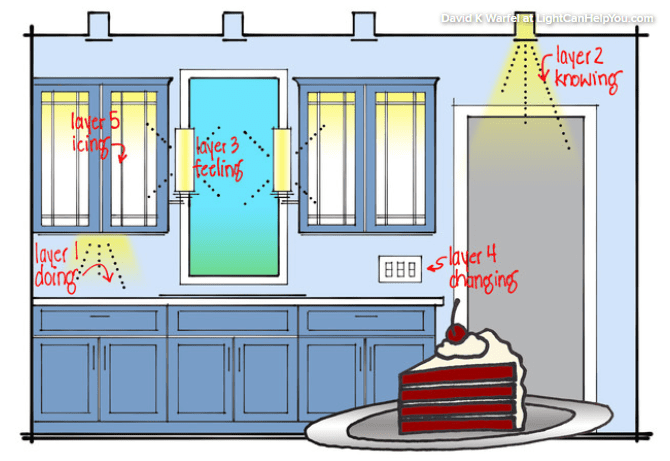
“Doing” lights help you perform manual tasks like prepping and cooking in the kitchen. “Knowing” lights help you navigate your way around a kitchen. “Feeling” lights make a kitchen feel inviting and comfortable. “Changing” lights help you adjust to the time of day and set a desired mood. And finally, the cherry and icing on top are all about adding decorative fixtures that let your personal style shine.
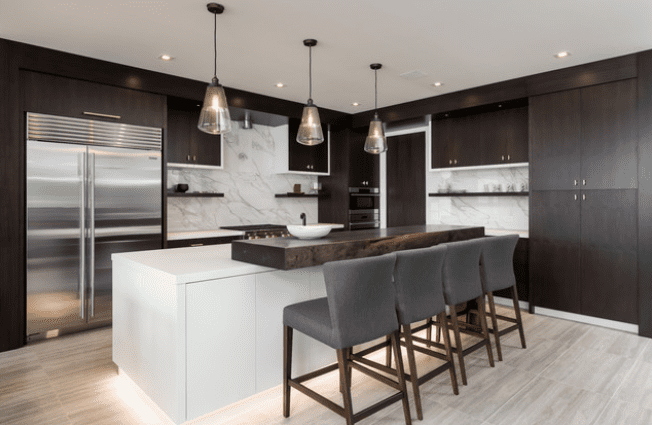
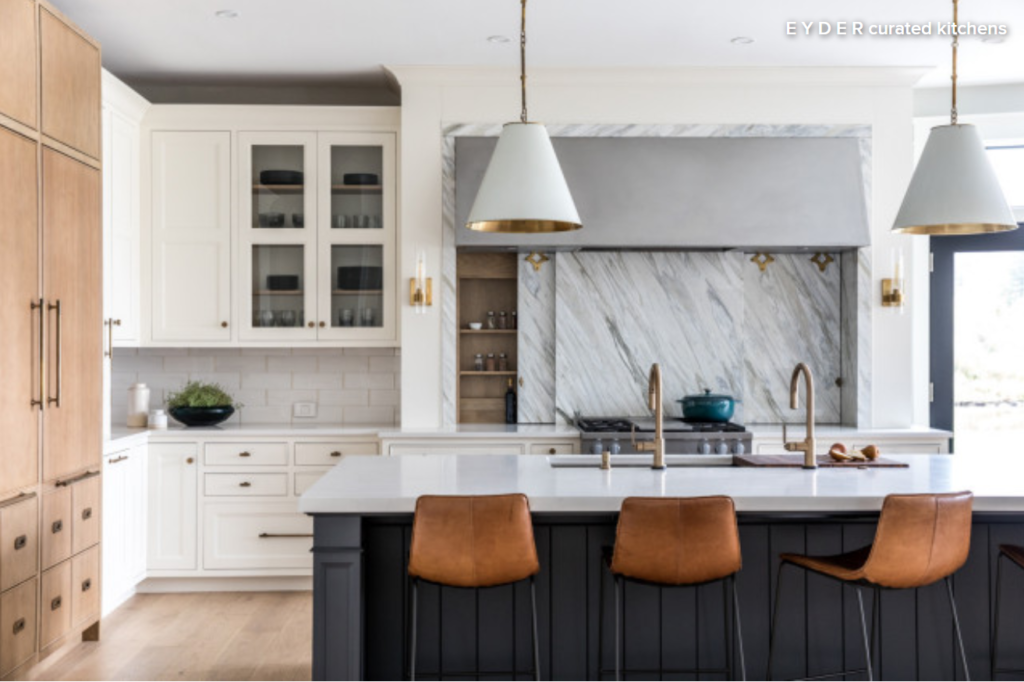
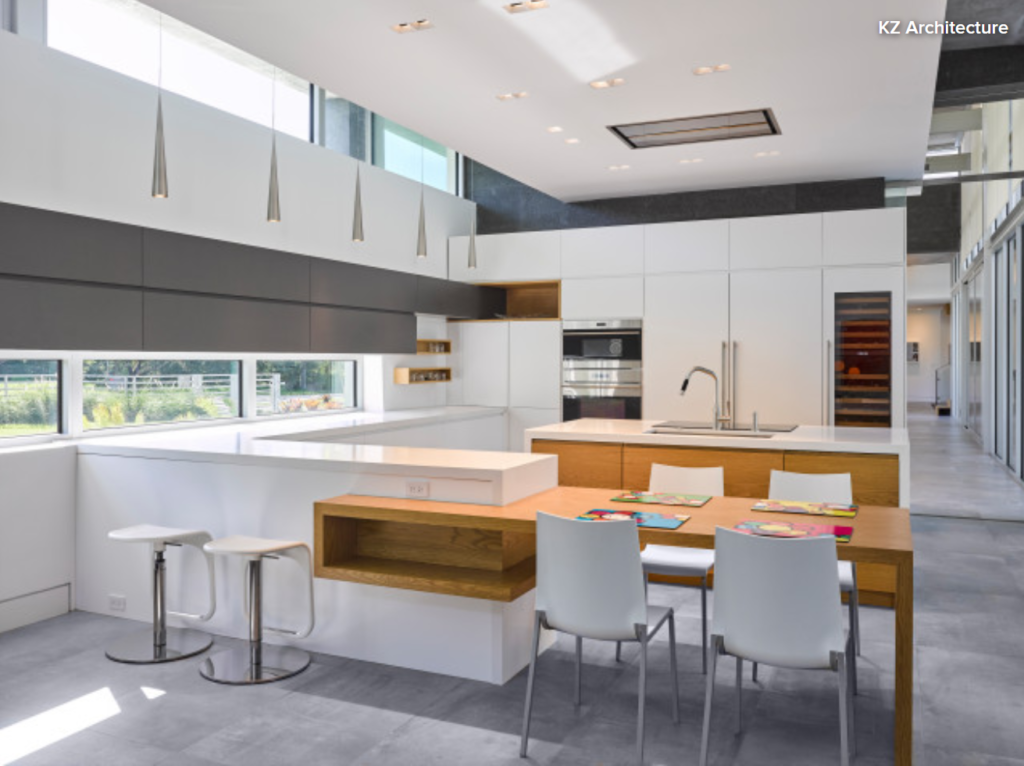
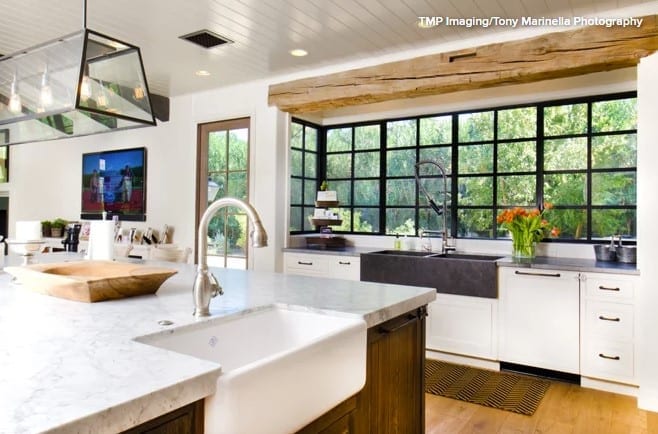
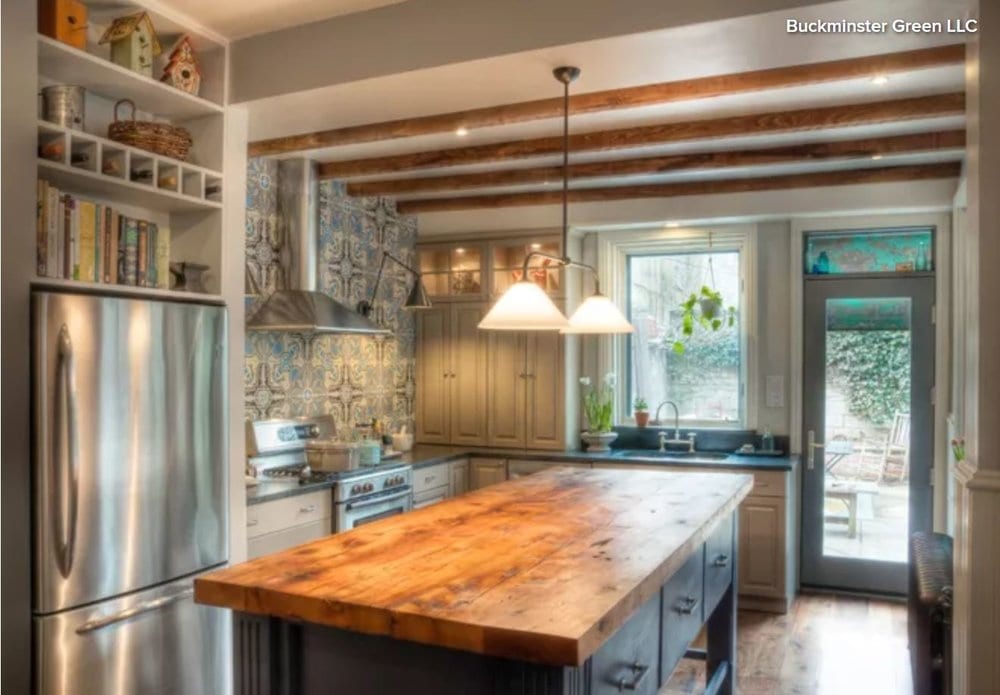
Layer 1: Lights for Doing
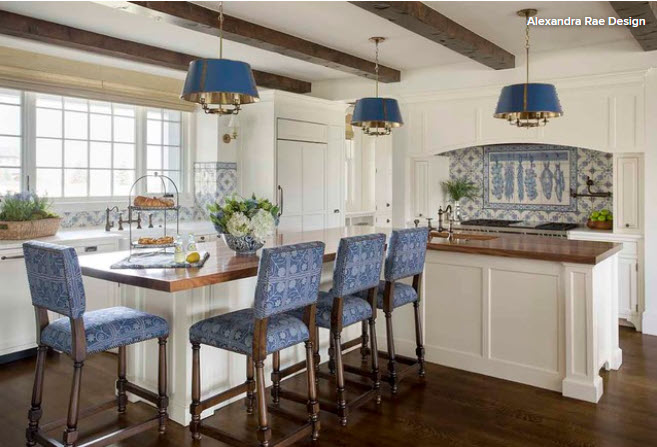
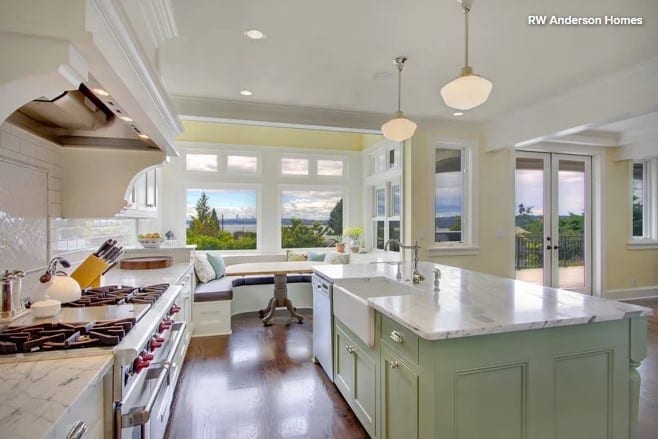
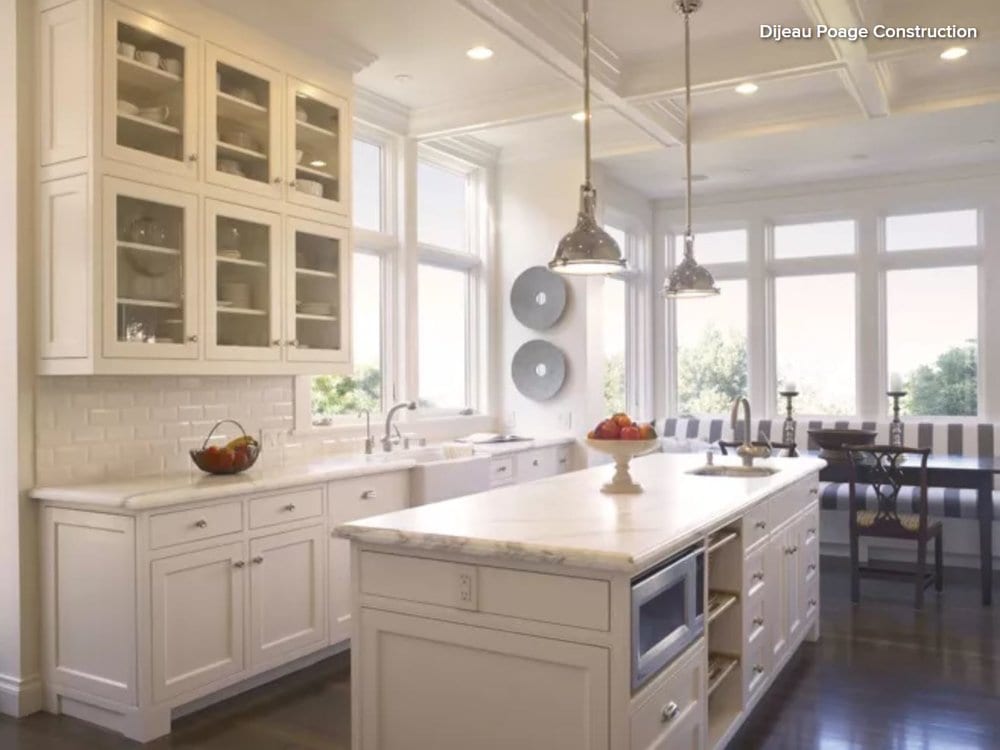
Your kitchen lighting scheme should start with creating a functional workspace. Adding lights where you need them the most, such as above countertops, sinks and cooktops, will let you perform manual tasks in a bright and safe atmosphere. We need light to see what we’re doing, especially when using sharp knives and high-temperature burners. You want to protect your fingers, so getting this layer right is important. In the kitchen above, note the strong lighting over the cooktop and the pendant lighting above the countertop. LED lights mounted underneath cabinets are also a great way to add functional lighting to your kitchen.
Layer 2: Lights for Knowing
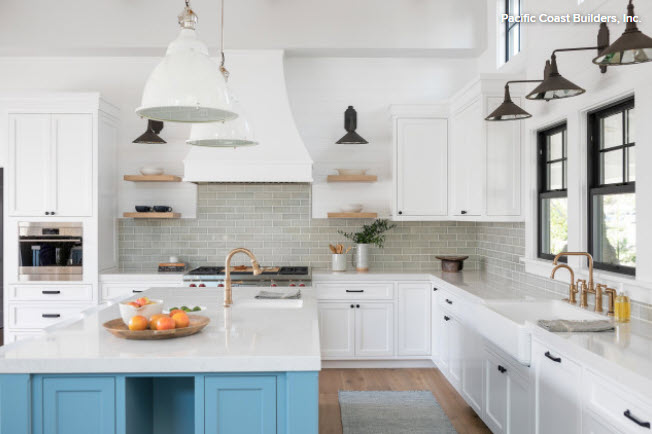
Designers call it “ambient light,” but it is really just a layer of light to help us know where we are and where we are going. Recessed “can” down lights are a great option here because they light up the floor and bounce light off cabinet fronts to create a bright, well-lit space. Adding toe-kick lighting underneath cabinets and islands is also a great way to help prevent stubbing toes at night. Wall sconces are another way to provide the ambient lighting that can help you better navigate your kitchen.
Layer 3: Lights for Feeling
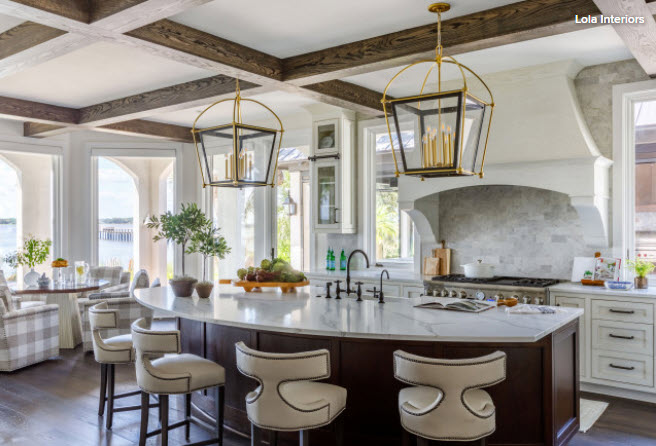
Showcase lights, also known as accent lights, all have one thing in common: They help a space feel more inviting and comfortable. Whether you use illuminated cabinets, chandeliers, sconces or pendants, showcase lights should be visible from wherever you stand or sit in the kitchen. That way you’ll get the benefit of this feel-good lighting at all times. Showcase lights might also help you perform functional tasks in the kitchen, but their main purpose is to draw attention and make a room feel complete.
Layer 4: Lights for Changing
As the sun changes location in the sky, lighting needs inside the kitchen change as well. During the day, natural light from windows might be all the lighting your kitchen requires. But at night, you’ll want your kitchen brighter for cooking meals and more dramatic for entertaining guests. Adding dimmers to your kitchen lighting is key for setting the mood.
Keep in mind that our eyes require more light as we age. So if you expect to stay in your home for awhile, you might want to add more lights than necessary now so you’ll have them later.
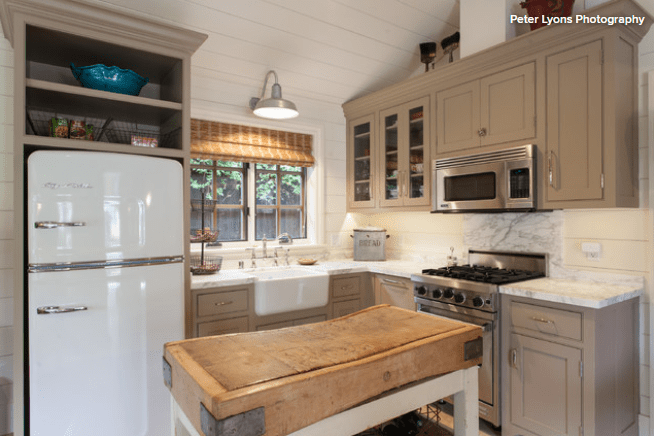
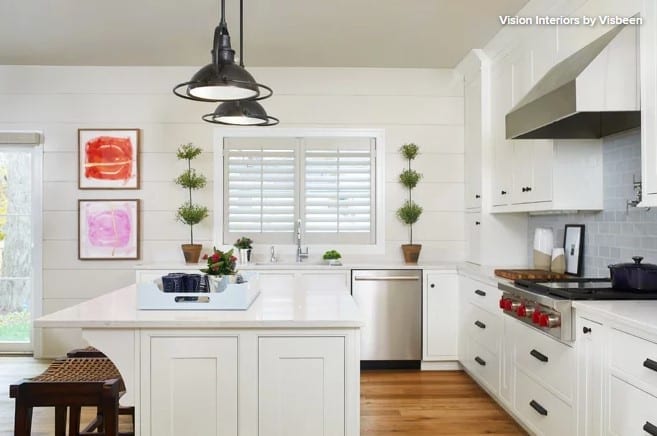
Cherry on Top: Decorative Light Fixtures
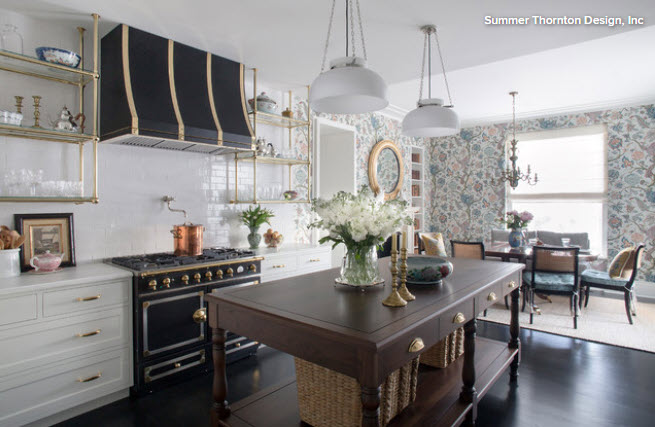
The fun part is choosing decorative fixtures that look at home in your kitchen, like this barn-style sconce in a country cottage. Think carefully about your personal style and kitchen design and then determine whether the light fixtures you choose can add any of the other layers of light needed.

Not keen on decorative fixtures? Choosing to minimize visible fixtures is also a valid style choice ideal for streamlined modern designs. You may want to highlight something else, like the backsplash in this kitchen lit by concealed LED strips.
How to Find Your Kitchen Style
If you’re planning to remodel your kitchen, here’s how to find inspiration and start narrowing down your choices.
When most homeowners embark on a kitchen remodel, they spend endless hours collecting inspiring kitchen photos. But this doesn’t necessarily help people figure out what they want, and it can even cause confusion. The tough part of the process is learning to narrow down the options and home in on what you want your dream kitchen to look like.
Gather Inspiration
Collect images. You may not be able to see it at first, but a pattern will show itself. You may find that a whole bunch of your kitchen inspiration images may need to be added to an ideabook for a future farmhouse or weekend getaway, but don’t skip over them just because they don’t relate to this project, save them for later.
Don’t edit yourself (yet). Don’t make yourself nuts from the get-go by trying to edit as you collect. I really believe in collecting with reckless abandon first and editing later. Editing yourself while you gather inspiration can be challenging and stifling for creativity.

Organize (but only if you want to). It’s OK to be unorganized and even a little messy with your photo categorization. If you’d like to organize your photos in your ideabook, then you’re a step ahead of us, but for those who don’t, don’t sweat it. There’s time to go back to your photos and label them later.
Start looking for a pro. This can be a great time to start noting the professionals who are responsible for the designs you like and looking for a design professional you might like to interview. For some homeowners, the right thing to do is hire a professional out of the gate and have him or her help you through this inspiration-gathering phase. Some homeowners even hand this off completely to a designer, and it’s the designer’s job to listen, interpret, and collect inspiration for the client and bring it back for approval.
Categorize Photos
Once you have a fair number of inspiration images to work with, go back through them and put them into loose categories.
You can categorize by style: Maybe you seem to fall on the fence between vintage and modern. Or maybe you find that you have a bunch of images of kitchens with dark wood floors. You can create a collection dedicated completely to islands or kitchen banquette seating. Consider creating an idea book for lighting, one for wallpaper, and any other details you’d like to single out. For now don’t think about why you like things, just that you do or don’t.
Edit Your Selections
Go back through your ideabooks and see if you still respond emotionally to the images within. If it’s been a while since you started gathering inspiration and you’ve looks at hundreds of spaces, your taste might have changed without you even realizing it. Ruthless editing can help clarify things. You’ll look at a room and say “Why on earth did I save that photo?” If you can’t remember and it doesn’t speak to you any longer, ditch it. See how easy that was?
Collect Images With Intention
Now that you’ve collected at random, categorized and edited, go back through all your saved photos and review images for specific items. Look only for glass-front cabinets, industrial hoods or island lighting, for example, not at the image as a whole. You might not like all features of a room, but one element could be exactly what you want.
When working with a client — often more than once during a project — I pull inspiration images and say, “Don’t look at the wall color or the cabinet style. Just look at the hood.” Or “look at the way the crown molding transitions around the beam and hood” or something very specific like that. Make a note beneath a photo with an element you like and edit your photos again.
How to Choose a Kitchen Sink Size
By Jennifer Ott
In addition to choosing the best material, mounting type, number of bowls, and bowl depth for your kitchen sink, you also have a range of sink size options. An extra-wide kitchen sink will obviously give you more space for food prep and cleanup, and you might prefer it over the confines of a smaller sink, but bigger sinks typically cost more and can take up valuable real estate in a small kitchen.
Feeling overwhelmed? Don’t worry. We’ve pulled together kitchens that feature various sink sizes, along with tips to help you figure out the perfect sink size for your cooking and cleaning needs.
Smooth Solutions to Kitchen Counter Corners
The designers of these kitchens found creative ways to ease the transition from counter to walking zone.
Erin Carlyle April 26, 2020. Writing about the cost of renovation and what it takes to remodel. Former Forbes real estate reporter. Fascinated by cool homes, watching the bottom line.
It’s pretty standard for kitchen cabinets to run in a straight line until they meet the end of a wall or the start of a doorway. But sometimes, that isn’t the smoothest route. These six kitchens employ clever alternatives for ending a run of cabinets. Though the solutions vary, each makes the nearby passageway feel a little more smooth. Could this be a solution for your kitchen?
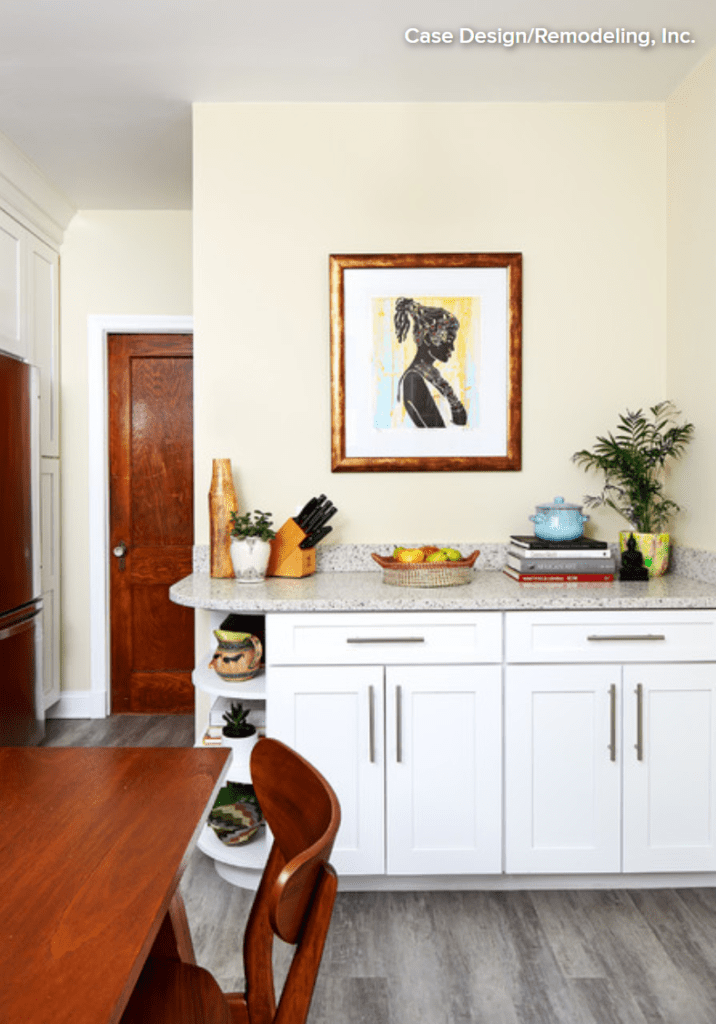
1. Curved Toward Walkway
For this Northwest Washington, D.C., kitchen by Case Architects & Remodelers, the designer gave the countertop a curve to soften the lines and give the space a transitional feel. The curve is also a practical choice because the counter abuts a walkway that heads toward a door. A curve in the pebbled quartz countertop means there’s no sharp corner to hit should you make a misstep.
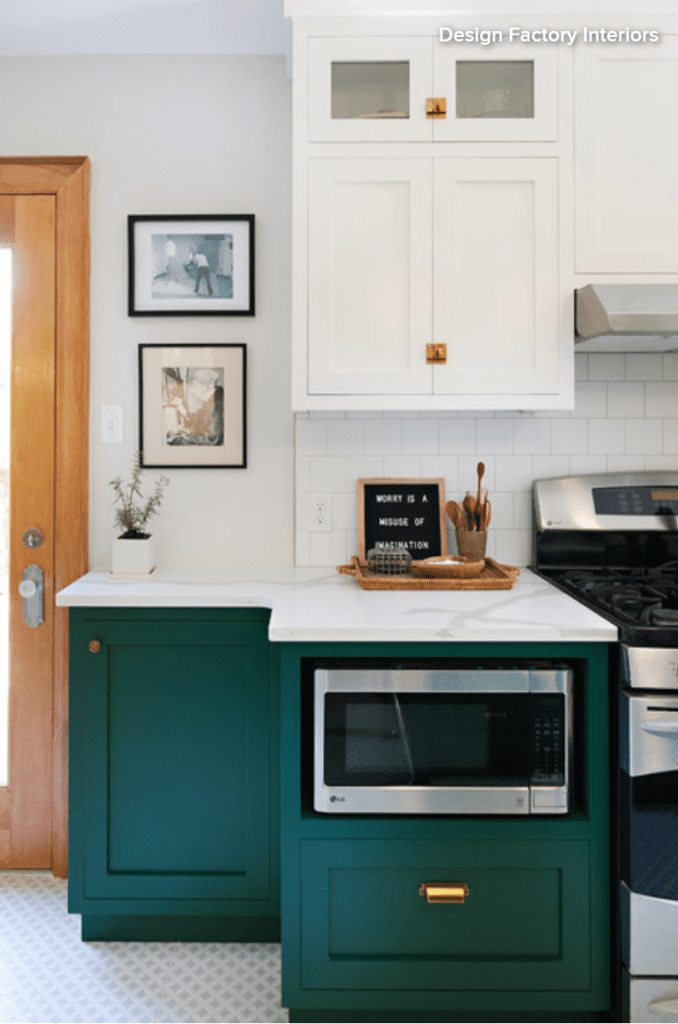
2. Recessed by Door
Another way to pull the counter back from the walkway is to recess it, as Shannon Eckel-Braun of Design Factory Interiors did for this Waterloo, Ontario, kitchen. Instead of a full-depth cabinet abutting the door that leads outside, a 12-inch-deep cabinet creates some breathing room. “I wanted it to be recessed back so you feel like you can smoothly walk around it,” Eckel-Braun says. “I didn’t want the countertops to just end.”
3. Angled by Door
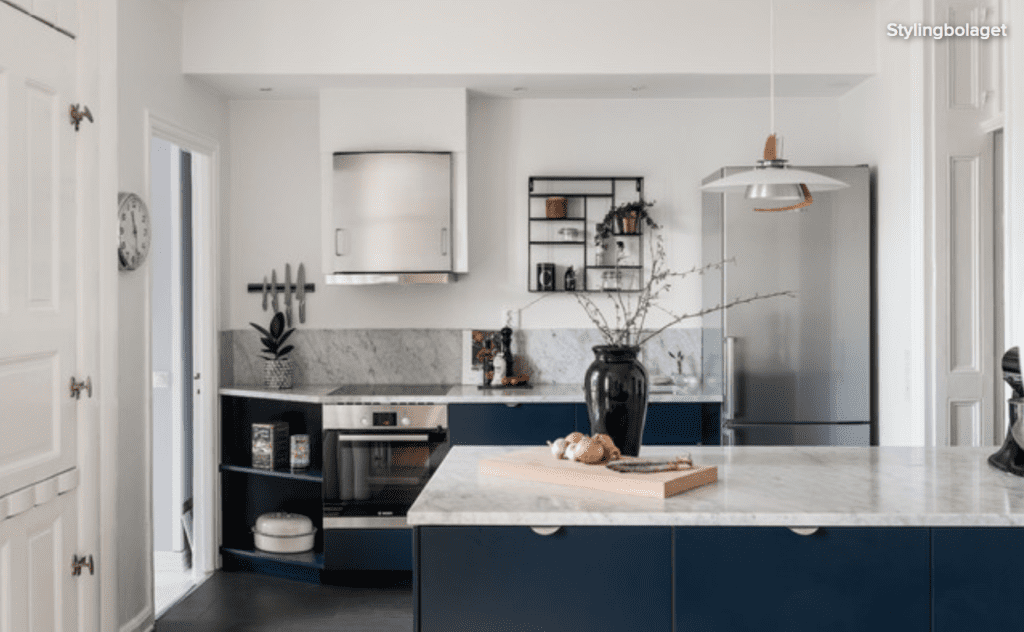
This kitchen in Stockholm, Sweden, by Stylingbolaget has a range that sticks out farther than the doorway wall. One option would have been to stop the run of counter where the range ends.
But the designer found a solution that also adds storage: angling the countertop to the left of the range so it forms a wedge that looks interesting but not awkward. More important, it creates a smooth route in and out of the kitchen. And with the space used for open shelving rather than a traditional closed cabinet, all that space is easily accessed.
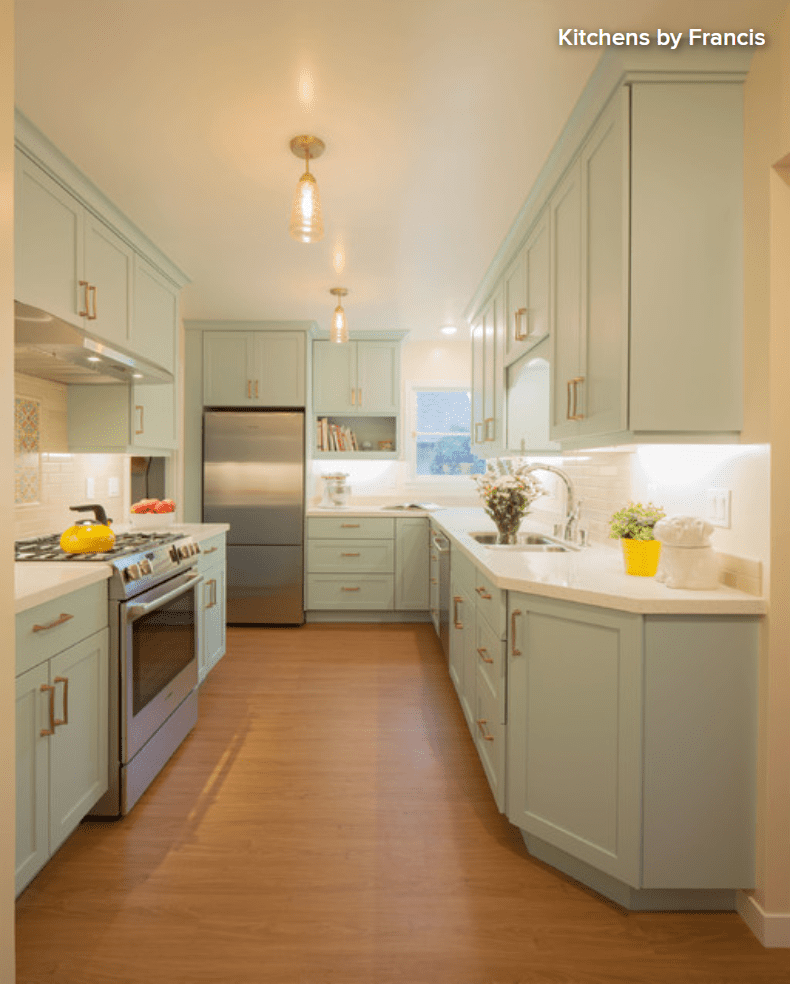
Here’s a more traditional way to angle a counter near a doorway: with a corner cabinet. The shape of this end run of cabinets in Oakland, California, by Kitchens by Francis invites you into the room. It also smooths the way out — you can glide right by via an efficient diagonal route.
4. Rounded on End of Run
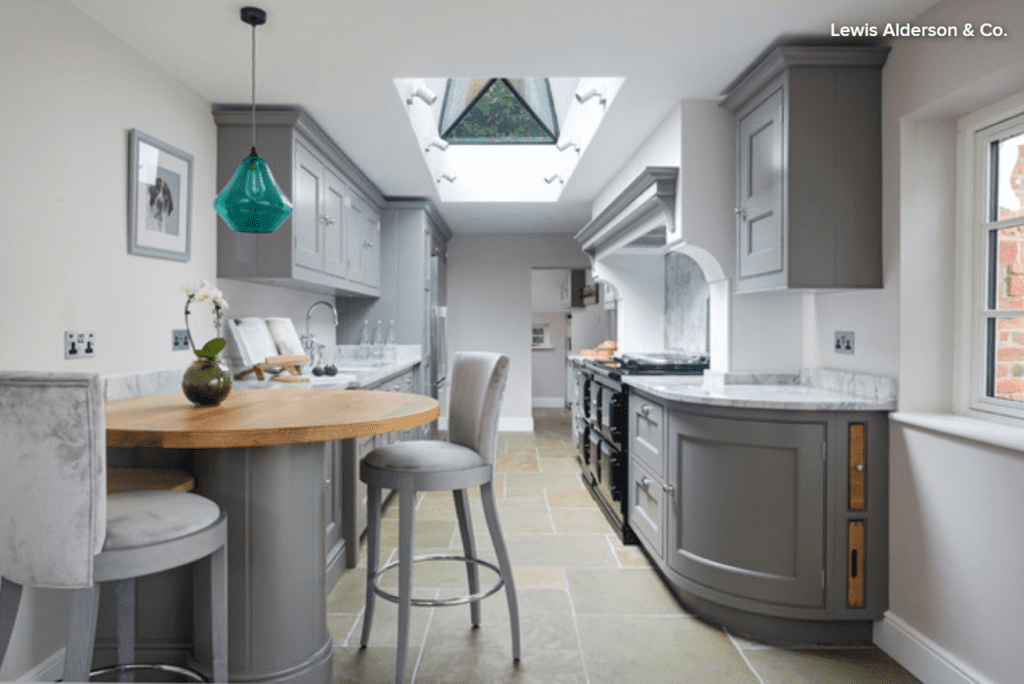
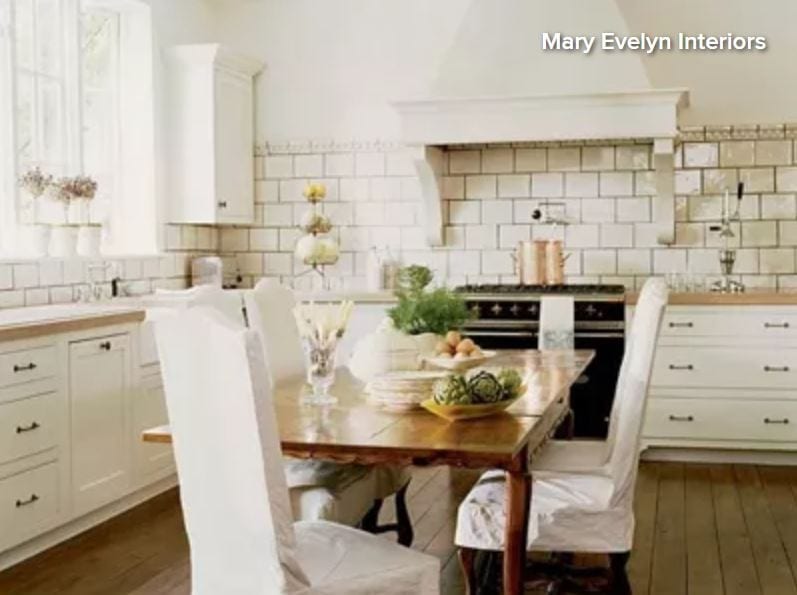
The designer of this kitchen in Hampshire, England, used curves to soften the lines of this long, narrow kitchen. The curve of the tall breakfast table echoes the curve of the cabinet by Lewis Alderson & Co. Both curves distract the eye from the otherwise long, straight shape of the space. The cabinet’s curve also allows space for a walkway around the table.
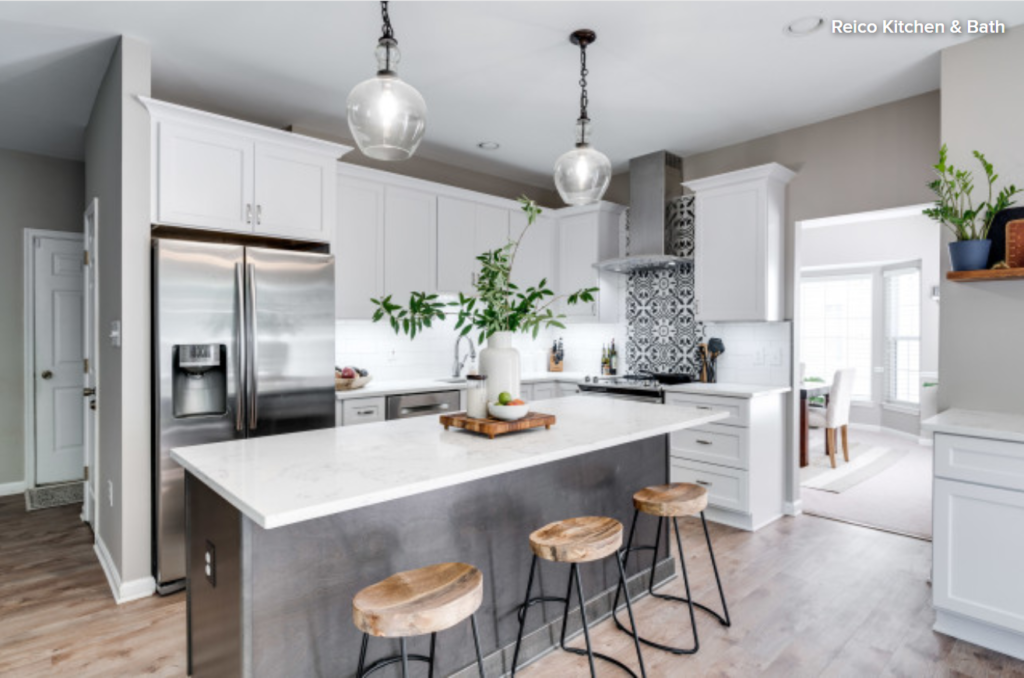
5. Rounded on Island
In this Minneapolis kitchen by Crystal Kitchen + Bath, squared-off cabinets at the perimeter maximize storage, but the curved shape of this island’s end zone offers a practical way to avoid uncomfortable bumps where people tend to hang out. As with the first example in this story, rounding the island adds to the room’s transitional feel, as do the speckled countertops and horizontal bar pulls on the cabinets.

5 Trade-Offs to Consider When Remodeling Your Kitchen
It would be great to have an unlimited budget for a kitchen renovation. But the fact is most of us do not. And that’s OK. Compromises of one form or another are part of the process, even for the rare homeowner who enjoys a bottomless budget and expansive square footage.
But how, exactly, do you decide between two compelling options with different pros and cons? The most critical tool to have on hand to help you make tough choices is a clear picture of your remodel goals. To get clarity on what matters most to you, read about some key trade-offs you and your kitchen designer will consider during your project.
How Will You Use Your Kitchen?
When planning a kitchen remodel, you want to be very clear on how you want to use your new kitchen. Here is one example: I want to have people over more often. I want to feel relaxed when I entertain. In order to feel relaxed, I need to make sure that no one is in my way while I cook. I also want my kitchen to stay neat during the cooking process and be laid out so that cleaning up will be efficient.
Clear goals can help homeowners make decisions and, as the budget nears its limit, ultimately choose the options that will best support their goals. What matters most to you in a kitchen?
1. Daily Use vs. Special Events
This area of consideration has to do with how many people your kitchen will serve. From refrigerator storage to seats at the dining table, the number of people you want to accommodate will affect your design choices. You’ll want to consider not only how many people live in the home now, but — if this is your forever home — how many will live in it 10 years from now. Also, how often do you entertain and for how many people?
I had a client who was retired and cooked only for herself and her husband most days. She entertained just four times a year, on holidays. At first, I was a bit baffled by her choice of a 36-inch range, double ovens and a 48-inch-wide refrigerator. But for her, these choices made sense.
As the matriarch of a large family, on those four holidays she cooked for 25 to 30 people and had at least two or three people helping her in the kitchen. It was important to her that we designed a flexible space that worked just as well when cooking for two as for 30.
That approach is a good one: Whenever possible, I recommend that clients design with their maximum capacity needs in mind.
2. Cost vs. Value
As you may have discovered if you’re considering a remodel (or in the midst of one), everything from cabinets to sinks to appliances comes at a variety of price points. How do you decide when it’s worth it to splurge for a high-quality item and when it’s best to save your dollars? Here are some questions to ask yourself:
-
Will the investment improve your everyday life?
-
Will the product solve a pet peeve?
-
Will the addition of this element make your house feel like a home?
-
Will the purchase increase the value of your home?
In each of these cases, you may decide that the cost of a feature for your new kitchen is worth it because of the value it brings. For example, a better dishwasher might eliminate the need to prerinse dishes.
Perhaps you hate scrubbing dishes, can afford an upgrade and would cherish any minute of spare time away from the sink. Or perhaps you feel quite the opposite: You don’t mind scrubbing dishes at all, and this investment wouldn’t be worth the pennies spent.
Framing your choices as cost vs. value — in terms of your experience in your kitchen, and possibly the resale value of your home — can help you get clarity on what’s worth the extra money.
One helpful way to prioritize your desires is to analyze the frequency and duration of a given task. Tasks you do frequently or spend more time on should get more weight as you consider what is worth investing in.
For example, most people use the burners to cook 80 percent of the time, the oven 20 percent of the time. If this applies to you, I recommend prioritizing the cooktop as opposed to the wall oven, both in terms of placement in your kitchen and quality of product. You wouldn’t want to give up a great burner feature to get a fancier oven.
On the other hand, if you are a frequent baker but rarely use the stovetop, you may prefer to invest in wall ovens rather than spend your budget on a fancy range. For you, it would be better to make sure that reaching into the oven is more ergonomic — done while standing upright, rather than bending over.
3. Function vs. Aesthetics
Ideally a kitchen redesign brings both beauty and function, but when we are dealing with limited funds, trade-offs between functionality and aesthetics may be necessary. By function, I mean not only the kinds of bells and whistles you get with high-end appliances, but also the kitchen’s layout and the choice of whether to have one sink or two.
Aesthetics, of course, are the expensive but gorgeous finishes and customized detailing that bring a high-end look to a kitchen. Quite often, a budget may force you to make choices on what matters most to you — the functionality or the look.
This area of trade-off is deeply personal and has a lot to do with your lifestyle. When weighing aesthetics vs. function, you’ll want to consider everything I mentioned before: how many people you cook for daily, how often you entertain, the kind of entertaining you do (backyard barbecues vs. sit-down dinners), the style of cooking you prefer and how many people work in the kitchen at one time.
For example, a client who doesn’t do a lot of cooking and is more concerned with the kitchen’s look than its function might really want a beautiful built-in fridge with custom panels but be willing to use a less expensive range or counter material to have that pricey, beautiful fridge.
On the other hand, I have had several clients (including the owners of the kitchen in this photo) who chose a free-standing fridge and put their budget into the plumbing and construction work required to add a second sink. To me, this is a significant functional improvement and, for those who enjoy cooking and entertaining, worth scaling back on some of the aesthetic details.
There are many ways you can cut back on aesthetics to create room in your budget for what’s important to you functionally. You might consider a simpler, less expensive door style on the cabinets, or a ceramic backsplash tile instead of glass, or quartz counters instead of granite.
I even had one client use a very inexpensive laminate counter so that she could put more money into the remodel work necessary to get the layout just right. Since she was in her forever home, she replaced the laminate with a beautiful stone two years later when finances allowed.
4. Speed vs. Patience
Any home improvement project takes time — that’s just part of the process. And once the kitchen is demolished and construction is underway, any delay can be difficult, particularly if you are living in the home and dealing with the mess. When you are in that situation, the risk is that you will be tempted to say yes to anything just to get the project done and your home back to normal.
This happened with one of my clients, who decided to use a second-choice backsplash because it was in stock, whereas her first choice had a month lead time. On the other hand, a different client had trouble finding a backsplash tile she liked, so she finished her kitchen and skipped the backsplash altogether. Three months later, she found the perfect tile and brought the tile installer back. I am sure you can guess which homeowner was more happy with her kitchen remodel.
When making a large financial investment that you are going to live with a long time, I recommend that you go slowly, taking the time to find the right people to help and weighing your decisions carefully.
That being said, speed can be a necessary evil. Perhaps you are remodeling for a special event, such as a backyard wedding. Or maybe you are planning to sell the house and just want a quick face-lift to get the most out of your investment.
As a guide when weighing the need for speed vs. the need to exercise your patience muscles, I recommend you consider how long you plan to live in your home. If you’re going to sell within five years, keep in mind that everything doesn’t have to be perfect — you simply want to be sure you will get your investment back when you sell. However, if you plan to live in the home for 10 years or more, it’s worth slowing down and investing in your quality of life. Take the time to find the right solution, not the quick one.
5. The Ideal Me vs. the Real Me
This one isn’t so much a trade-off as a reality check. It’s worth mentioning that some clients have fantasies that a remodel can change their habits — or even their personalities. But my observation has been that if you are already a messy cook, the chances of a new kitchen transforming you into a clean-as-you-go type are pretty slim.
Rather than plan a kitchen for the person you wish you were, focus on solutions that take your true habits into account. For example, a messy cook who is embarrassed when guests are around might want to add a separate cleanup sink where he can hide dirty dishes while making a meal.
Or, if clutter is a constant problem, a homeowner might want to create a hidden drop zone for papers, cellphones, pens and other detritus that kitchen counters tend to attract.
7 Reasons to Choose Dark Kitchen Cabinets
Article by Amanda Pollard
Dark and dramatic or light and bright? When it comes to choosing kitchen cabinets, it can be hard to decide. Here we look at the benefits of crossing over to the dark side.
1. Add Ambiance
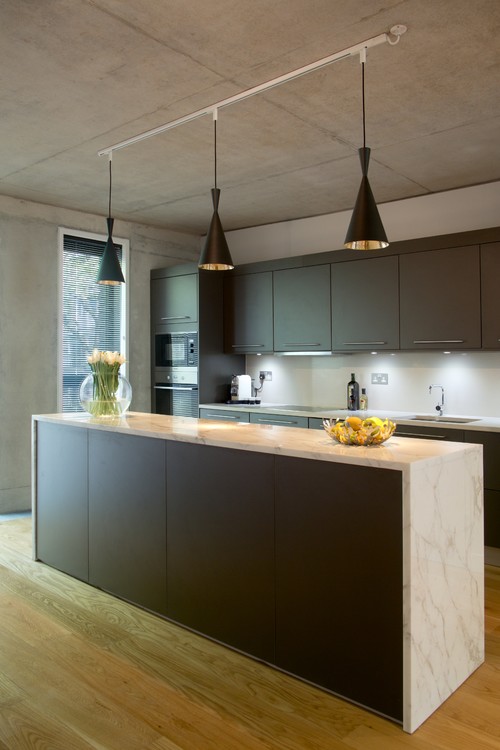
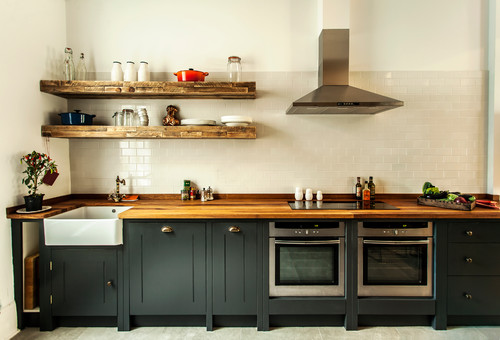
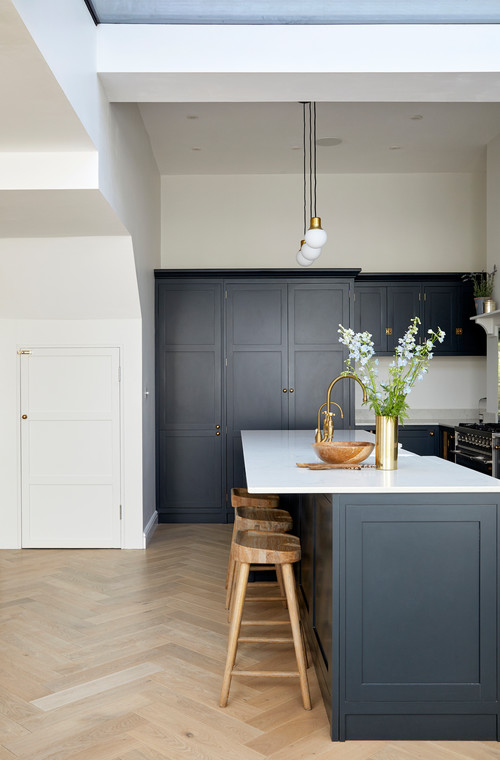
If you’re looking to design a kitchen that’s both contemporary and cozy, dark cabinets could be the way to go. Inky surfaces, like the ones in this elegant kitchen, help enclose the space slightly to create an intimate feel.
Position your lighting strategically, so it casts an atmospheric glow over the dark finishes.
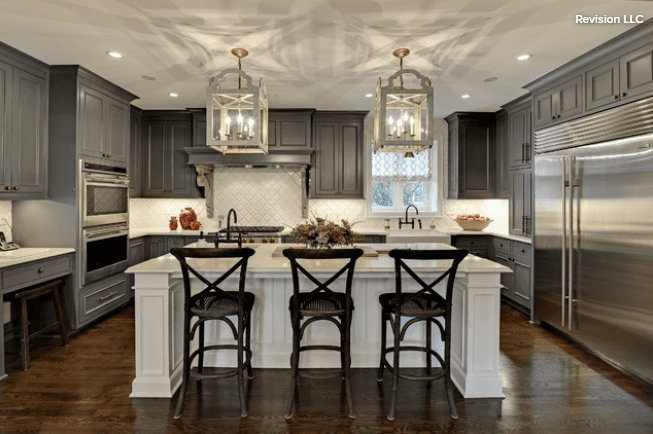
2. Bump Up the Style
For a dose of sophistication, you can’t beat dark cabinetry. Moody colors give a grown-up feel that can make a space feel seriously chic.
In this kitchen, the classic white wall tiles and the pale gray flooring highlight the dark gray cabinets and the black architectural features beautifully. Brass handles, meanwhile, bring out the richness of the charcoal hue.
3. Hide the Knocks
All kitchens get their fair share of wear and tear, but some show it less than others. A kitchen with dark cabinets, such as this one by Compass & Rose, is a good choice if you think your cabinets are going to need to stand up to frequent spillages and dings.
A dark surface can be more forgiving than a light one and won’t instantly show scuffs and stains. If you’re painting your cabinets, make sure you apply a few coats, so the dark undercoats hide any scratches in the topcoat.
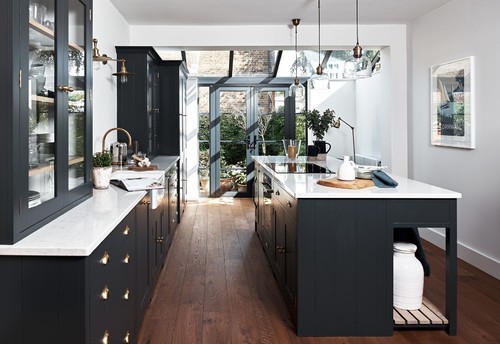
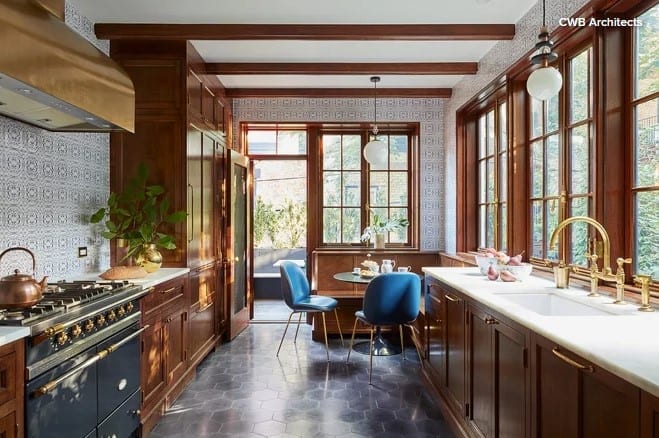
4. Contrast With White
If you’re going for a white countertop, contrasting it with a dark shade will have the most striking effect. The gleaming marbled surface here looks stunning against the deep-hued cabinets. The House of Beulah designers embraced the contrast, mixing white walls with dark gray features. To warm up the room, they added a wooden floor and some soft foliage.
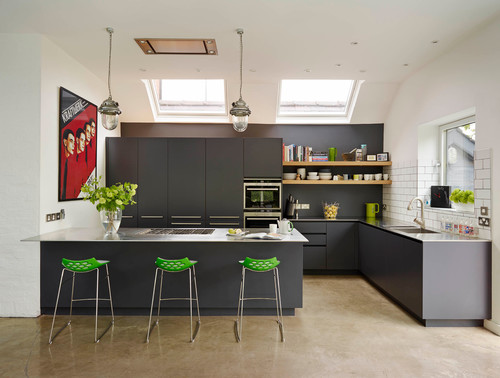
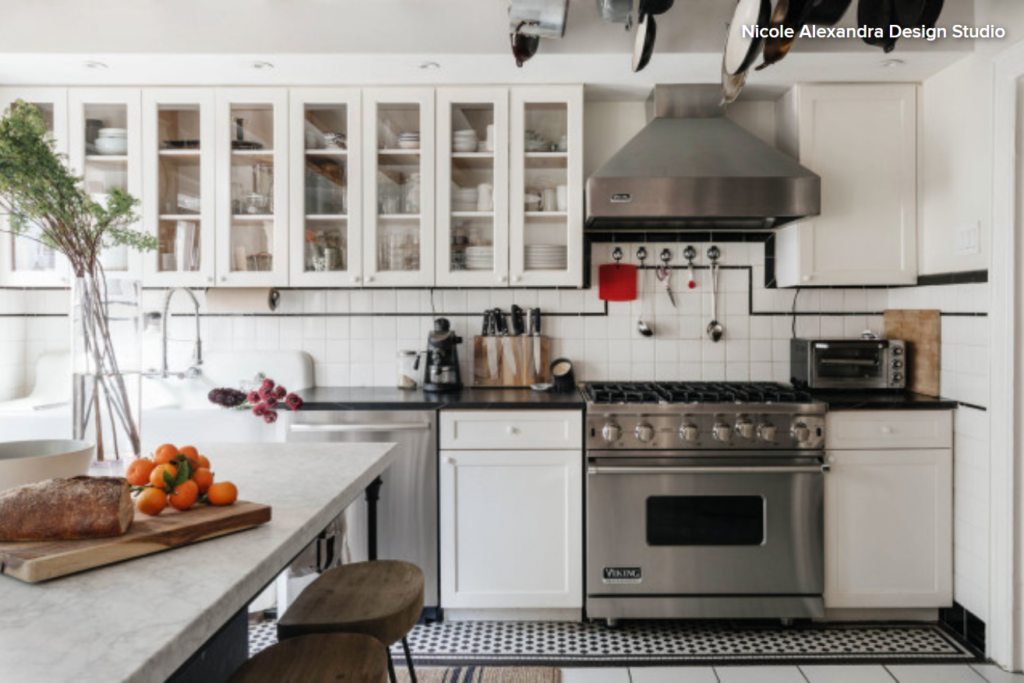
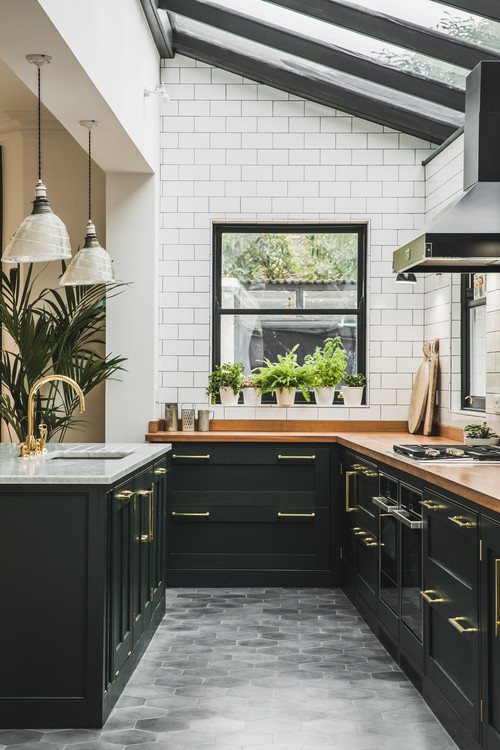
5. Highlight Bold Colors
Just as dark cabinets set off a white countertop, they also can form a dramatic backdrop for other vivid colors. Take a look at this kitchen designed by Roundhouse, for example. The dark gray cabinets are neat and practical, but it’s the accents of green and red that really make the space. The cabinetry works as a moody canvas to showcase those bright bursts of color.
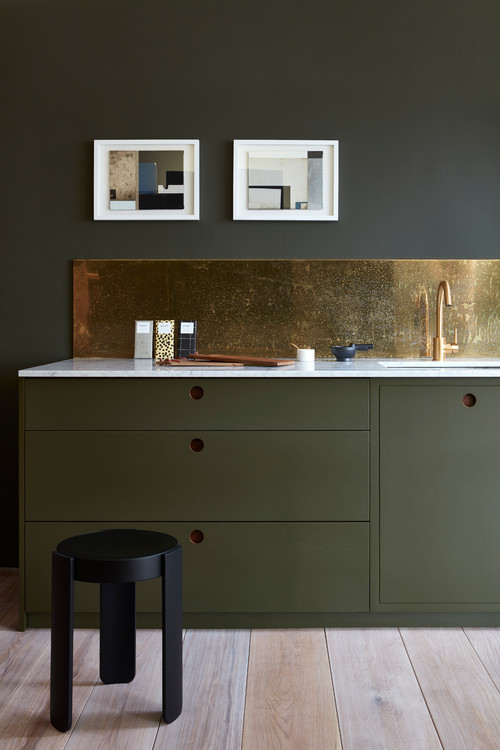
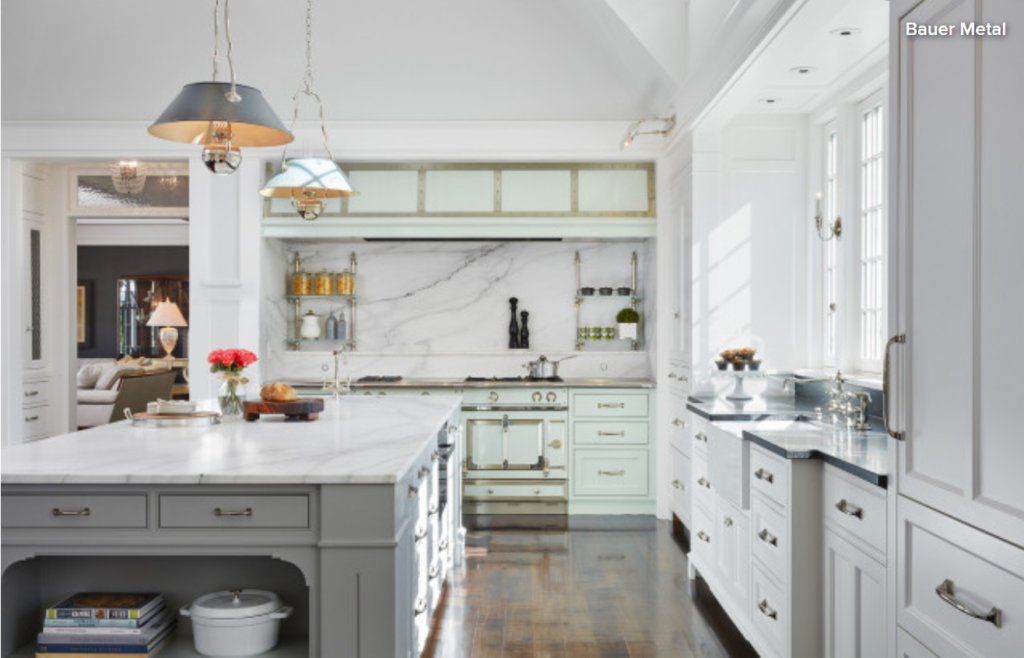
6. Embrace Luxury
Dark colors look beautiful with metallic finishes, such as brass and copper, as this space by Naked Kitchens illustrates. The green cabinets complement, rather than clash with, the brass faucet and backsplash.
The two surfaces are wonderfully balanced, giving this room a feeling of understated luxury.
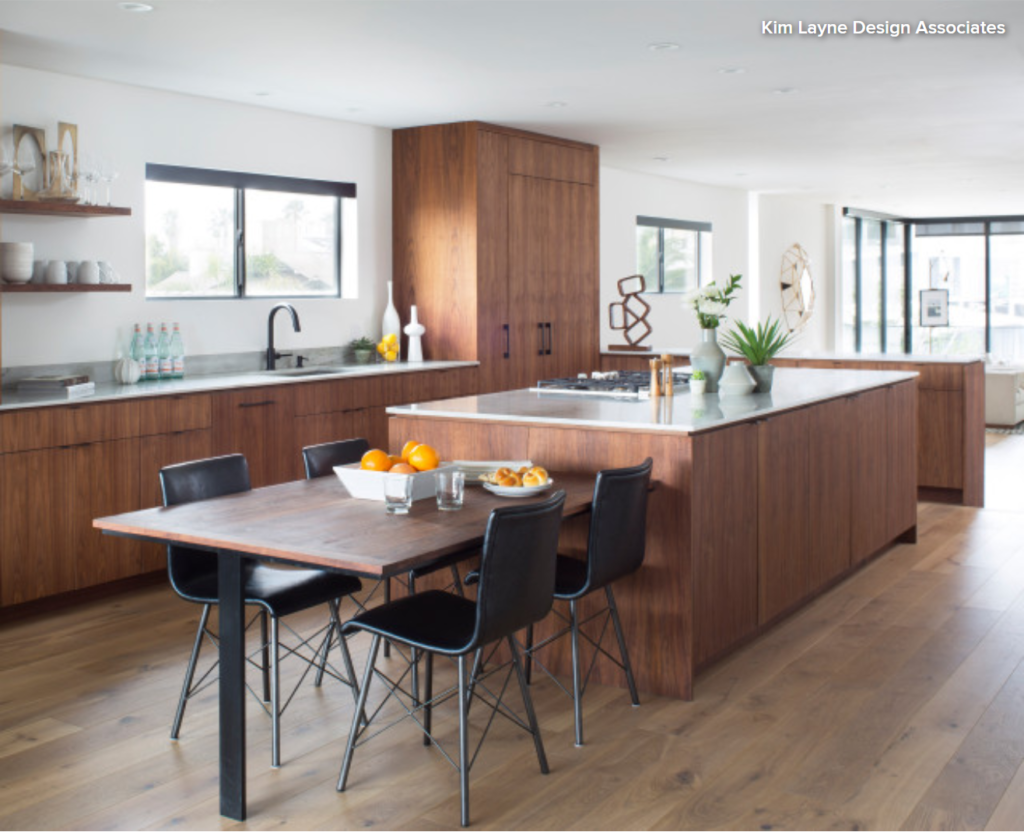
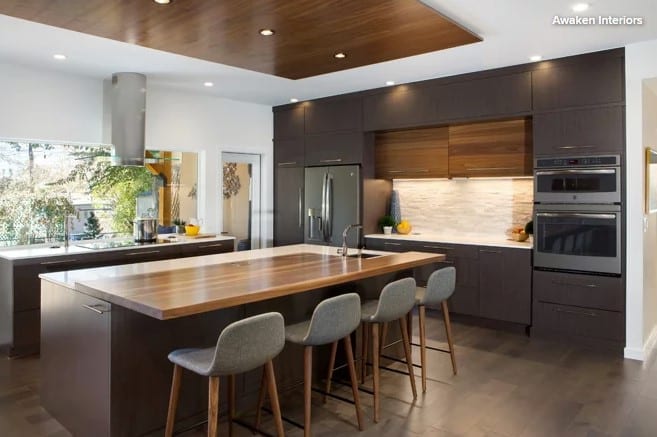
7. Zone the Space
In an open plan, it’s a good idea to use color to zone different areas. By using a dark shade on your cabinets, you can make your kitchen appear grounded in its spot.
The dark cabinets in this kitchen by Hannah Gooch contrast with the white walls around them, helpfully marking out the kitchen from the rest of the room.
Tell us: Have you dared to go dark with your kitchen, or do you prefer a lighter color scheme?
How to Remodel Your Kitchen
You’ve decided to remodel your kitchen. Now what? Not knowing where to start, many homeowners fall into two camps. Some start by looking at appliances. Others start by collecting inspiring kitchen photos. Some decide they need more room. Others simply want to upgrade their current kitchen. Homeowners may find themselves in this exploration stage for a year or longer before they start interviewing kitchen designers or general contractors.
Once you’ve pondered long enough and you’re ready to green-light a kitchen remodeling project, then what? We’ll start with the first 9 steps and we’ll get into the nitty-gritty details under specific steps as we move through the complete kitchen remodel workbook.
Step 1: Think about what you need in your kitchen remodel
This step is all about how you use your kitchen, and finding the layout and features that fit your household’s lifestyle.
Think about your priorities: how many people will be cooking and gathering here, and how they’ll need to move around in it. Do you need an addition? Or can you work with your existing kitchen footprint?
If you haven’t already, start saving photos of kitchens with features that suit your style. Your collection can be organized and beautiful like a scrapbook or it can be filled with random, unorganized images. I actually prefer the latter, because I like to randomly stuff images into my folders and ideabooks and go back to them later on for edits.
Step 2: Research and plan
Ready to green-light that project and take the plunge? The best place to start is by formulating what’s commonly referred to as a scope of work and figuring out your preliminary budget.
Both of these may be subject to change, so don’t feel like you have only once chance at this. Budget and scope are intertwined and often change many times during the kitchen design process as you become more educated and able to reconcile what you want and what you can afford. As a homeowner, you’re not expected to walk into this knowing what everything should cost. Remember, this is an educational process.
Step 3: Find the professionals you will need
Even if you’re going the DIY route, unless you’re building your own kitchen cabinets and doing your own electrical and plumbing, you’re going to have to work with a professional at some point. It may be as brief as leaning on your salesperson to help you in selecting and ordering your appliances or cabinets, but it’s something to plan on either way.
Some people start by visiting big-box stores or cabinet showrooms where they can see everything. Many homeowners get referrals from friends or colleagues and start by hiring an architect or designer. Still others might work on their own with a builder or contractor. Pros are available to help you with everything from contracts and permits to space planning, budgets, choosing finishes and fixtures, shopping, ordering products, helping you set up a temporary kitchen, and managing your project from start to finish.
Step 4: Schematic design
This phase includes sketches, space planning, preliminary floor plans and elevations showing the layout and cabinet sizes. I try to keep my clients focused more on layout and space planning, even though the temptation is to talk about what the kitchen will look like. But I find that getting caught up in the look too early can distract from the space planning phase.
Plus, you need a plan in order to figure out what materials will go where, and how many square feet you will need, and ultimately how much this will cost. I like to begin the contractor interview process early and give them a preliminary drawing packet and scope of work so we can get some ballpark construction numbers. At the same time you can be sending out drawings for estimates on some top choices of kitchen finishes and fixtures.
Step 5: Fixture and finish specification
Throughout this process, and probably long before, you have been saving photos of kitchens you love into your ideabooks and folders. You’ve found your kitchen style, whether it’s modern, classic, traditional, cottage or a personal style in between. You probably know if you want a white kitchen, a natural wood kitchen, or some color.
Now you need to make your final selection of finishes and fixtures. This usually includes:
-
Cabinetry construction type, doorstyle, finish and color
-
Countertop material
-
Refrigerators and other appliances
-
Kitchen sink and faucet
-
Light fixtures
-
Flooring
-
Backsplash
-
Decorative hardware
Step 6: Work on design development and construction documents
This is the stage when you finalize the design and prepare final floor plans, elevations, details and, if applicable, mechanical and electrical drawings, lighting switch plans, and exterior elevations.
This is where your final permit set or Construction Drawings (CDs) come into play. It’s important to have finishes and fixtures selected at this time, since this is what will be considered in the final pricing from the contractor.
You’ll submit drawings for permits. These have a lead time, so check the timing with your local village. You’ll need an architect, designer or licensed contractor signed up to finalize the paperwork and pick up your permits, so get ready to hire someone in the next step. I often find that we’re submitting for permits around the same time or a little bit after we’ve placed the cabinet order, due to similar lead times.
Step 7: Get contractor estimates
If you don’t already have a licensed contractor on your project, your next step is to find one to carry the project through. I always recommend to my clients to get at least three different contractor estimates. I like to do preliminary walk-throughs with the contractors once the schematic designs are done so we can get some ballpark estimates and find out if we’re on the right track or need to pull back some to fit the budget.
Step 8: Get ready for demo
The big day is upon us, most likely something like 4-8 weeks from when you submitted for permits. Time to get that schedule firmed up and plan on cleaning out the cabinets, putting what you don’t need in storage and — if you’re living in the house during construction — setting up a temporary kitchen so you don’t lose your mind!
You may be moving out of your house temporarily, but most homeowners white-knuckle it and try to live in the house through construction. Preparation and organization can save your sanity.
Discuss the logistics ahead of time with your contractor. Will you meet once a week for updates? Will you have to be out of the house for certain tasks like demo or flooring? What about debris removal and dust? Are there any family allergy issues? What is a typical work day for the crew? Getting all this on the table beforehand can set expectations and make for a smoother ride.
Step 9: Surviving the dreaded punch list
Once construction is over, well … almost over … there’s always this annoying little list of items that are missing, wrong, or simply forgotten about. A missing light switch plate, a caulk line that shrank and pulled away from the wall, paint touch ups — small things like this, and sometimes bigger things like the hood doesn’t work, or there’s a big scratch in the newly refinished floor.
Sometimes the homeowner does the punch list. It can be as informal as an emailed list of items that need to be fixed or finished. I like to use a little form I put together that identifies the item to be fixed or finished, the responsible party and the date of completion. I send it to the client for review, changes and additions, and then off to the contractor.
It’s inevitable that the contractor may have to make multiple visits back to the house to finish these items; prepare yourself for more than one visit and you’ll be fine. The best way to approach this is with a Zen attitude. Things happen, little things get missed. It’s sort of like making a list for the grocery store and still forgetting some key ingredient. We all do it.