FREE DESIGNS AND ESTIMATES

Raw Materials Revealed: Drywall Basics

Learn about the different sizes and types of this construction material for walls, plus which kinds work best for which rooms.


Pine_Grove_Homes_Ready_For_Drywall.jpg

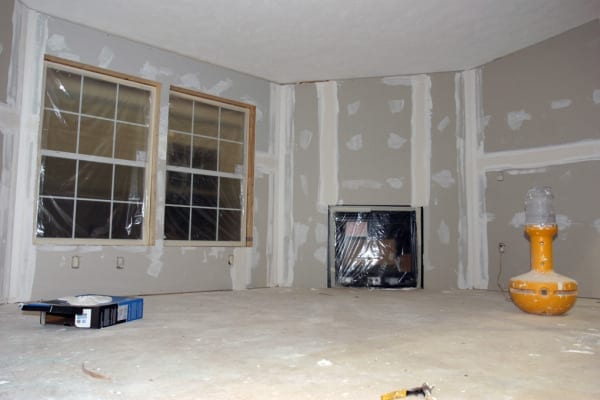
Photo: Pine Grove Homes Ready for Drywall via Wiki Commons

Drywall vs. Plaster

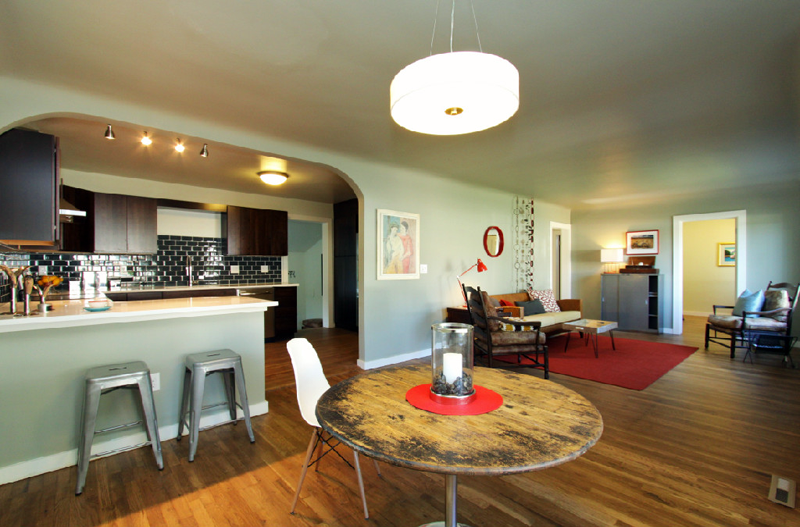
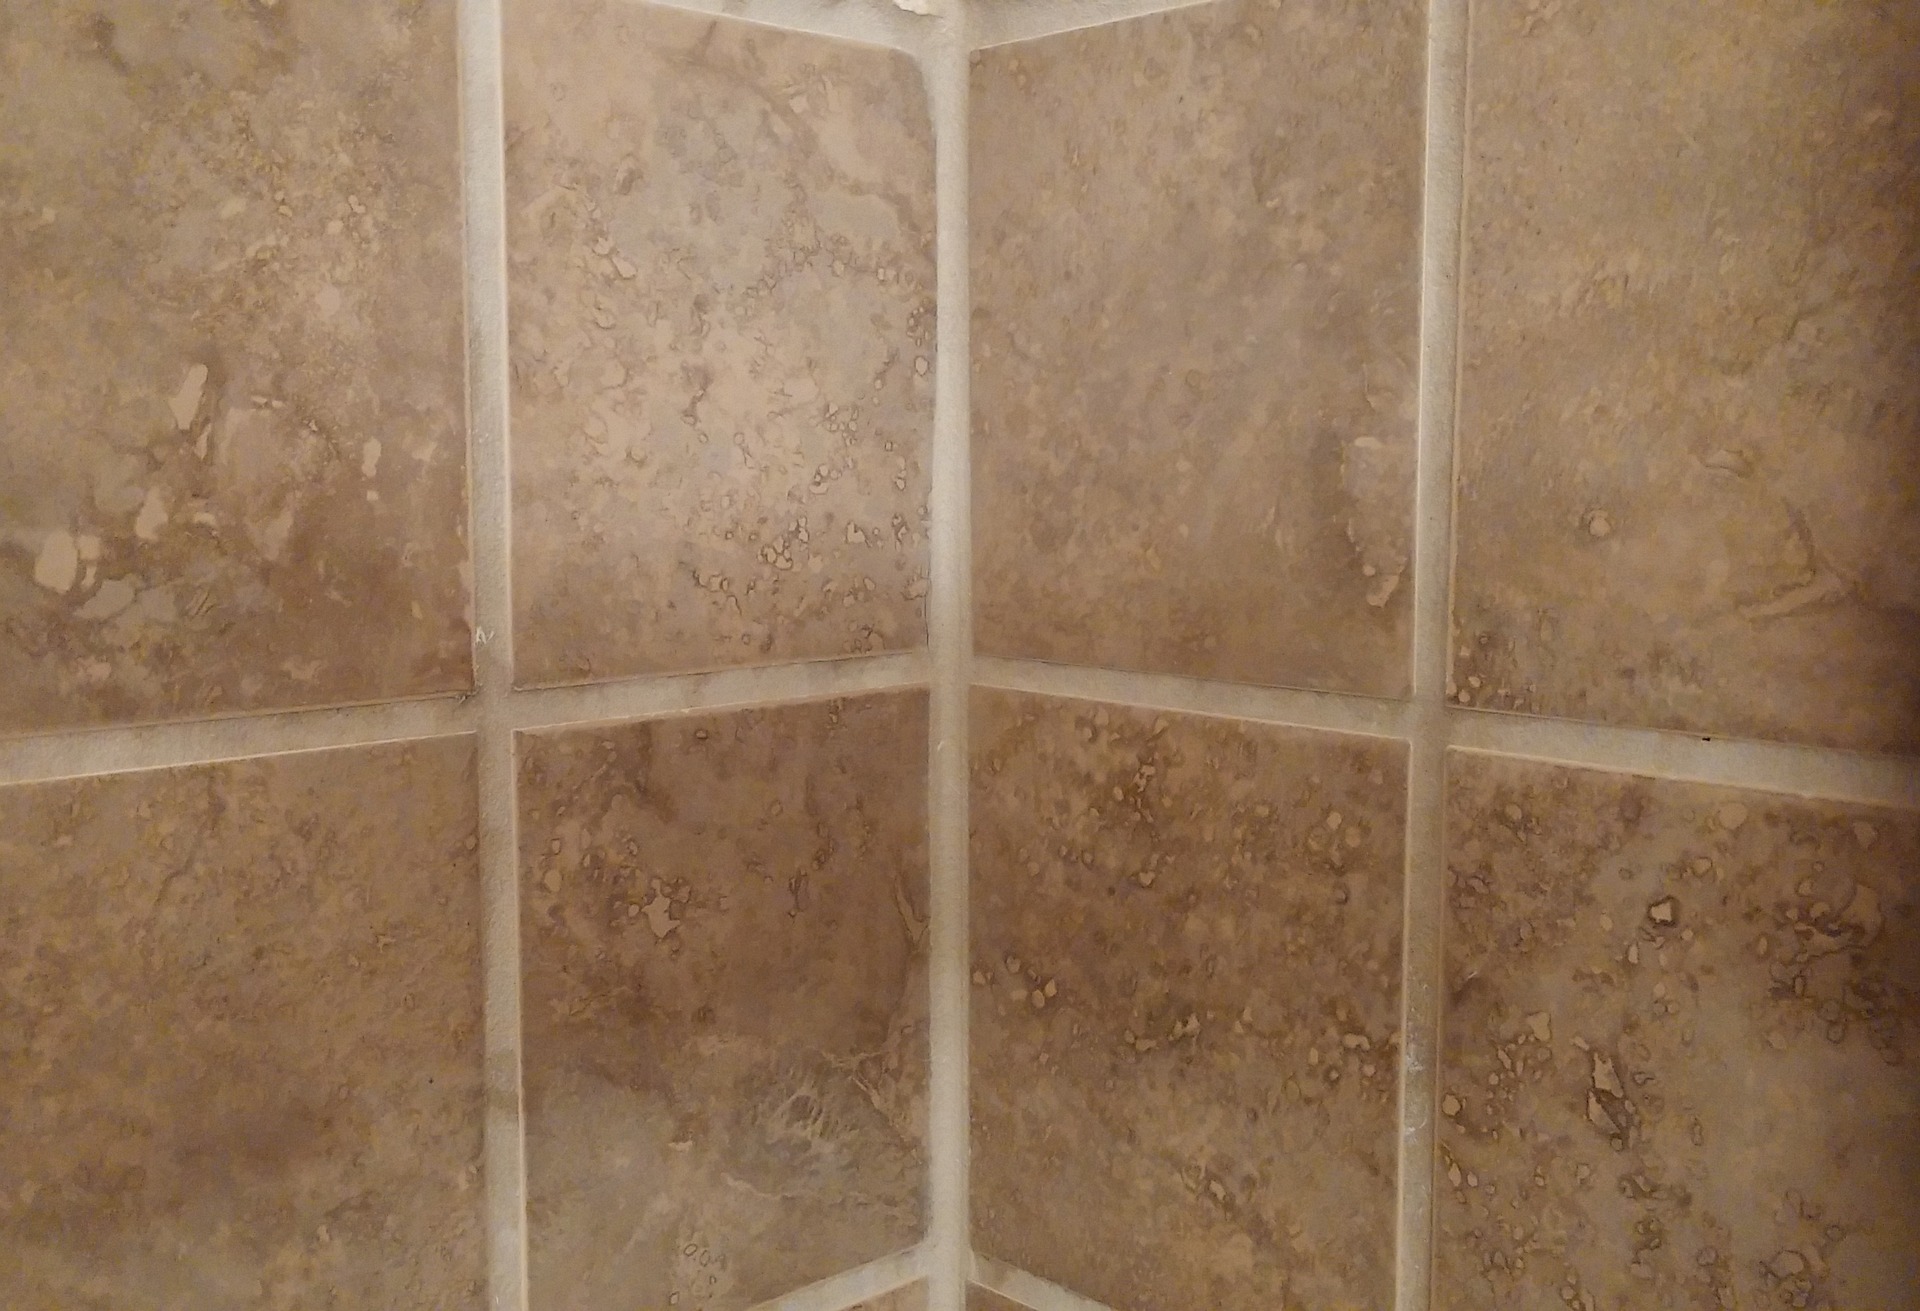
Drywall is a master of disguise. The walls in this picture look like they could be plaster. One of the visual giveaways that you’re actually looking at dry wall is when you see the sharp corners created by standard corner bead.

Corner bead is a metal or plastic piece that covers the outside corners of drywall to protect them from damage. Then joint compound is spread over the bead and sanded smooth.

In many traditional plaster applications, a rounded piece of wood trim was placed at the corners and then plastered over, creating a round corner. To mimic this look with drywall, look for a bullnose corner bead.

Unlike with traditional plaster applications, for which the entire surface was troweled on by hand, only the seams and fasteners are covered with joint compound when you’re finishing drywall.

The finishing happens in several steps. First paper tape is embedded in joint compound, or “mud”. Then two more coats of mud go on before sanding.

If you are looking for a plaster-like finish, you should install blue bead – a drywall product made for this purpose – then skim coat the entire surface instead of just the seams. This is much faster than with traditional plaster. 

Drywall Sizes

Most drywall of Sheetrock you see is either ½ inch or ⅝ inch thick. What size to use depends on a variety of factors, including durability, location and fire safety.

The width of drywall sheets is either 48 or 54 inches. The reason for the two width sizes is that when installed horizontally, two sheets will equal either 8 or 9 feet – common ceiling heights in residential construction.

The sheet lengths vary from 8 to 16 feet. For the do-it-yourselfer, a 4- by 8-foot sheet will be difficult enough to maneuver. And don’t forget that you’ll need to cut holes for every outlet and light fixture box and get those all to line up, too. 

Professionals generally use the longer sheets, like the one shown in this picture, because it reduces the time spent on taping joints. 

The advantage of ⅝-inch-thick drywall is that it does not bend or sag as much as ½-inch drywall, which can show imperfections in the framing.

But what if you want the drywall to bend? Use ¼-inch or ⅜-inch drywall. You may also need to make slits in the material to allow it to take the curve.

Quiet Rock Soundproof Drywall & Other Drywall Types

Other than regular gray drywall, you’ll also see green and purple. Both of these are good for areas that will see a lot of moisture, like a bathroom. The purple is a step up in moisture protection from the green. Even with this added security, I don’t recommend installing these in a shower or tube surround – you’ll want to tile on cement board for bathroom walls outside the shower. And install a good bath fan with a timer switch so that you’re not testing the capability of the drywall.

Other types of drywall you’ll see are type X for added fire protection and QuietRock, which is two pieces of gypsum laminated together with a special glue that allows the assembly to absorb sound and make your living space quieter. The drywall is installed with the same special glue at the seams, and a putty-like material is placed around outlet boxes. If installed properly, it is quite effective – but that doesn’t come cheap.

If you’re looking for a lighter sheet of rock, try USG’s new lightweight drywall. Better yet, DIYers should rent a drywall left for ceilings. It’s worth the added expense. 

We’ve only scratched the surfaces of what can be done with drywall. Although drywall is easier to install than plaster, it takes time to master the skill. Look for opportunities to practice, like in a garage, before you try your skills on the living room.

Have fun, wear a mask when you sand and rock on!

Raw Materials Revealed: Drywall Basics

(You are reading an article originally posted on Houzz

Love Your Living Room | Make a Design Plan

Photo: American Cabinet & Flooring, Inc. | Designer Clay Bernard

Create a living room you and your guests will really enjoy spending time in by first setting up the right layout!

To get an idea of what you already have, make a list of everything in your living room: furniture, rugs, lights, curtains – even accessories. What pieces do you love? What pieces should be tossed? Do you have any other pieces that you’d like to integrate into your living room? Maybe you have an inherited table or chair that would  look perfect in your living room after you redo the layout. This also could be the right time to replace a few worn-out pieces or order new window coverings.

Decide What Your Living Room Can Do For You

How do you need to live in this room? Is the space for watching television only? Does it flow directly into your kitchen or dining room? Maybe you have small children and pets. Prioritize your needs so that the space can function effectively – you may not be able to get everything you want in one space.

Have a Focal Point

Identify your room’s best focal point. Our natural inclination is to visually focus on one object or area when we enter a room. If your living room doesn’t have a focus, a striking piece of art or built-in shelving may give you an anchor point to build your furniture around.

Maximize Your Seating

Try to design your living room to comfortably cater to six to eight people. Day to day you will have only immediate family to worry about, but don’t forget that your visitor’s comfort is equally important.

Occasional seating like a stool or ottoman takes up less space than a sofa or chair and will work hard for you. If you have more dining chairs than you use every day and the color scheme works, put one in a corner of your living room – this can be a nice way to link the decor in both rooms.

Lay Out the Living Room

Your list of furniture and accessories is made; how will everything fit?

An interior decorator or designer can work with you to get the look you’re after, and even come up with ideas you didn’t know you’d love. If you’re going the DIY route, start with a simple sketch of the room on paper. Measure the length and width of the room, including any windows or doors. Plain paper and a ruler are all you will need to draw up the room – 1 centimeter on the paper equals 1 foot (or 1 meter) of real space.

Then measure, draw and cut out paper to match all the pieces of furniture you want in the room, new and existing, including rugs. Don’t stress about trying to make them look professional; the basic shape is enough to get an idea. Make sure you use the same formula used for the room measurements.

Once you are happy with how it all looks on paper, you can start moving furniture around. Use masking tape to make an outline of any pieces you like but haven’t yet bought. This will help with scale and help you avoid any unwanted purchases.

If possible, arrange the furniture so it sits off the walls. This allows for airflow around the perimeter and actually makes the living room appear larger.

(You are reading an article originally posted on Houzz)

Get Grout Magically Clean – Stains and All

tile grout

If your grout is grossing you out, this deep-cleaning method will help it look new again!

by Meg Padgett, Houzz

Tile – whether it’s used as flooring, in the kitchen as a backsplash or for counters, or in the bathroom – has one great downfall: grout. Since grout is porous in nature, unsealed grout absorbs all kinds of stains, from mildew to coffee and everything in between. To say it’s a headache to keep grout clean is an understatement.

NOTE: Be wary of using too much lemon juice with marble, since it can etch or damage the stone if left on too long. Hydrogen peroxide can be a safe alternative.

We inherited marble tile counters when we purchased our home. It’s pretty clear that the grout was never properly sealed, so it soaks up stains like crazy. It makes our kitchen feel gross and grimy, even if it was just cleaned. While I’d love to replace the counters with a solid surface like quartz, it’s just not in out budget – plus, we just can’t justify getting rid of something that’s perfectly fine otherwise.

Luckily, I have a foolproof method that will lift most household stains from that pesky grout. 

What you’ll need:

  • Oxygenated bleach (like OxyClean)
  • Warm water
  • Coarse scrubbing brush (like an old toothbrush)
  • Towel
  • Lemon
  • Grout sealer

TIP: Cleaning colored grout should be done with special care. Bleaching agents (like chlorine bleach) can discolor and harm the colored grout. Fortunately, oxygenated bleach does not contain corrosive chemicals and is safe to use on all grout. 

1). Clean the surface thoroughly, removing any surface residue or debris. Let the grout dry fully.

2). Dissolve 2 tablespoons of oxygenated bleach in 2 cups of warm water. Wet the brush in the mixture and apply it to the grout. Let is soak in, then scrub the grout in a circular motion, which will loosen the stain more effectively than a front-and-back motion. If needed, dip the wet brush into the oxygenated bleach to make a paste. Wipe clean, then let dry.

TIP: To lift extra dark stains, squeeze lemon juice onto the stain, let it soak in, then scrub, wipe clean and let the grout dry. Use lemon juice sparingly, since it can damage some tile finishes.

3). Spray the tiles and grout with an ecofriendly cleaning spray and wipe them clean. Let the grout dry fully before making a final decision on whether your hard work paid off – damp grout looks darker than dry grout. 

4). Apply grout sealer after the grout has fully dried to avoid any future stains. Be sure to reapply it each year. 

Still having trouble getting that grout clean? For those impossible-to-remove stains, you might want to consider:

  • A commercial tile and grout cleaner
  • A coarser brush (avoid using metal bristles, though, as they can erode the grout)
  • Grout Renew

If after you’ve tried all three, the stain is still hanging strong, you may have to resort to removing the old grout and replacing it with new. 

TIP: An electric multitool, like the Dremel Mult-Max, helps to make quick and safe work of removing the old grout. 

Houzz: et Grout Magically Clean — Stains and All

Strategies to Create Color Flow Throughout a Home

Originality and creativity are having a moment: eclectic, colorful spaces are all the rage. But though many are over matchy-matchy furniture and one-size-fits-all paint colors, some consistency throughout the home isn’t a bad thing. Done right, color coordinating leads to better flow and a polished, cohesive interior design. 

Model-home interior designer Mary DeWalt from Austin, Texas; creates designs to appeal to buyers, and one of the ways she does does that is by maintaining color flow throughout. “For us, picking colors is all about memory,” she says. “People are more likely to remember a home with a particular color scheme, because it’s different from all the rest. If buyers are looking at several homes, that all-turquoise one will stand out in their minds.”

DeWalt’s savvy color-coordinating strategies can help turn a disjointed, choppy sauce into a flowing thought-out masterpiece, as this model home design demonstrates. Pick and choose the ideas that might work for you, too.

Photo: Colorful House in Portland via Flickr

As you make your color choices, go with what you love, not just what is trendy. DeWalt suggests picking one neutral and two accent colors to carry throughout every room. Accessories provide the color in rooms with neutral walls and grouping accessories in threes keeps tabletops interesting yet clutter free. 

Not every room needs to include every color. Cohesion is key, but that doesn’t mean you can’t experiment with materials. When accessories aren’t enough, add a wow factor, or what DeWalt calls a punctuation mark. 

Even if you love your color scheme, be cautious with big purchases. “Don’t commit to large, colorful furniture, because if you get tired of the color, it is much more expensive to replace,” DeWalt says. Game rooms and kids’ rooms are great spaces to take chances in; consider going bold with a brightly painted ceiling. In a transitional room, such as a hallway or an entryway, don’t feel the need to go big with color just a hint of your palette can be enough. 

Don’t limit your color scheme to the interior – bring it to your pool or patio with matching tile. For those whose budget doesn’t include a pool renovation (or even a pool), something as simple as colorful outdoor cushions can ensure that your outdoor and indoor spaces pair perfectly.

Be Prepared With A Household Inventory

You may have heard of, or even created, a home inventory before. This record, often used to document belongings for insurance purposes, can also be a really helpful tool if you are trying to declutter, prepare for emergencies, clear space for a remodel or just get organized. Check out these tips to create a thorough home inventory and streamline your belongings at the same time.

Make Your Inventory | Choose Your Checklist

The first step in making a home inventory is getting your hands on a comprehensive checklist – one from your own insurance company is best. Review the checklist before getting started.


home_inventory_checklist.jpg

Photo: via Insurance U

Work Through Your Home, Room by Room 

Following your checklist, work your way slowly through the entire house – you may wan to divvy up the task over several weekends. Record a brief description of each item, how many you have, how much it cost and the year you purchased it. 

Don’t leave out any nooks or crannies. Craft rooms, sheds, attics, workshops, porches and garages should all be carefully examined and documented.

Supplement With Photos or Video

Using digital photos is one option, but you may find it easier to create a video tour of your home to document your belongings. Whether you are taking photos or video, start at the front and work your way through each room – try to go in the same order used on your checklist.


Simple_house_floor_plan.gif

Photo: via Wikipedia Commons

Add a Storage Map

Noting down where exactly in the house everything is stored can be incredibly useful when you need to find something, whether it’s an emergency or just time to hang the Christmas lights. 

Use an actual floor plan if you have one; if not, you can create your own simple sketch of each floor of your house. Being as specific as possible, note where in each room boxes or other items are stored. 

Keep Paperwork in One Place

Gather receipts, credit card statements, appraisal documents and the like, and keep them bundled with your other home inventory materials.

Even better, take the time to scan everything and store the digital archive in at least two places.

Use Your Home Inventory to Declutter | Get Rid of Unnecessary Multiples

Cutting back on excess multiples can free up a lot of space in your home, but actually getting rid of unneeded things is easier said than done. Your home inventory checklist can make things easier by providing emotional distance.

Read over your list and mark any items you have a lot of. Do you really need all of those extra dishes? Start a list of things you want to sell or donate. 

Highlight Valuable Items

Especially note valuable pieces you’ve been holding onto for a long time but are not necessarily using. Do online research and estimate what you could sell the pieces for. Would you rather have the extra space and money? If so, let those pieces go!

Mark Your Calendar for a Big-Junk Toss

You know that stuff you’ve been meaning to toss but haven’t found the motivation to? We all have it. Now that your know exactly what and where yours is, set a date to (finally) take care of it.

Get prepared by researching where you can take it – things in good condition may be candidates for donation, while others may need to be dropped at a special recycling center. Involving a reward at the end of your day of errands is always a good plan!

Box Everything

Now that you’ve cleared out space in your storage areas, think about ways to make your storage really work for you. One simple but effective strategy is to tuck every single item in storage – whether in closets, cupboards or in deep storage – into a box or bin.

Containers instantly make things look neater, and it’s also easier to shift items around or grab a box you need rather than trying to unload armfuls of loose stuff from a shelf. 

Use Storage for Rotating Items Too

Free up space in cupboards, closets, shelves and counters for the items you actually use daily, and pack away the rest. This is one of the best ways to make your life easier, without getting rid of a drastic amount of stuff. Simply rotate in fresh dishes, linens and decorative items seasonally.

Consider Digital Backups

Creating digital backups (photos or scans) of important paper records, photos, kids’ art and other memorabilia can offer peace of mind. For less sentimental items, you may choose to actually toss the originals and keep only the digital record. 

Remember to Also…

  • Update your inventory anytime you buy something new or get rid of something on your list, pull out that inventory and note the change. If it’s something new you are adding , use this as a cue to look for a similar item on your inventory to get rid of. It’s much easier to keep clutter at bay than deal with it after things have gotten out of hand.

  • Keep a copy of your inventory offsite. Use a safe-deposit box or an online cloud-based storage system to keep your home inventory and all supporting documents secure.

var hzw_id=5193122;function hzwshow(id,v,delay){var showDiv=document.getElementById(‘hzexpand’+id);if(v){ position=function(element){ var p={x: element.offsetLeft || 0,y:element.offsetTop || 0};while(element=element.offsetParent){ p.x += element.offsetLeft;p.y += element.offsetTop;} return p;};var ref=document.getElementById(‘hzfooter’+id);var p=position(ref);var scrollX=(window.pageXOffset||(document.body.scrollLeft-10)||document.documentElement.scrollLeft);var x=Math.min(Math.max(p.x -(300-ref.offsetWidth)/2 ,scrollX),(window.innerWidth || document.body.clientWidth) + scrollX -300);var root=document.body;root.insertBefore(showDiv,root.firstChild);showDiv.style.top=(p.y + ref.offsetHeight + 3) + ‘px’;showDiv.style.left=x + ‘px’;} var timeout=window[‘hzwtimeout’+id];if(timeout) clearInterval(timeout);if(delay && !v){ window[‘hzwtimeout’+id]=setTimeout(‘hzwshow(‘+id+’,false,false)’,400);} else{ showDiv.style.display=v?’block’:’none’;} }

(You are reading an article originally posted on

Houzz

)

Be Prepared With A Household Inventory – and Use It To Declutter Too

You may have heard of, or even created, a home inventory before. This record, often used to document belongings for insurance purposes, can also be a really helpful tool if you are trying to declutter, prepare for emergencies, clear space for a remodel or just get organized. Check out these tips to create a thorough home inventory and streamline your belongings at the same time.

Make Your Inventory | Choose Your Checklist

The first step in making a home inventory is getting your hands on a comprehensive checklist – one from your own insurance company is best. Review the checklist before getting started.

Photo: via Insurance U

Work Through Your Home, Room by Room 

Following your checklist, work your way slowly through the entire house – you may wan to divvy up the task over several weekends. Record a brief description of each item, how many you have, how much it cost and the year you purchased it. 

Don’t leave out any nooks or crannies. Craft rooms, sheds, attics, workshops, porches and garages should all be carefully examined and documented.

Supplement With Photos or Video

Using digital photos is one option, but you may find it easier to create a video tour of your home to document your belongings. Whether you are taking photos or video, start at the front and work your way through each room – try to go in the same order used on your checklist.

Photo: via Wikipedia Commons

Add a Storage Map

Noting down where exactly in the house everything is stored can be incredibly useful when you need to find something, whether it’s an emergency or just time to hang the Christmas lights. 

Use an actual floor plan if you have one; if not, you can create your own simple sketch of each floor of your house. Being as specific as possible, note where in each room boxes or other items are stored. 

Keep Paperwork in One Place

Gather receipts, credit card statements, appraisal documents and the like, and keep them bundled with your other home inventory materials.

Even better, take the time to scan everything and store the digital archive in at least two places.

Use Your Home Inventory to Declutter | Get Rid of Unnecessary Multiples

Cutting back on excess multiples can free up a lot of space in your home, but actually getting rid of unneeded things is easier said than done. Your home inventory checklist can make things easier by providing emotional distance.

Read over your list and mark any items you have a lot of. Do you really need all of those extra dishes? Start a list of things you want to sell or donate. 

Highlight Valuable Items

Especially note valuable pieces you’ve been holding onto for a long time but are not necessarily using. Do online research and estimate what you could sell the pieces for. Would you rather have the extra space and money? If so, let those pieces go!

Mark Your Calendar for a Big-Junk Toss

You know that stuff you’ve been meaning to toss but haven’t found the motivation to? We all have it. Now that your know exactly what and where yours is, set a date to (finally) take care of it.

Get prepared by researching where you can take it – things in good condition may be candidates for donation, while others may need to be dropped at a special recycling center. Involving a reward at the end of your day of errands is always a good plan!

Box Everything

Now that you’ve cleared out space in your storage areas, think about ways to make your storage really work for you. One simple but effective strategy is to tuck every single item in storage – whether in closets, cupboards or in deep storage – into a box or bin.

Containers instantly make things look neater, and it’s also easier to shift items around or grab a box you need rather than trying to unload armfuls of loose stuff from a shelf. 

Use Storage for Rotating Items Too

Free up space in cupboards, closets, shelves and counters for the items you actually use daily, and pack away the rest. This is one of the best ways to make your life easier, without getting rid of a drastic amount of stuff. Simply rotate in fresh dishes, linens and decorative items seasonally.

Consider Digital Backups

Creating digital backups (photos or scans) of important paper records, photos, kids’ art and other memorabilia can offer peace of mind. For less sentimental items, you may choose to actually toss the originals and keep only the digital record. 

Remember to Also…
  • Update your inventory anytime you buy something new or get rid of something on your list, pull out that inventory and note the change. If it’s something new you are adding , use this as a cue to look for a similar item on your inventory to get rid of. It’s much easier to keep clutter at bay than deal with it after things have gotten out of hand.
  • Keep a copy of your inventory offsite. Use a safe-deposit box or an online cloud-based storage system to keep your home inventory and all supporting documents secure. 


(You are reading an article originally posted on Houzz)

Spring Gardens Are Blooming! Here’s What to Do in April

Colder climates may still be shrugging off winter, but most gardeners are excited to be back to work by April. Dry summers in California and the American Southwest call for drought-tolerant plantings and water-wise practices. Butterflies signal spring’s return in the Great Lakes region and elsewhere,while flowering native trees make their presence known in the Northeast. In Texas and the Southeast, warming temperatures mean everything from herbs to vegetables to annuals can be sown from seed. Here’s what to do in your garden, by U.S. region, this April.


Rocky Mountain Gardener’s April Checklist

Photo: Lake Irene Trail in Rocky Mountain National Park via Flickr user KrossbowPlanting is the name of the game in the April garden. Plants in all forms can be installed as soon as the soil is warm and workable. In the meantime attend to the last of the spring cleanup chores and get your lawn in shape for the coming season. Enjoy the symphony of greens that’s being played right now by all of the emerging new foliage.

Plant bare root plants. Roses, clematis and young fruit trees are commonly available for sale in our region this month, as well as asparagus, rhubarb, strawberries and grapes.

Bare-root planting is an economical option that comes with a small window of time to implement, so take advantage of the opportunity. Select plants that have not leafed out yet with a well-developed, healthy root system (not dried out or rotted). Plant them as soon as possible – if not immediately – after purchasing and keep them moist until the root system is established. 

Transplant or divide crowded perennials when new growth emerges. Summer and fall bloomers like asters, hummingbird flower (Zauschneria spp), Maximillian sunflower (Helianthus maximiliana), gayfeather (Liatris spp), tall garden phlox (Phlox paniculata), coneflower (Echinacea spp) and ornamental grasses may need attention.

A plant with a dead center or a lack of blooms last year may indicate that it needs to be divided. Here’s how:

  • Use a sharp spade to dig out the plant with as much of its root system as possible (6 to 12 inches beyond the drip line).
  • Remove some of the soil from the root ball and pull or chop it into large sections that include both stems and roots.
  • Replant the divisions – or share them with a friend – and water thoroughly.

Plant cold-tolerant annuals in containers as a colorful welcome to spring. Good flower choices include pansies, violas, English daisies, snapdragons and sweet alyssum. Prep any previously used containers by cleaning them thoroughly with a solution of one part bleach to nine parts hot water. Fill your pots with a growing medium made specifically for container gardens, one that’s lightweight and well draining yet moisture retentive.

Cut back woody perennials and subshrubs to within a few inches of the ground. These include Russian sage (Perovskia atriplicifolia), Powis Castle Sage (Artemesia), bluemist spirea (Caryopteris spp), butterfly bush (Buddleia davidii), leadplant (Amorpha canescens), rabbitbrush (Chrysothamnus nauseosus) and St. John’s wort (Hypericum spp). 

Sow cool-season vegetable crops directly into the ground once the soil temperature is at least 40 degrees Fahrenheit. Plant potatoes, peas, Swiss chard, kale, turnips, carrots, spinach, radishes, onions and lettuces. Keep frost blankets and cloches handy to protect seedlings from the inevitable April snowstorms.

Get your lawn off to a good start.

  • Core aerate your lawn before fertilizing it mid month. Leave the plugs on the lawn to decompose and add nutrients to the soil.
  • Overseed thin lawn areas with high-quality grass seed when the soil temperature reaches 40 degrees Fahrenheit. Rake the area to be seeded to expose the soil, then scatter the seeds in a dense, single layer. Cover the seeded areas with a scant ¼ inch of compost and water thoroughly. Keep the area evenly moist until the seeds germinate. 
    • Note: do not use preemergent weed controls, such as corn gluten, in areas that have been newly seeded.
  • Tune up your lawn mower and sharpen the blades. Sharp blades not only make your job easier (especially if you’re using a push or reel mower), but a crisply cut blade of grass is less susceptible to disease infestations than one that is torn and ragged from a blunt mower blade.

Install plant supports – such as circular cages, loop stakes and grow-through grids – to support tall, floriferous perennials once they come into bloom. Placing supports now will allow the plant to grow into and through the structure with a more natural appearance. Peonies, catmint (Nepeta spp), baby’s breath, delphiniums and tall varieties of yarrow (Achillea spp) are all good candidates for support.

April Checklist for a Smooth-Running Home

Spring has arrived! Wake up your home and prepare for the season ahead by deep cleaning, sprucing up outdoor areas and simplifying your living areas, one shelf at a time. And when you are finished, pour yourself a nice glass of something cold to drink and toast your lovely, freshly cleaned home.

Freshen patios and porches.

The lengthening days never fail to draw people outdoors onto porches, patios and decks to savor the longer-lasting light. Make sure your outdoor spaces are ready for the season by cleaning away cobwebs and leaves, washing floors and refreshing outdoor furniture.

Clean the exterior and inspect window screens for tears.

Increasing your home’s curb appeal is as easy as turning on the hose(or a pressure washer) and giving the siding a quick blast to remove accumulated dirt and debris. Also be sure to check window screens for small tears that can let bugs in, and repair or replace the screens as needed.

Clean ceiling fans and overhead light fixtures.

Grab a tall ladder and (carefully!) get to work. Use a duster or soft rags to remove dust from fans and light fixtures – wet rags will only make the dust harder to remove. For caked on grime, start with a dry duster or microfiber cloth and then move on to a fresh damp cloth if needed.

Deep clean the kitchen and prep for seasonal meals. 

Give your kitchen a fresh spring start with a thorough cleaning. In addition to your usual cobweb clearing and floor mopping, wipe down walls and doors and vacuum behind the fridge and stove. Encourage healthy seasonal eating by cleaning out the fridge and pantry, and stocking the space with fresh local produce and other healthy picks.

Organize one shelf.

If an organized home is a goal you want to reach this year, set yourself up for success by starting small. Working on a single shelf, drawer or cupboard at at time will help you build momentum. Try starting with the spice rack, a bedside table or a frequently used desk drawer.

Simplify the living room.

Pare down books and media to create a more relaxing space. Donate used books, movies and music to your local library or sell them. Organize what’s left, hiding anything unsightly (gaming, equipment, I’m lookat at you) behind closed doors. To keep things from getting out of hand in the future, pencil in a date about a month from your paring-down date to spend an afternoon culling unwanted media.

Streamline files.

Since you will likely be digging through your old paperwork this month as you prepare taxes (ugh, I know), take the time to toss junk as you come across it rather than stuffing everything back into the files. A slimmed-down file drawer will make it easier to find what you need, so it’s worth the extra effort now. 

Lighten up tablescapes.

If you’ve had the same arrangements on your tables for months, now is a good time to shake things up. There is no need to spend money – simply look around your home and see what can be moved or repurposed from another room. Try displaying flowers on the dining table in vintage tea tins or jelly jars, or put fresh herbs in your vases instead of flowers. Streamline the decorative objects you choose to keep out, and store the rest to rotate in at a future date.

12 Great Kitchen Styles – Which One’s for You?

Style is easier to recognize with your eyes than with words: You know it when you see it, and the photo that inspires you most can often surprise you. Think you know your kitchen style? Check out these guides to a dozen favorite kitchen design themes, then tell us which one takes the cake.

#1 – Farmhouse Kitchens

Warm and homey farmhouses anchored a life on the land, and they still offer great functionality and comfort. Their open shelving, wide sinks, classic flooring and big kitchen table make them easy to work in and easy to love. 

#2 – Rustic Kitchens

“Worn”, “distressed” and “rough hewn” may not be the first words that come to mind when we think of kitchens. But today rustic kitchens rival the classic white kitchen in popularity – thanks to their timber, stone, brick, vintage appliances and fireplaces. 

#3 – Modern Kitchens

Definitions of “modern” vary widely, but when we think of modern kitchen designs, we often think of frameless cabinets, sleek and simple hardware, strong horizontal lines and a lack of ornamentation, with the natural beauty of the materials shining through. 

#4 Traditional Kitchens

Traditional kitchens are defined by their details, which can include arches, decorative moldings and corbels, raised-panel cabinets, a mix of antique finishes and furniture-like turned legs – even a chandelier. Whether they have a classic American or old-world flavor, they still carry the stamp of their owners’ personal style.

#5 Contemporary Kitchens

Contemporary kitchens can be very sleek, but while a purely modern kitchen often celebrates structure and grid, a contemporary kitchen is often more playful in form and finishes, including elements of other styles and creating its own reflection of the times.

#6 Transitional Kitchens

Think of a transitional kitchen as the great moderator. With the warmth and welcome of traditional design and the clean, simple lines of contemporary style, transitional spaces project balance and harmony. Because they offer a great deal of flexibility, they’re a great choices for homeowners whose taste spans the two.

#7 Craftsman Kitchens

Craftsman style arose in the early 20th century as a reaction to the mass-produced fussiness of the Victorian era. Its rich woods, built-ins, handcrafted tiles and well-made simplicity continue to charm us.

#8 Cottage Kitchens

Cozy, happy and unpretentious, a cottage kitchen harks back to simpler times and evokes a sense of easy, carefree living. Beadboard, soft colors, vintage hardware, wood floors and colorful accents and curtains will infuse your kitchen with cottage comfort. 

#9 Paris Bistro Kitchens

If you long for a sugar-laced café au lait on Rue Monmartre, why not bring a little Parisian style into your house? Intimate kitchen lighting, pretty cookware on display, tile floors and a striped awning ought to do it.

#10 Classic Kitchens

What is classic? The answer is as varied as cooks are. Still, white or cream kitchen cabinets, simple architectural details and black accents offer a blank slate that homeowners can personalize with contemporary, traditional and eclectic touches as they see fit.

#11 Mediterranean Style Kitchens

Flared hoods, hand-painted tile, warm wood cabinets, beamed ceilings and arched cooking alcoves are just some of the features that put Spanish revival kitchens on the most-wanted list.

#12 Eclectic Kitchens

Do you rebel against styles and refuse pigeonholes? It’s your housel you can mix and match for your own distinct kitchen style however you please. The trick: be a rebel with a cause. Get ideas for a very personal kitchen, with touches of modern and rustic styles, well-traveled flair, humor and irreverence.

How to Work With a Kitchen Designer

Whether your kitchen needs a minor face lift or a complete gut job, soliciting help from a certified kitchen designer can be well worth the investment. The rule of thumb: if a kitchen project costs more than a few hundred dollars, it may be time to call a pro.

Not only do kitchen designers have access to planning tools and technology that most homeowners don’t, but they have the inside scoop on trends, new materials, building codes and technical quirks. And their kitchen remodel expertise can save you a lot of time, money and frustration. Use our tips to help the process flow smoothly from start to finish. 


Kitchen Island

Photo: American Cabinet & Flooring | Designer: Randy Wilson

Know the different types of kitchen designers

If you’re ordering cabinetry and more through a national chain or other retailer, there likely will be designers on staff who can help you plan. The main advantage: often, there’s no additional cost for their services, although some charge a percentage of the total sale or work under another fee structure. Other designers work independently at an hourly or per-project rate. Because they’re not affiliated with a particular store or brand, they can sometimes be more objective about materials. 

If you choose an independent professional, ask for recommendations from friends an others in your community, and browse the Houzz professionals directory or the National Kitchen and Bath Association website for reputable designers in your area.

In any case, request to see examples of the designer’s previous work and ask for client references in order to ensure that he or she is a good match for your needs.

Note the ups and downs of your existing space

Perhaps your kitchen operates just fine, but the finishes are long past their prime. Or maybe you’re planning a soup-to-nuts renovation and have no idea how to retool the space. Be prepared to share with the kitchen designer what you like and what you hope to change to give a firm place to start.

Do your research…

Your initial meeting with the designer will go more smoothly if you have a general idea of the look, flow and equipment you want. Browse decorating websites and magazines for kitchen design photos that speak to you, and how them to your designer. A picture can communicate clearly what you may struggle to capture in words. 

…but stay flexible

The kitchen designer may spot holes in your wish list or mix materials that won’t work for you no matter how much you love them. Conversely, he or she may introduce you to options you’d never considered. And he or she will keep you from sacrificing function for beauty, which is a recipe for misery down the road. Be open to suggestions – after all, expertise is why you recuirted a designer. 

Know your budget

Have a firm idea of what you want to, and are able to, spend to avoid a disconnect between plans and reality. If you have the means for pro-grade appliances and high-end finished, your kitchen designer can work those into the scheme from the beginning. If you don’t, make it known upfront. Although miracles mau not happen on a shoestring, a designer has the experience and the know-how to stretch your dollars as far as they’ll possible go. 

Settle on a time line and a number of draft plans

Kitchen designers don’t expect to nail it on the first try – some back and forth is usually built into the process. Agree upon how many drafts of the plan you’ll see before you sing a contract and part with any cash. you should also confirm a time line for the work, though circumstances beyond anyone’s control can throw even the best-orchestrated jobs off schedule.

Keep changes minimal

Depending on how far along in the process you are, change orders can be anything from a mild nuisance to a major issue. Not only will they hold up progress, but they’ll also put a dent in your wallet. That said, if there’s a change that must be made for you to enjoy and use your revamped kitchen the way you intend, it’s better to speak up than to end up dealin with the flaw on a daily basis.

Be patient

A good kitchen plan takes time to create, and so does bringing it to life. Putting in effort on the front end, from choosing finishes to thinking through the work zone, will pay off in the long run. And the last thing you want is a rushed construction job, so don’t hurry the contractors – no matter how anxious you are to put your new kitchen to work.