You may have heard of, or even created, a home inventory before. This record, often used to document belongings for insurance purposes, can also be a really helpful tool if you are trying to declutter, prepare for emergencies, clear space for a remodel or just get organized. Check out these tips to create a thorough home inventory and streamline your belongings at the same time.
Make Your Inventory | Choose Your Checklist
The first step in making a home inventory is getting your hands on a comprehensive checklist – one from your own insurance company is best. Review the checklist before getting started.

Photo: via Insurance U
Work Through Your Home, Room by Room
Following your checklist, work your way slowly through the entire house – you may wan to divvy up the task over several weekends. Record a brief description of each item, how many you have, how much it cost and the year you purchased it.
Don’t leave out any nooks or crannies. Craft rooms, sheds, attics, workshops, porches and garages should all be carefully examined and documented.
Supplement With Photos or Video
Using digital photos is one option, but you may find it easier to create a video tour of your home to document your belongings. Whether you are taking photos or video, start at the front and work your way through each room – try to go in the same order used on your checklist.

Photo: via Wikipedia Commons
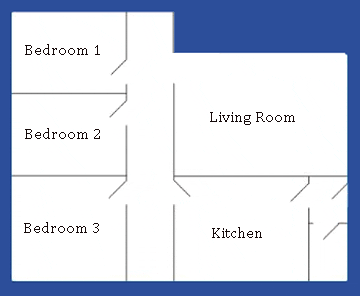
Add a Storage Map
Noting down where exactly in the house everything is stored can be incredibly useful when you need to find something, whether it’s an emergency or just time to hang the Christmas lights.
Use an actual floor plan if you have one; if not, you can create your own simple sketch of each floor of your house. Being as specific as possible, note where in each room boxes or other items are stored.
Keep Paperwork in One Place
Gather receipts, credit card statements, appraisal documents and the like, and keep them bundled with your other home inventory materials.
Even better, take the time to scan everything and store the digital archive in at least two places.
Use Your Home Inventory to Declutter | Get Rid of Unnecessary Multiples
Cutting back on excess multiples can free up a lot of space in your home, but actually getting rid of unneeded things is easier said than done. Your home inventory checklist can make things easier by providing emotional distance.
Read over your list and mark any items you have a lot of. Do you really need all of those extra dishes? Start a list of things you want to sell or donate.
Highlight Valuable Items
Especially note valuable pieces you’ve been holding onto for a long time but are not necessarily using. Do online research and estimate what you could sell the pieces for. Would you rather have the extra space and money? If so, let those pieces go!
Mark Your Calendar for a Big-Junk Toss
You know that stuff you’ve been meaning to toss but haven’t found the motivation to? We all have it. Now that your know exactly what and where yours is, set a date to (finally) take care of it.
Get prepared by researching where you can take it – things in good condition may be candidates for donation, while others may need to be dropped at a special recycling center. Involving a reward at the end of your day of errands is always a good plan!
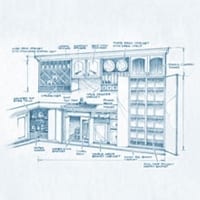
Box Everything
Now that you’ve cleared out space in your storage areas, think about ways to make your storage really work for you. One simple but effective strategy is to tuck every single item in storage – whether in closets, cupboards or in deep storage – into a box or bin.
Containers instantly make things look neater, and it’s also easier to shift items around or grab a box you need rather than trying to unload armfuls of loose stuff from a shelf.
Use Storage for Rotating Items Too
Free up space in cupboards, closets, shelves and counters for the items you actually use daily, and pack away the rest. This is one of the best ways to make your life easier, without getting rid of a drastic amount of stuff. Simply rotate in fresh dishes, linens and decorative items seasonally.
Consider Digital Backups
Creating digital backups (photos or scans) of important paper records, photos, kids’ art and other memorabilia can offer peace of mind. For less sentimental items, you may choose to actually toss the originals and keep only the digital record.
Remember to Also…
-
Update your inventory anytime you buy something new or get rid of something on your list, pull out that inventory and note the change. If it’s something new you are adding , use this as a cue to look for a similar item on your inventory to get rid of. It’s much easier to keep clutter at bay than deal with it after things have gotten out of hand.
-
Keep a copy of your inventory offsite. Use a safe-deposit box or an online cloud-based storage system to keep your home inventory and all supporting documents secure.
var hzw_id=5193122;function hzwshow(id,v,delay){var showDiv=document.getElementById(‘hzexpand’+id);if(v){ position=function(element){ var p={x: element.offsetLeft || 0,y:element.offsetTop || 0};while(element=element.offsetParent){ p.x += element.offsetLeft;p.y += element.offsetTop;} return p;};var ref=document.getElementById(‘hzfooter’+id);var p=position(ref);var scrollX=(window.pageXOffset||(document.body.scrollLeft-10)||document.documentElement.scrollLeft);var x=Math.min(Math.max(p.x -(300-ref.offsetWidth)/2 ,scrollX),(window.innerWidth || document.body.clientWidth) + scrollX -300);var root=document.body;root.insertBefore(showDiv,root.firstChild);showDiv.style.top=(p.y + ref.offsetHeight + 3) + ‘px’;showDiv.style.left=x + ‘px’;} var timeout=window[‘hzwtimeout’+id];if(timeout) clearInterval(timeout);if(delay && !v){ window[‘hzwtimeout’+id]=setTimeout(‘hzwshow(‘+id+’,false,false)’,400);} else{ showDiv.style.display=v?’block’:’none’;} }
(You are reading an article originally posted on
)