FREE DESIGNS AND ESTIMATES

Amazing 40-Square-Foot Kitchen

Article By: Vanessa Brunner

How do you get storage, prep space, cooking space and a washer-dryer into 40 square feet? Ask Palmer Thompson-Moss, who did just that for a New York client. “These constraints actually helped us make something nice that works really well,” he says. 

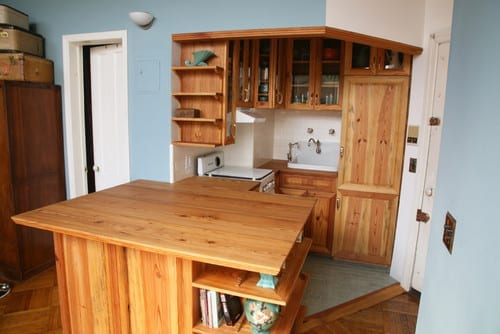
Even better, almost every part of this teeny kitchen is reclaimed from various demolished projects in New York City. Handmade cabinetry made from salvaged old-growth pine, salvaged subway tile, a vintage stove and a massive island combine beautifully to give the client everything on her wish list. 

Kitchen at a Glance
Who lives here: A single woman
Location: East Village neighborhood of Manhattan
Size: About 40 square feet


Traditional Kitchen by Brooklyn Design-build Firms Grant Davis Thompson, INC.


The previous kitchen was an eyesore. “You were just looking at this hideous thing from the living room,” says Thompson-Moss. 

He likes to use salvaged items in his design, rather than using just recycled materials. He had the custom cabinets built with salvaged old-growth pine beams — very dense — from old New York City buildings. “These were the beams that built New York,” he says.


Traditional Kitchen by Brooklyn Design-build Firms Grant Davis Thompson, INC.


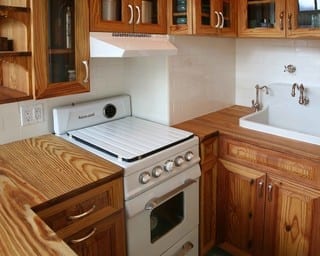
The designer found the 1930s Armoid stove on Long Island via Craigslist, and painstakingly cleaned and polished it before installing it in the kitchen. “You really have to really do your research to make sure that a vintage stove is actually working and it’ll fit in your space,” he says.

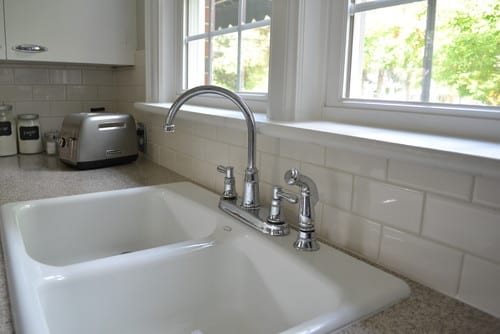
The subway tile was salvaged from old apartments and projects around New York City.


Traditional Kitchen by Brooklyn Design-build Firms Grant Davis Thompson, INC.


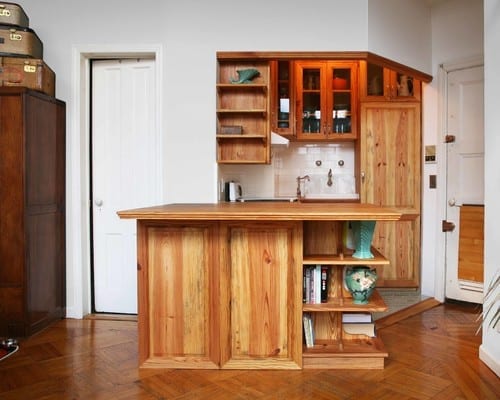
The long, glass cabinet doors and open shelving around the island put the client’s beautiful dish collection on display. The shelving makes the large island look more like a piece of furniture. “It feels less like a massive volume just sitting in the middle of the room,” Thompson-Moss says.


Traditional Kitchen by Brooklyn Design-build Firms Grant Davis Thompson, INC.


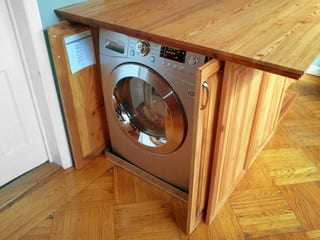
A space at the end of the island holds one of the client’s biggest musts: a washer and dryer. This LG appliance actually combines both functions in one to save space.


Traditional Kitchen by Brooklyn Design-build Firms Grant Davis Thompson, INC.


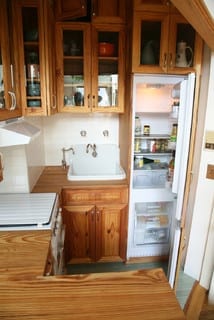
A superthin Blomberg refrigerator with custom wood panels fits the kitchen perfectly.

Thompson-Moss had to leave the build-out in the wall on the left side of the sink because it contains plumbing. The upper cabinet actually wraps around this section of the wall. A glass panel on the side of the cabinet keeps it from looking too awkward.

The sink was salvaged from Demolition Depot in Manhattan’s Harlem neighborhood. TheHerbeau fixtures — among the few new things in the kitchen — were carefully chosen to match the sink.

The vintage cabinetry hardware was refinished to a shine. 


Traditional Kitchen by Brooklyn Design-build Firms Grant Davis Thompson, INC.


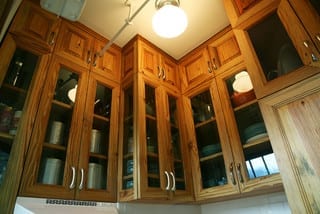
A sprinkler pipe at the top of the kitchen posed some problems with the new, higher cabinetry design. The pipe couldn’t be moved, so Thompson-Moss built a door around it. The door is stationary, but the inside of the cabinet can be accessed through the other door. 


8 Good Places for a Second Kitchen Sink

Article By: Shane Inman

Don’t underestimate the power of a second sink in your kitchen. When installed in just the right spot, a secondary sink can be just as useful as a primary sink. The perfect sink location allows two users to cook and clean simultaneously, making everyday meals and special occasions easier to prep for and clean up after. Whether your kitchen is large or on the smaller side, the right extra sink in the right spot might make your life better.

Island. Most designers put second sinks on kitchen islands, where they’re easy to use and access but out of the way of main prep areas. This sink makes cooking easier with chef number two on Christmas and Thanksgiving.


Workstation. Create an out-of-the-way workstation in your kitchen by adding a niche for your second sink. 

The layout of this kitchen allows for a second person in the kitchen to have water access while staying out of the chef’s way. What a great idea!


Baking center. If you are an avid baker, having a baking center with its own sink can help you confine your mess. This tidy countertop area keeps the mess contained, and it’s easy to wash the dishes and the countertop once everything’s in the oven.


Butler’s pantry. A sink immediately upgrades the functionality of a butler’s pantry. Nothing’s easier than blending, mixing and stirring right near where ingredients are stored; you can prep appetizers and drinks for guests without traveling back and forth into the kitchen.


Wet bar. For those who love to host, a wet bar can make entertaining easier. A small sink like the one here is great for adding water to cocktails and doing light cleanup.


Peninsula. If you have a peninsula instead of an island, adding a sink can be a great solution for guests and homeowners. This particular sink can be accessed from the front or back for easy use.


Eclectic Kitchen by Other Metro Photographers Fotograf Lisbet Spörndly


Coffee station. Is coffee a beverage staple in your house? Imagine never having to travel to the main sink to fill the coffeepot (hey, everything’s difficult early in the morning). An additional sink by your coffee center would allow you to fill, pour and serve with ease.


Contemporary Kitchen by Newark Kitchen & Bath Designers Tim Kriebel – KRIEBELDESIGN


Right next to the main sink. Your secondary sink doesn’t have to be a smaller version of your primary sink — it can be the same size and even the exact same model. Just like double dishwashers, double sinks translate into a quicker cleanup.


Architects, interior designers, and more ∨

Ideas for your living spaces, lighting and landscape design.
Work with a home decorator when choosing area rugs or hanging new window blinds in your home.


How to Pick a Kitchen Backsplash That Wows

Article By: Vanessa Brunner

A kitchen’s backsplash works much like jewelry. Simple or snazzy, it can bring a whole look together; the right backsplash helps your kitchen reach its potential. Our in-depth guides, rounded up here, can help you find the backsplash material and color that fit with your kitchen’s look, your cleaning style and budget.


Modern Kitchen by Bristol Architects & Designers DHV Architects


Find Your Inspiration

The Kitchen of the Week series is great fodder for remodeling and renovation inspiration. Learn about the back-painted glass shown here and nine more favorite backsplashes from beautiful kitchens on Houzz. 


Choose Your Material

Tile. The good news: You’ve finally settled on a tile backsplash. The bad news: The selection process has just begun. Cement, subway, mosaic, patterned or laser cut? This guide will give you the pros and cons for each one, along with styling tips. 


Mirror. Additional visual space, a variety of styles and a relatively affordable cost make mirror a great backsplash choice. See how this flashy backsplash material can work in almost any kitchen design. 

Recycled tile. Whether salvaged or containing recycled material, recycled tile can add a unique element to your kitchen that’s easy on your conscience. 

Window. Planning on making some structural changes to your kitchen? Consider a different kind of backsplash: a new window. A beautiful view, more light and fresh air could improve your kitchen’s style and functionality. 


Tin. Take an old-fashioned approach to your backsplash and use simple tin tiles. This time-tested material is durable, beautiful and affordable. 


Unique materials. Maybe you feel like your classic kitchen needs a different touch. Or maybe you’re just ready to embrace the unusual. Either way, one of these unique backsplash materials can help you get the statement-making look you want. 

Installation Considerations

Half backsplash. If you have your heart set on a marble backsplash but can’t afford the counter-to-ceiling application you envisioned, don’t give up your dream just yet. Cut your backsplash in half — or more! — to reduce cost without sacrificing efficiency. 


DIY. Think you’re ready to put in your own backsplash? If you have experience setting tile and want something simple in your kitchen, take a look at this guide. A DIY backsplash installation could help you save some serious money. 


Architecture, interior design, and more ∨

From Shabby Chic home decor to contemporary furniture and mirrors, browse thousands of decorating ideas to inspire your next home project.
Hire a residential builder in your area to renovate or install a new fireplace.


Get Grout Magically Clean – Stains and All

tile grout

If your grout is grossing you out, this deep-cleaning method will help it look new again!

by Meg Padgett, Houzz

Tile – whether it’s used as flooring, in the kitchen as a backsplash or for counters, or in the bathroom – has one great downfall: grout. Since grout is porous in nature, unsealed grout absorbs all kinds of stains, from mildew to coffee and everything in between. To say it’s a headache to keep grout clean is an understatement.

NOTE: Be wary of using too much lemon juice with marble, since it can etch or damage the stone if left on too long. Hydrogen peroxide can be a safe alternative.

We inherited marble tile counters when we purchased our home. It’s pretty clear that the grout was never properly sealed, so it soaks up stains like crazy. It makes our kitchen feel gross and grimy, even if it was just cleaned. While I’d love to replace the counters with a solid surface like quartz, it’s just not in out budget – plus, we just can’t justify getting rid of something that’s perfectly fine otherwise.

Luckily, I have a foolproof method that will lift most household stains from that pesky grout. 

What you’ll need:

  • Oxygenated bleach (like OxyClean)
  • Warm water
  • Coarse scrubbing brush (like an old toothbrush)
  • Towel
  • Lemon
  • Grout sealer

TIP: Cleaning colored grout should be done with special care. Bleaching agents (like chlorine bleach) can discolor and harm the colored grout. Fortunately, oxygenated bleach does not contain corrosive chemicals and is safe to use on all grout. 

1). Clean the surface thoroughly, removing any surface residue or debris. Let the grout dry fully.

2). Dissolve 2 tablespoons of oxygenated bleach in 2 cups of warm water. Wet the brush in the mixture and apply it to the grout. Let is soak in, then scrub the grout in a circular motion, which will loosen the stain more effectively than a front-and-back motion. If needed, dip the wet brush into the oxygenated bleach to make a paste. Wipe clean, then let dry.

TIP: To lift extra dark stains, squeeze lemon juice onto the stain, let it soak in, then scrub, wipe clean and let the grout dry. Use lemon juice sparingly, since it can damage some tile finishes.

3). Spray the tiles and grout with an ecofriendly cleaning spray and wipe them clean. Let the grout dry fully before making a final decision on whether your hard work paid off – damp grout looks darker than dry grout. 

4). Apply grout sealer after the grout has fully dried to avoid any future stains. Be sure to reapply it each year. 

Still having trouble getting that grout clean? For those impossible-to-remove stains, you might want to consider:

  • A commercial tile and grout cleaner
  • A coarser brush (avoid using metal bristles, though, as they can erode the grout)
  • Grout Renew

If after you’ve tried all three, the stain is still hanging strong, you may have to resort to removing the old grout and replacing it with new. 

TIP: An electric multitool, like the Dremel Mult-Max, helps to make quick and safe work of removing the old grout. 

Houzz: et Grout Magically Clean — Stains and All

Design 101: Common Kitchen Shapes That Blend Beauty and Function

We all want our kitchens to be both beautiful and functional. And while you may have an idea of how you want your new kitchen to look, balancing proportion and scale to achieve a harmonious whole is critical. However you’ll also want to understand the factors that impact how it feels to be in the space. Here, we’ve gathered some information on kitchen shapes, optimizing functionality and how to ensure a layout works for you and your family.

Your Lifestyle and Your Home Will Influence Your Kitchen’s Shape

Are you an aspiring cook? Do you like to entertain? Is counter space a premium? These are just some of the considerations that will determine which kitchen shape is right for you.

Photo Credit: Omega | MasterBrand Cabinets, Inc.

U-SHAPED

Popular with many cooks because of its efficiency, the U-shaped kitchen offers generous counter space and provides an efficient workflow by creating a compact work triangle. It can however make the cook feel apart from a group when entertaining, as most movement will be facing one of the three walls.

Photo Credit: Omega | MasterBrand Cabinets, Inc.

L-SHAPED

The L-shaped kitchen offers flexibility for both large and small homes. This shape utilizes only two kitchen walls, providing an open sensibility. The L-shape minimizes traffic through the kitchen and, typically, features larger expanses of countertops, allowing ease of preparation at mealtime.

L-SHAPED WITH AN ISLAND

An L-shaped kitchen with an island is ideal for entertaining. The ample counter space along the “L”of the kitchen becomes the primary work area, while the island allows guests or other family members to gather, to help prepare or just visit… AND to stay out of the way of the cook!

Photo Credit: Omega | MasterBrand Cabinets, Inc.

G-SHAPED

A modified “U” shape, the G shaped kitchen is very efficient. However, unless one or more of the walls are designed as half or “pony” walls, this kitchen shape can feel confining for today’s cook.

SINGLE WALL

This layout positions all of the appliances on a single wall, and would typically be found in a studio apartment or other very small space.

Photo Credit: Omega | MasterBrand Cabinets, Inc.

GALLEY

Open on both ends, the Galley requires a minimum corridor width of 48″ so that the cook can easily maneuver during meal preparation. Typically, appliances are near one another which is convenient, but due to the corridor shape of the kitchen, all of the household traffic will pass through the space.

Efficiency Has a Shape: The Triangle

The basic work triangle is comprised of an imaginary line drawn between the kitchen’s primary work areas:

  1. food storage (refrigerator)
  2. food preparation (stove)
  3. clean up (sink)

For maximum efficiency, the sum total of the triangle should be 26 linear feet, with the sink being the center point.

What You Can Expect From Your Designer

In addition to offering guidance on door style, wood type and color selections; a professional kitchen designer will typically prepare three types of documents for your review:

  1. floor plan
  2. elevations of all the wall that receive cabinetry
  3. perspective view from one of more vantage points within the room

Availability of these documents to the consumer is usually contingent on a contractual agreement and/or down payment.

FLOOR PLAN

A floor plan shows the wall layout from above, and an outline of all the components that will fill the space, such as base, wall and tall cabinetry. Sometimes lighting and electrical detailing are also shown on this plan.

Photo Credit: Omega | MasterBrand Cabinets, Inc.

ELEVATION

A “flat” drawing that shows each wall of cabinetry as if you were standing and facing it head on. The elevation view is good for seeing the detail of the cabinetry components that aren’t visible in the floor plan view. It is also good for establishing heights of components within the room.

Perspective

A perspective drawing is one that is “3D” or dimensional. It shows the room as it would be actually seen from the viewpoint of a person 5′-6″ in height. Perspective drawings provide details such as areas that are increased or reduced in depth, a dimensional quality that elevation drawings don’t offer.

Testing the Fit

It is a good idea to layout the proposed kitchen in the actual space. If the space is empty, this is easily accomplished a couple of different ways. Refer to the completed floor plan utilizing a tape measure and masking tape to indicate where cabinets and appliances will be located. Newspaper can be folded to adjust its size and then moved around within the space – perfect for determining just how big that island should be! If there is an existing kitchen in place, you’ll have to improvise a bit. Both tape and newspaper can be used to outline new cabinets or appliances, helping you visualize your new space.

Holiday Home Improvement Projects


Happy Holidays.jpg

The run-up to the holiday season is a good time to be taking care of home improvement projects. Friends and family will be dropping by a bit more frequently, so they’ll be able to see the fruit of your labors.

Even if your home isn’t a major social setting, if you’re like most of us, you tend to spend a bit more time indoors in the winter, so you might as well be making the most of your home for the people living in it: you.

Seal the driveway and fix those cracks in the sidewalk

Salt on the roads and frequent temperature changes can break down your entrance ways. Make a good impression on the outside of your home and avoid curious looks from guests thinking “was that crack always there?”

Home theatre area

You’ve got a big screen television and a great sound system. But what about the stand the TV rests on? How about the decor? You may want to look at custom cabinets or storage for your DVDs and related items. Is the couch your guests will be sitting on looking a bit worn? Upgrade and replace as needed. You may also want to consider mounting your flat screen television on a wall for more effective use of space and a sophisticated look. 

The kitchen: the most used room in the house

When you’ve got company over for the holidays, even if the main event may be in the living room, people naturally gravitate towards the kitchen for an extra cup of cocoa or a gingerbread cookie from the pantry. Think about new cabinets, solid slab countertops or a coat of paint that brightens up the room can create a welcoming feel. And if you’ve upgraded your kitchen utilities like your dishwasher, you’ll have an easier time after the party is done.

Bathroom fix-ups

New tiles and re-grouting can add a fresh look to your bathroom. Maybe it’s also time to add touches like a new mirror, shower curtain or bathroom mat.

Designer fireplace and maintenance

A lot of holiday parties tend to center around the fireplace. Custom fireplaces that double as art installations are becoming more popular. More homes are also including them in other parts of the house besides the living room, such as in the kitchen or master bedroom.

If installation is a bigger job than you were thinking and you’ve already got a working fireplace, at least get your maintenance done, cleaning it up, checking connections and ventilation and ensuring cracks in the mantle or other areas get sealed properly.

Give yourself a home improvement schedule

You’re not going to want to deal with dust and packaging from home improvement projects while your guests are arriving. Give yourself plenty of time to work through your improvements, and don’t bit off more than you can chew. Give yourself a realistic list to accomplish and if you can’t get it done before New Year’s Eve, well, there’s always next year.

Kitchen Space and the Organized Homeowner

The war against clutter is not just about keeping objects in your space in line. It’s about the emotional pay-off of having a space that is easy to move around in. And no room in your home demonstrates this benefit more than your kitchen.

To explore this, guest writer Jenney Maria is here to present a few ideas on de-cluttering and organizing your kitchen.

Photo: American Cabinet & Flooring | Designer Clay Bernard

The kitchen is the central part of every house, as the whole family gathers here to prepare food, enjoy the meal and to entertain friends. It is also the most frequently used portion of your house which needs to be organized on a daily basis. If you utilize your kitchen space effectively, food preparation and cleaning up becomes very efficient and comfortable. Here are some tips that will help you a lot in organizing your kitchen in an efficient manner.

Kitchen space, the wheat and the chaff

First of all, it is very important to make a list of all the items that you will need in the kitchen. You should only include items that you use on a daily basis and try to avoid any unnecessary items. After preparing the list assess the situation, which is, what you actually have and which items you’ll have to purchase. 

Zones and your kitchen

Once you have all the things you need; now you can start organizing your kitchen. Divide your kitchen into different zones, e.g. cooking – eating – and washing. Your kitchen can be organized very easily if you arrange things accordingly. Designate a small area for your family members to sit and eat in the kitchen. A well-organized kitchen will give you a pleasant feeling every time you enter and will make your kitchen tasks quite easy and hassle-free.

The right kitchen tools to have

The next step is to place all the routine tools and appliance near you. You must have an easy access to all these items because while working in the kitchen, you have to perform multiple tasks. You should place your cooking utensils in a storing container so that you can save the drawer space. Make use of the cabinet doors by placing cook books, or other type of reading materials that you require while cooking, inside. 

Kitchen space organization

Finally, it’s time to position things. Ensure that you have placed the things that work together near each other. For example pots, pans, whisks, spatulas and also ladles should be placed near the stove; bowls, measuring glasses and appliances should also be in the cooking zone. Small appliances, sharp tools and cleaning chemicals should be carefully placed in secured storage areas so that children are not able to reach them. Hardly used tools and appliances should be placed on the top shelf.

Simplify your life in your kitchen

By following these simple tips you can easily utilize your kitchen space and make your life much easier. Dividing the kitchen area according to your work will help you find whatever you require as it’s needed and will save your time and energy. Having a well-organized kitchen could make your task movement smooth, and your time in the kitchen will be more enjoyable and comforting.

Kitchen Counters | High-Tech Solid Surfaces Make Maintenance Easy

Solid-surface countertops are the stuff of George Jetson, in which high-tech plastics can be heat sculpted into any imagined shape. These modern surfaces take on many appearances, including stone, yet shed the shortcomings of their counterparts with a nonporous surface that doesn’t age or develop a patina. In this cutting-edge countertop right for your kitchen? Read on to learn more.

Photo: Wilsonart Solid Surface in Bedrock

The basics: solid-surface counters are a blend of acrylic or polyester resins, powdered fillers and pigments, cast into slab. There are many manufacturers of these synthetic counters, including Corian, HIMACS, Wilsonart, Formica, LivingStone, and more.

Cost: $50 to $100 per square foot installed.

Advantages: solid surface is durable nonporous, making it resistant to stains, mildew and bacteria. Its unique composition makes buffing out scratches a breeze and provides that appearance of a seamless installation, including for integral backsplashes. This product outshines its competitors with an ability to be thermoformed into unusual shapes and configurations.

Disadvantages: its resin-based composition makes this counter material sensitive to heat and vulnerable to scratches. As with many countertops, keep your trivets and cutting boards handy.

Sustainability: many solid-surface manufacturers tout GreenGuard‘s approval, which certifies that due to the nonporous surface and low chemical emissions, the countertop contributes to healthy indoor air quality.

The ecological shortcoming of these products is their composition, which comes from finite, nonrenewable resources, including petroleum and aluminum trihydrate (ATH), which is strip mined. Choosing a solid-surface product with recycled content, can reduce the negative environmental impact.

Maintenance: soapy water will suffice for everyday spiffing up of this easy-to-clean surface. However, it’s essential to dry the surface completely after cleaning or spills, as wet counters can lead to a dull or uneven, blotchy finish.

Special considerations: acrylic solid surface is more pliable, whereas its polyester-based counterparts claim a deeper coloration. Dark colors will show more fingerprints.

The Four Things Home Buyers Really Want in Kitchen Cabinetry

kitchen cabinets

A great kitchen design can dramatically increase your property value – if you want to attract prospective buyers, your kitchen  is the perfect place to invest money. The trick is to get it to appeal to the majority of people by spending your money on what most of them really want.

Kitchen cabinetry can do much to attract the right buyers. There are four key factors to consider:

  1. Quality
  2. Symmetry
  3. Color
  4. Layout

If you can get these key elements right with your cabinetry, you’re bound to have a higher home value.

Quality

The number of cabinets you have is not as important as the quality of the cabinetry. The fewer cabinets you add to your kitchen renovation, the less expensive it will be. Choose quality over quantity.

DO: choose quality hinges and runners, including soft-close drawers and custom made cabinetry.

DON’T: go for large fillers and ill-fitted modular cabinetry.

Keep the cost down by keeping the cabinet count down. Design the kitchen layout to keep it light, bright and with an open plan, without using tons of cabinets. 

Note: Excessive internal organizers aren’t essential if you are planning on reselling your home. They are wonderful in adding value to your personal use of the kitchen but are not always a wise choice if you are renovating purely to sell. Internal drawer and cabinet fit-outs are often expensive, and the extra money you spend on these accessories may not come back to you when you’re selling your property.

Symmetry

The eye is naturally drawn to appreciate symmetry and repetition. When you’re renovating to sell, keep your kitchen cabinetry simple and appealing. Elegance has a way of being understated, and simplicity is key when you are trying to appeal to the majority of buyers.

DO: keep the wall cabinetry sizes the same where possible. Drawers look nice when they are large and expansive – if you have multiple sets, keep them the same size, with the same proportion of drawers.

DON’T: add multiple cabinets in varying sizes, try to keep the look and feel consistent in the whole space.

Light, Bright Spaces

Many buyers want an open, light and airy space. A kitchen that is white makes the space feel bigger. White is also a universally appealing color and leaves a blank slate so buyers can re-envision the space.

DO: keep the space open, bright and light with white cabinetry. If you want some contrast, go for a darker bench top. Backsplahes should be kept fairly neutral too – try to introduce texture instead of color into the backsplash. The more neutral and elegant the space is, the more potential buyers you will attract.

DON’T: use darker-color cabinetry which can make the space feel closed. While adding a strong color may suit your taste, it may not be to everybody’s liking. You want to attract as many potential buyers as possible, and while white may not be the most daring color for your cabinetry, it’s the most popular. 

An Open Layout

Designing your kitchen to have a sensible and open layout is pivotal to increasing property value when you’re renovating to sell. The trend is moving toward open-plan living and multifunctional spaces. 

DO: have a large open-plan space with a kitchen island if possible. Buyers often want to multi-task in the kitchen. They want to cook, have their kids do their homework and socialize in it.

DON’T: place your kitchen in a small and poky room, the kitchen is now often the hub of the house and buyers want to see a kitchen that is interactive and sociable.

The Great Room Evolves

Eight new residential design trends turned heads at the annual Best in American Living Awards (BALA), presented by the National Association of Home Builders (NAHB) at the 2012 International Builder’s Show. One of the most-buzzed-about was a changing approach to “the family triangle.” The term refers to the three activities and spaces that generally draw families together: cooking (kitchen), eating (dining room), and relaxation (living/family/great room). The latest approach creates spaces that link these activities, as a traditional great room would, while also allowing private nooks. 

The family triangle continues the movement away from formal, compartmentalized space toward more open living. One of the judges, Heather McCune, Marketing Director for Bassenian Lagoni Architects of Newport Beach, CA, said demand for such spaces is strong across all buyer profiles, in all regions of the country.


the-great-room-evolves.jpg

Photo: Bassenian Lagoni Architects

More than a Big Room

But the family triangle is more than just a big room. It modifies the conventional open floor plan by including “different areas for different tasks and levels of comfort,” says Amy Martino, principal of Building Site Synergy, an architectural firm in Media, PA. “It should be able to accommodate large groups, but should also feel comfortable if just one person is in the room.” For instances, eliminating the living room and adding a flex space or den near the kitchen and family room allows for privacy when needed, but let’s family members in different parts of the space easily interact with one another.

McCune isn’t surprised at this trend. In fact, she sees adaptable spaces as a sign of the times. “We’re looking to shrink the home’s overall footprint, while allocating space in the home so it lives bigger. It seem natural in a post-recessionary period.”

Emphasizing the Practical

To help the home live bigger, a plan that emphasizes the family triangle will eliminate spaces that aren’t needed and more practical touches to spaces that are. Case in point: don’t count on hallways sticking around. “The spaces that people never use are gone.” says McCune. 

What you’re more likely to see is a kitchen island with lots of convenient storage and an island sink that faces the living space. The expansive island provides useful workspace for one or more cooks, while also creating a “safe zone” that separates the cook from children and guests. When no one is cooking, the island can also serve as a place to study or work on a project. Incorporating varying counter heights makes the island comfortable for family members and guests of different ages, heights and levels of ability. 

A nearly universal element of the family triangle? “Some kind of kitchen command center,” says McCune. Often a small dedicated desk area works as a place for bill paying or where children can do homework.

Defining Spaces

One challenge when designing a family triangle revolves around how to create small pockets of relative privacy in the midst of all that space. According to Martino, designers use architectural elements like ceiling treatments, columns and softfits to create distinct zones for reading, working or simply relaxing, while also retaining the openness of the overall space. 

Lighting plays an extremely important role, too. Different levels of lighting with dimmers can accommodate different tasks and completely change the room’s ambience. Layered lighting – overhead, sconces, accent lighting, task lighting, and specialty lighting such as a chandelier or colorful pendant – can be adjusted, used separately, or as a group to create a sense of place within the space.