FREE DESIGNS AND ESTIMATES

8 Elements of Classic Kitchen Style

By: Rebekah Zaveloff

Many people are at a loss when it comes to defining their style. Some people know what they like but are afraid of getting the terms wrong, or they’re afraid of being pigeon-holed into one style when they feel like they’re in between a few different ones. The truth is, most spaces have elements of different styles and aren’t all one way. 

To sort all this out, join me on a tour of kitchen styles and sub-styles, from Classic to Modern, Industrial to Cottage, and lots in between. Today we’ll start with the most approachable of styles, classic style. 

Read more

Smart Investments in Kitchen Cabinetry — a Realtor’s Advice

By Tiffany Carboni

The kitchen is the most expensive room in the house to build. The national average cost of a kitchen remodel is $50,000, though the real cost can vary widely, depending on where you live, the scope of the project and the materials you choose. New cabinetry can take up much of that expense. Make the most of this big purchase by treating your new cabinets as an investment. 

Realtor Victoria Gangi offers insider tips on how to get the best return on your cabinet investment, even if you’re not moving in the foreseeable future.

Read more

New Kitchen: 7 Questions You Didn’t Know You’d Ask

Some of the questions you ask when planning a new kitchen are obvious, such as, “Do I want white cabinets or wood?” and “Do I want stainless steel appliances?”

But there are many design decisions that you might not even know to consider until the project is well underway. To help you avoid surprises and unfortunate mistakes, here are seven questions you should ask yourself before you begin your kitchen design.

Read more

CREATING ECO SUSTAINABILITY IN COUNTERTOP FABRICATION

Granite Countertop in Denver Kitchen

When it comes to construction of any kind, environmental concerns are more important than ever. This is why The Top Shop Inc (AC&F) partnering with VT Industries, is committed to providing sustainable products and using environmentally friendly manufacturing methods.

Our production facility located in Denver, Colorado works hard to keep emissions and waste to a minimum, conserve natural resources, and protect local ecosystems. This strategically located facility, allows The Top Shop Inc. (AC&F) to provide the shortest lead times available but more importantly, reduce harmful vehicle emissions that contribute to air pollution and ozone depletion.

Every post form countertop we offer is GREENGUARD Indoor Air Quality Certified®. The Top Shop Inc. (AC&F) partnering with VT Industries, is the first and only laminate countertop product to receive this low-emitting certification, ensuring our product will contribute to healthy indoor air and building occupant wellness.

With EQcountertops, The Top Shop Inc. (AC&F) takes the sustainability of our countertops to the next level. Manufactured using 100% pre-consumer recycled particleboard, water-based adhesives and GREENGUARD Certified laminate, EQcountertops meet multiple green building standards, including Leadership in Energy and Environmental Design (LEED®) and NAHB’s green building guidelines.

Best of all at The Top Shop Inc. (AC&F), we’re continually adapting our manufacturing techniques and providing innovative products to ensure environmental responsibility. All employees—from production to accounting—are involved and encouraged to find innovative ways to make our business efficient and effective.

10 Pair-Ups for Black in the Kitchen

Article by: Laura Gaskill

It can be cool and modern, elegant and traditional, or something in between — black in the kitchen may be having a moment, but this classic color isn’t going anywhere. As in other rooms, remember that a little bit of black can go a long way, so consider the size of your room and the amount of natural light before committing. From cabinetry and tilework to floors, here are 10 ideas for incorporating the deepest, darkest hue into your kitchen design.

1. Black and white striped tile + polished concrete. Give simple subway tiles a fresh treatment by alternating horizontal rows of black and white tile. Varying the width of the stripes makes the look more dynamic; stainless steel appliances and polished concrete counters add a sleek, modern note.

2. Black floors + warm gray walls. Black stained wood floors and white cabinetry are warmed up by “greige” walls, a cozier alternative to stark white. Dark floors paired with a lighter hues on the walls and ceiling can make a room feel taller. Bright window shades and stools, plus a large framed beach photograph, give this space a playful feel.

3. Bicolor black and white walls + oak counters. Can’t decide between black and white? Split the difference: Paint the lower half of the kitchen black and the upper half white for a creative look. In this kitchen a line was drawn around the room and everything below it — including the bottom portion of the upper cabinets — was painted black, and everything above it white.

4. Shiny black appliances + aqua cabinets + brass hardware. Black appliances and a black sink surround add a polished note to this pale aqua kitchen. The bright brass gooseneck faucet and hardware stand out like jewelry against the watery-hued cabinetry.

5. Black counters + chocolate backsplash.Who says black and brown don’t go together? On the contrary, sleek black counters paired with glossy chocolate brown subway tiles make for a rich combination. The rest of this kitchen was done in crisp white, which keeps the space feeling light and spacious.

6. Black counters + black grout + white tile. For such a simple, easy change, swapping out light grout in favor of dark makes a big impact — not to mention it’s easier to keep looking clean! Classic white subway tile installed in a herringbone pattern calls attention to the spaces between more than if it were laid in straight rows.

7. Black cabinets + black trim + dark stained wood floors. If your kitchen is part of a larger, open-plan space, deep, saturated color can make the space feel kitchen-like. In this room, dark stained floors, black cabinets and black trim are enhanced by sculptural Tom Dixon pendant lights and a Carrara-marble-topped island.

8. Black cabinets + white and wood. Black cabinetry paired with white counters is a clean, simple and modern look. Stylish pendant lights, plus a few details in white and wood — like the paint-dipped stools shown here — keep this combination from feeling too simple. 

9. Black lower cabinets + white subway tile + white floors. Increase the sense of space in a small kitchen by using black on lower cabinets, and forgo uppers in favor of open shelves installed on a glossy white subway tile wall. High-gloss finishes on cabinet fronts and tilework help maximize light.

10. Black cabinets + pops of color.Sometimes what you put on your counters and shelves is just as important as the material they are made of. Here, a handful of brightly hued accessories pops against jet-black counters and cabinets.

Big Ideas for Compact Kitchens

Article by: Sara Emslie

Even the smallest of kitchen spaces needs to deliver big when it comes to form and function. No matter how awkwardly shaped or compact your cooking space, design tricks can help make even tiny corners work hard and look good too. These kitchens offer ideas for getting more from less and giving a high-function space a clean, uncluttered appearance.

Use open storage as display. If your tiny kitchen is part of a larger open-plan space, consider an island with built-in open shelves. This will add storage and display space and help separate food prep, cooking and clean-up areas from those for other living functions. 

Use attractive tableware, accessories and cookbooks to create a pleasing display.

Store high (and seamlessly). A clever way to add storage in a tiny kitchen is to position it high up the wall. Installing storage above seating, such as a built-in bench, can be a particularly smart use of space. 

For a clean, contemporary feel, fit the cupboards with push latches, removing the need for a door handle and creating a seamless finish that gives the impression of more space. A ladder stored away — perhaps inside a bench seat — can be used to access high cupboards.

Custom build a pantry cupboard. Well-planned storage makes efficient use of space and can help keep your kitchen organized. Consider a custom all-in-one pantry cupboard if you’re designing a kitchen from scratch. Install custom storage baskets for shelves and rail bars and baskets for cupboard doors to make the most of the space inside. 

A cupboard pantry can be used to store everything from food to china and kitchen equipment. And when the doors are closed, it’s all neatly out of sight.

Integrate built-in appliances. Shop around for appliances that will work in compact spaces and consider integrating them into your kitchen design. The framework needed for integrated designs eats up a little more lateral space, but the result will be a neater look. 

Think laterally, too — dishwashers are available as pullout drawers and can be paired with a storage drawer with the same front for a fuss-free finish. Microwaves and ovens can be fitted into a bank of wall cupboards, freeing up counter space for other kitchen essentials.

Think industrial. Utilitarian styling is ideal for making the most of a compact kitchen. It echoes the kitchens of days gone by, and its robust aesthetic says it means business, despite being a tiny space. Look for subway tiles, industrial factory lighting and Shaker-style units that combine beauty with utility.

Squeeze in an eating space. Having a space for sitting and eating in a kitchen, no matter how small, doubles the room’s functionality, making it feel more substantial. 

A compact breakfast bar, for example, can be both a dining area and an additional work surface for food preparation. To save space, choose bar stools that can be tucked under the counter when not in use. Try giving this tiny tabletop a separate visual identity with bold accessories, such as bright artwork and standout lighting. 

A fold-out, wall-mounted table is another option for a small kitchen.

Highlight character with color. Flashes of vivid color are ideal for adding a wow factor to a tiny space. It might be small, but it can still have presence. 

Against a pure white background, neon shades really stand out, so use these to emphasize any design features that have character and style. Maximize the different sizes and configurations of drawer and cupboard fronts to create eye-catching color combinations and design appeal.

Stick to a restricted palette, though, and keep clutter stored so as not to overcrowd your little kitchen.

Go for top of the line. Being small on space doesn’t mean a kitchen can’t be big on style. Adopt a high-end approach for fixtures and hardware in an otherwise minimal space to give a compact kitchen a designer look. 

Smart handles, inset lighting, state-of-the-art integrated appliances, contemporary faucets and molded draining boards are all design features often found in larger, more expensive kitchen designs, but they can add a big style hit to a tiny kitchen too.

10 Countertop Mashups for the Kitchen

Article by: Katie Pegler

Mixing materials for kitchen countertops has many benefits. For one, you can save money by using a less expensive material for your perimeter countertops while splurging on something more luxurious for an island top. Plus, mixing materials is a great way to add visual interest to your kitchen and avoid the overabundance of one color or material. With that in mind, designers are pairing marble with walnut, granite with reclaimed wood, engineered quartz with maple butcher block and more to create diverse surfaces for working, eating and gathering.

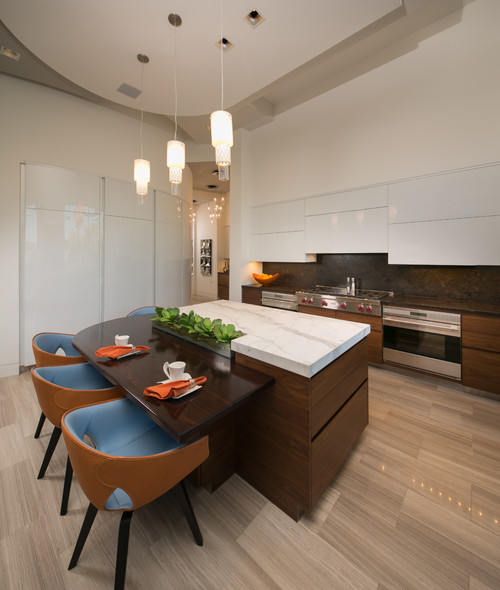
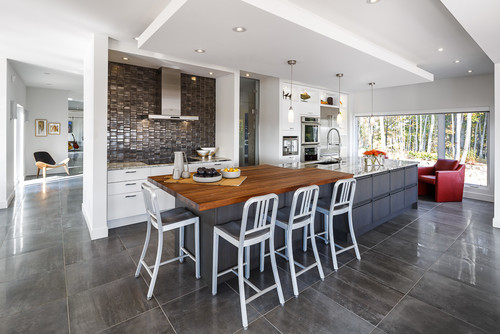
Marble Island With Wenge Bar

“Our overall design was form meets function throughout this kitchen design,” says Ashley Luberger, design associate at Osborne Cabinets and Millwork. “The island is the key focal point of this space, so we wanted to add interest combining heights and different materials to create a cohesive space.” 

Osborne designed and fabricated the island cabinets and wood top, made out of African wenge wood. “The wood has a really dark natural color along with a really tight grain pattern, creating a contemporary feel,” Luberger says. Collaborative Design Group chose the marble top.

The wood top was selected for the lower eating area because it is more durable than marble, which was used only on the island to avoid stain concerns. 

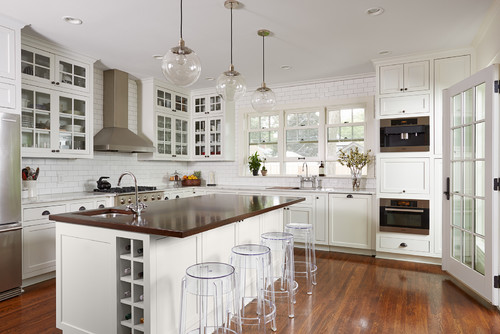
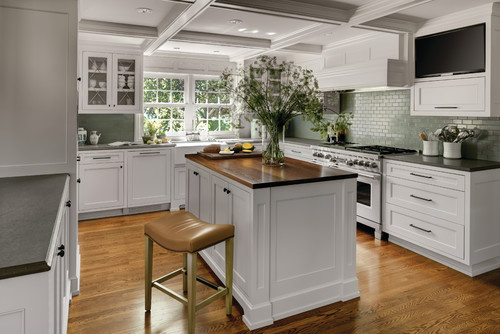
Marble Perimeter With Walnut Island

A white kitchen was a must for the owners of this Minneapolis home. However, both the husband and wife grew up in houses with wood countertops and were keen to incorporate wood. Nicole Bostman, owner and lead designer at Dezaar Interiors, found a happy medium by pairing a white marble countertop and oversize walnut island. “We wanted to introduce the warmth of wood to balance all the white, which can sometimes look a little cold and clinical,” Bostman says.

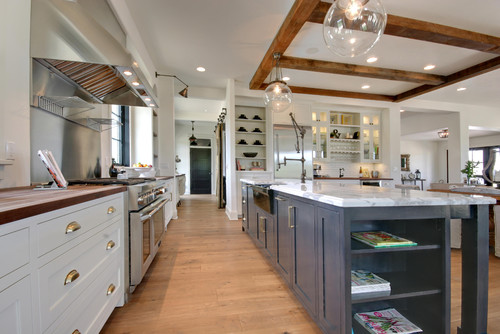
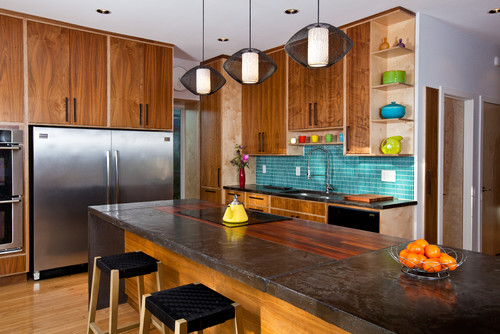
Walnut Countertops With Marble Island Top

In this Nunica, Michigan, kitchen by Meiste Homes, the perimeter countertops are oiled walnut, while the custom island is topped with a 10-foot slab of Arabescato marble with a built-up ogee edge. 

Be sure to follow proper maintenance routines for each material. Wood can chip and warp, especially in wet areas, such as near the sink. And marble can stain and chip. 

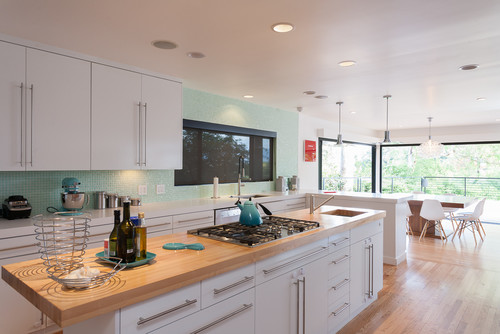
Quartz Perimeter With Maple Butcher Block Island

Before the remodel of this Los Angeles contemporary home, the owners had white marble countertops. Gabriel Abikasis, president of Kasis Construction, recommended engineered quartz as a durable alternative.

To add depth, texture and contrast to the white cabinets, Abikasis used 2-inch-thick maple butcher block in a clear satin finish for the island. 

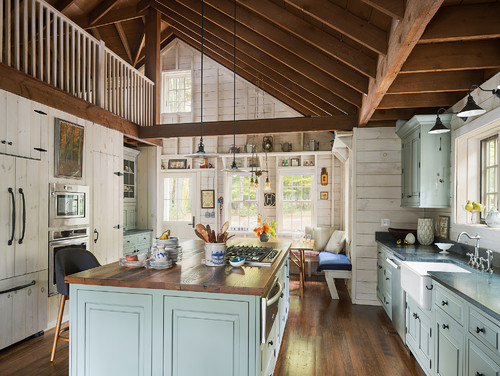
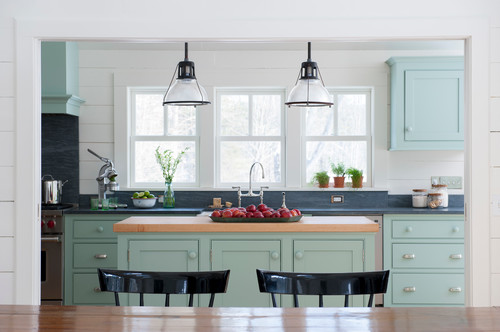
Granite Perimeter With Reclaimed-Wood Island

This design of this kitchen reflects the homeowners’ desire to retain the old elements of the 1930s cabin.The main countertop is Jet Mist honed granite, while the island has a reclaimed-wood top fabricated by Grothouse Lumber. The wood island is sealed and cannot be used for cutting directly on. “The contrasting wood counter warms up the kitchen and makes it feel more cabin-like than if everything was dark granite,” says Kelly Ennis, principal at Ennis Nehez

Photo by Colin Cadle Photography – Discover kitchen design ideas

Granite Island With Walnut Chopping Block Extension

Much thought was put into this kitchen, because it’s in the “forever home” of its owners, in Dartmouth, England. They wanted to make the most of the new space and were meticulous in defining their kitchen right down to listing what items each cabinet would need to store, so that Distinctive Living Kitchens could plan for the correct cabinet sizes and functionality.

The inspiration for the granite came from an existing granite countertop in the laundry room, which Distinctive Living Kitchens matched to the Shivakashi granite counters that are paired with the end-grain walnut chopping block island extension. 

Granite Island With Walnut Butcher Block Extension 

This Ottawa, Canada, home was built for a couple who wanted an environment conducive to entertaining large groups of family and friends, so a large, functional kitchen with good flow was key. “In addressing the functionality, I wanted to create a space that looked aesthetically balanced with functional and decorative elements,” says Nathan Kyle, senior interior designer at Astro Design Centre.

The island counters have silver wave granite surrounding the prep area mixed with walnut butcher block for the eating area. The inclusion of two materials was necessary to create the length that was required without having a seam in the countertop, and created a length that was ideal for entertaining. The butcher block also allows for a warmer touch on the area where people can rest elbows, versus a cold surface. 

“Using a two-toned kitchen allows for the back wall, which is utilitarian in nature, to stand on its own and juxtapose itself with a more detailed decorative island,” Kyle says. 

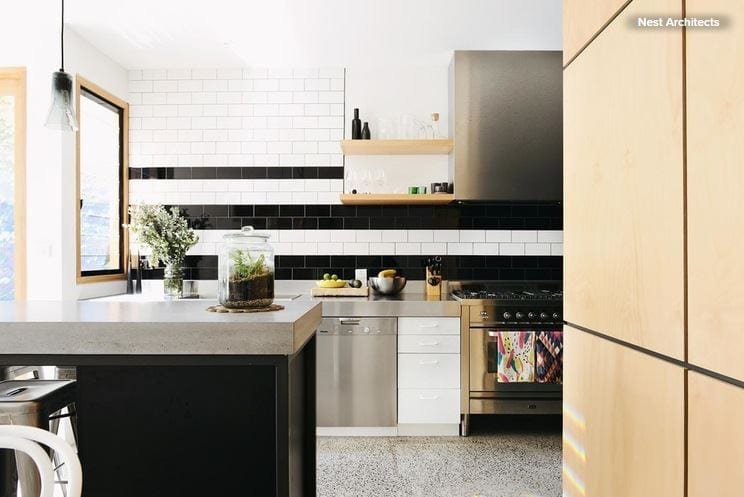
Concrete Island With Wood Inlay

For this contemporary Kansas City, Missouri, kitchen, Studiobuild blended poured concrete for the majority of the island and juxtaposed it with a wood inlay surrounding the cooktop on the same plane. Not only does this look have more visual interest, but a large island for eating and working eliminated the need for an eating nook.

Pietra Cardosa Stone Perimeter With Maple Island

For this center kitchen island, Brooks Custom used a 2-inch-thick premium wide-plank maple top. The light-colored wood contrasts with the dark Pietra Cardosa stone countertop along the perimeter of the kitchen. The seemingly simple finish on the island ties the modern farmhouse look together. 

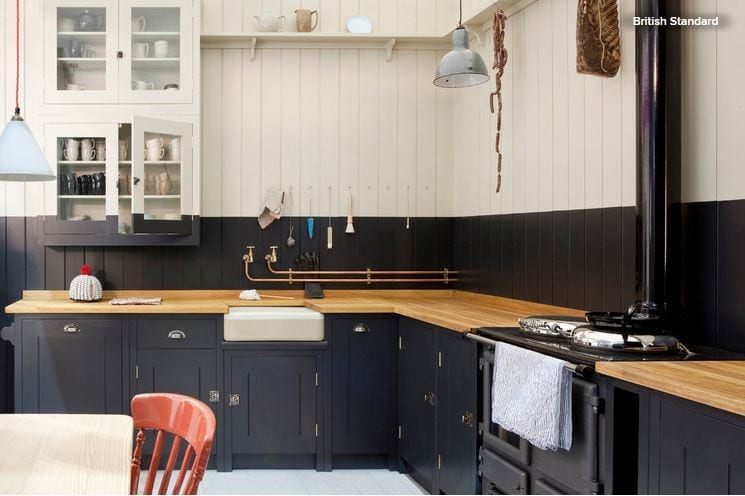
Basaltina Perimeter With Walnut Island

Here a walnut island surface warms the basaltina perimeter and helps add contrast to the white kitchen. It offers the perfect fusion of natural materials and lower maintenance. “There is always a balance to strike between durability offered by manufactured options and the beauty and soul of living materials,” says interior designer Joelle Nesen of Maison.

See a Complete Kitchen Remodel for $11,000

Article by: Mitchell Parker

Norma Rushton and her partner, Randy Dyke, really wanted a waterfront property in the Vancouver area but were quickly priced out of most places. When they lucked into a mobile home on the Stave River about an hour east of downtown Vancouver, they were thrilled at the great location right on the water at a good price. But that’s where their excitement ended. The home was in bad shape and needed major repairs.

BEFORE: Recently they started adding more storage and function to the original kitchen (shown here), which had been picked apart since it was built in 1970. For example, the backless cabinets had been cut up by previous owners to make room for a larger refrigerator and stove, leaving little storage. “The cabinets were starting to get useless,” Rushton says.

AFTER: Determined, Rushton, a high school theater teacher, spearheaded a complete gut and remodel, choosing all the materials, fixtures and appliances, while Dyke, a retired water taxi driver, did a lot of the work, including installing the drywall, molding, trim, backsplash (twice) and new window and patching the floor. The couple painted everything together. Professionals installed the cabinets and countertops. 

But best of all, the couple got discounted help from their contractor neighbor, Milan Vaclavik of Milan’s Home Renos, who took care of the plumbing, framing and electrical work at a friendly rate. 

Though the homeowners considered getting granite countertops, they ended up going with Formica instead. “Granite is too hard of a surface,” Rushton says. “I wanted something a little more forgiving.”

BEFORE: A bank of upper cabinets and a floor-to-ceiling cabinet made things a bit claustrophobic and blocked views between the kitchen and living room. “I wanted to be able to sit in the living room and see out the windows of the kitchen to the water,” Rushton says.

AFTER: They reduced the size of the upper cabinets and did away with the tall cabinet altogether, opening up the sightline between the two spaces. “Now you can actually chat with whoever’s in the kitchen,” Rushton says. 

The couple had a couple of remodeling disasters along the way. Rushton had found solid oak cabinets at a discounted price that she really liked, but when they arrived, they were the wrong model. With the renovation already under way, she had to make a tough decision and went with the different cabinets, which ended up throwing off all their measurements. 

The backsplash was another compromise. The first one that Rushton put up was “a horrible mistake,” she says. She had found peachy-taupey-colored porcelain tiles that looked great lying on the counter. But as soon as she installed them vertically on the wall, the angle of the light turned them green. A local tile guy informed her that artificial colors tend to do that and suggested a natural stone product instead. “It was either I live with it or let the money go,” she says. “I let it go and went and got marble tile instead.”

BEFORE: The washer and dryer were shoved into a storage closet in the kitchen, while an old cabinet did the work of storing bowls, platters and mail. 

AFTER: The homeowners replaced them with a stacking washer and dryer unit, an Ikea unit of sliding drawers for a pantry and a place for the vacuum cleaner. “It was all about getting what I need for putting things away,” Rushton says.

Sliding doors nicely seal off the laundry and pantry area, freeing up clutter near the pristine river view. 

Rushton says they budgeted about U.S.$8,000 but the actual cost came in at just over $11,000. 

Here’s some of the breakdown: 

Cabinets: $2,300
Cabinet handles: $170
Countertops: $675
Closet doors: $250
Washer, dryer, microwave: $2,000

Lighting: $335
New flooring (closet): $85
Wood: $85
Paint: $170
Backsplash: $335 
Sink: $250
Window: $60
Labor: $1,000

Ikea shelving: $300
Drywall, insulation, plumbing fixtures, electrical wiring, switches, plugs, power tools, screws and brackets, taxes and other miscellaneous expenses: around $3,200