FREE DESIGNS AND ESTIMATES

Your Guide to 6 Kitchen Island Styles

By Sam Ferris

There are plenty of reasons to include an island in your kitchen — extra storage, seating and workspace, for example. But there are also several reasons why you might want to choose one island shape and style over another. This guide to six popular kitchen island styles will help you determine which one is right for you.
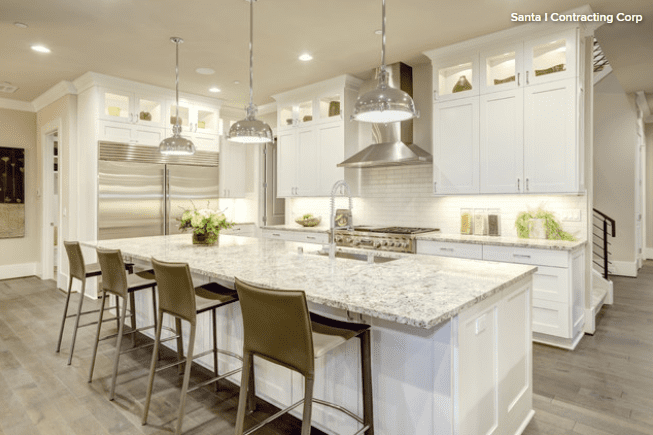
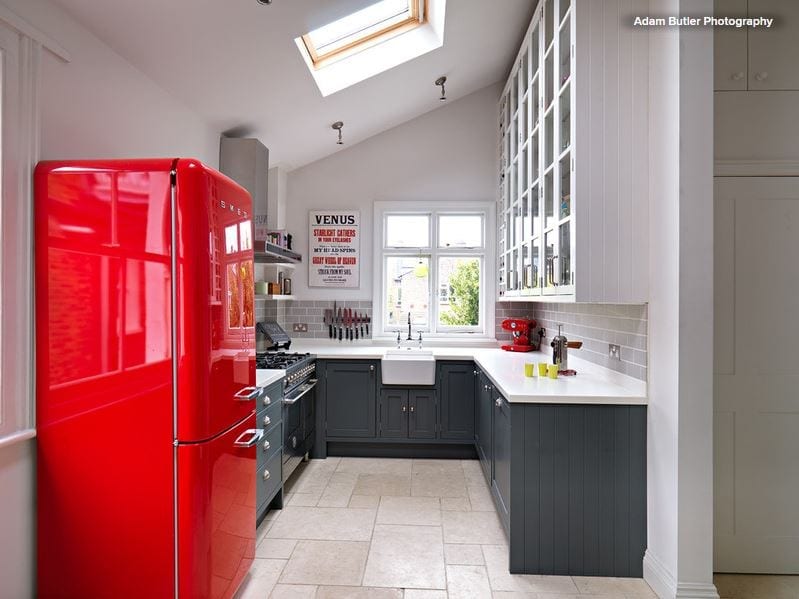
1. L-Shaped

This type of island can ebb and flow with the shape of your kitchen or fill in the blank space with more storage and prep space.

Pros. L-shaped islands tend to be large with correspondingly generous storage. Their sprawling design ensures that workspace isn’t crowded, a huge perk for households with avid chefs or more than one cook. You won’t have an issue finding room for bar-style seating. If you aren’t a fan of clean lines, L-shaped islands bring some intrigue to the table.

Cons. While L-shaped islands may be larger and provide more prep space, they aren’t exactly open-concept. They can chop up your kitchen design, which can hamper efficiency during meal prep. The shape may be too spread out for some homeowners, and it doesn’t always maximize storage space since corners tend to decrease accessibility.
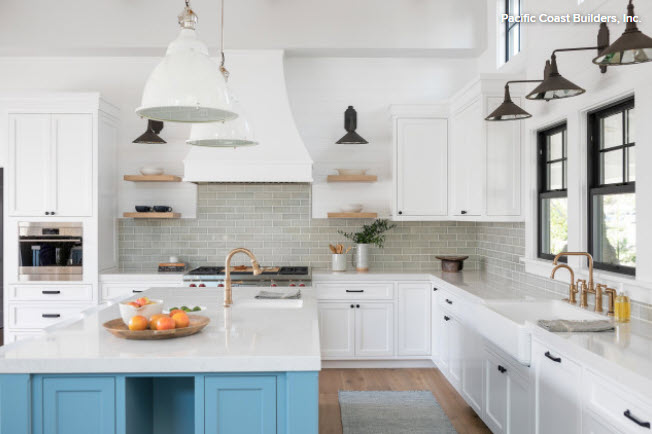
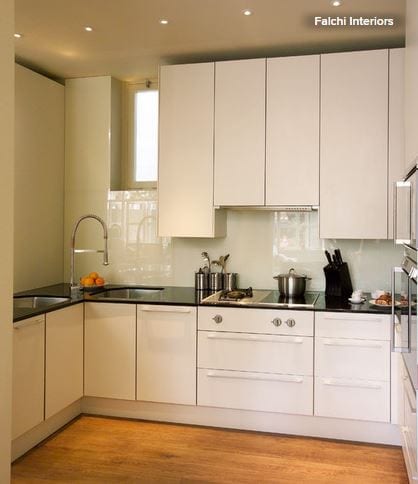
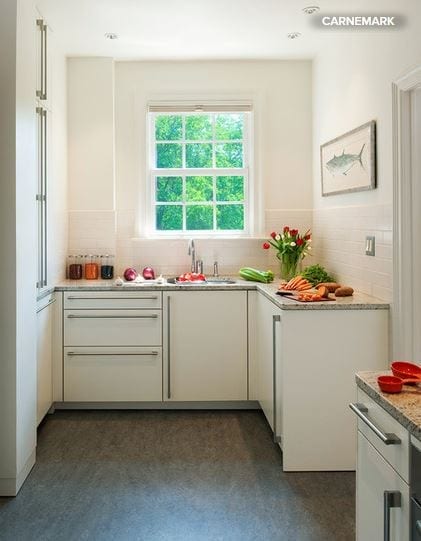
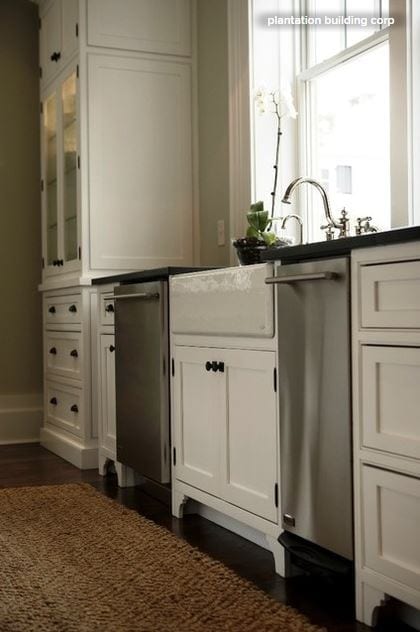
2. Galley

With fewer frills and a straightforward design, galley islands are built to be workhorses. They can be a good fit for any type of kitchen layout, assuming that there’s enough space for one.

Pros. Often considered the quintessential island design for open-concept kitchens, galley islands ensure that your space has flow and remains efficient with their streamlined design. They usually maximize storage space because there aren’t any corners or curves. Appliances and stored items are always accessible. The design also favors bar-style seating.

Cons. Yes, galley islands are simple and efficient, but some homeowners may think they’re boring. They certainly won’t wow the eye unless they’re larger than life or have an intricate exterior. Sometimes they’re too small to comfortably fit an appliance, which can create problems with your layout.

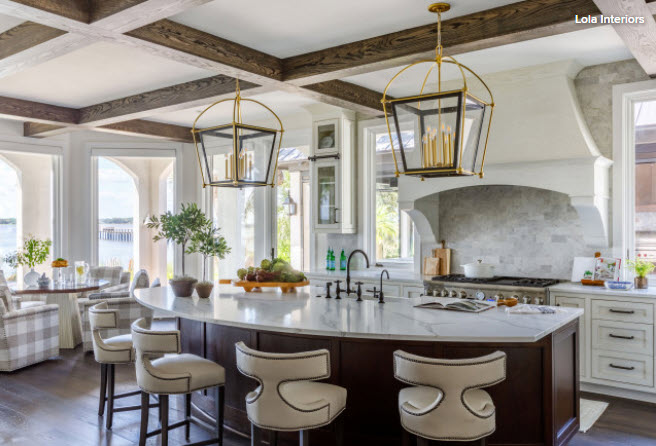
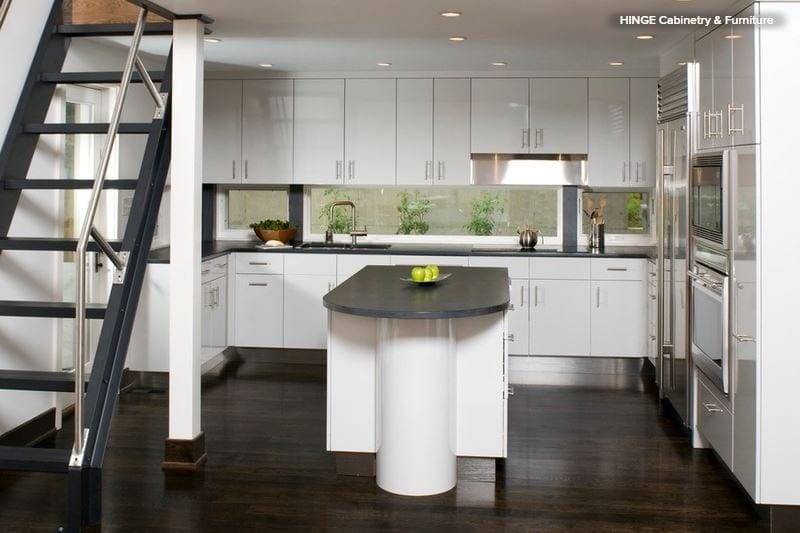
3. Circular or Curved

If you’re looking to add personality to your kitchen layout, a circular island may be for you. The design can go full circle or feature a half-moon.

Pros. Circular and curved islands add an interesting visual dynamic to kitchens. They’re a go-to option if you don’t want a run-of-the-mill island design. Like L-shaped islands, they’re packed with prep space. There’s more than enough room to operate during meal prep. Circular designs can incorporate expansive seating areas that leave enough room for four-plus guests to comfortably eat and socialize.

Cons. Prep and storage space aren’t always efficient with circular islands. Your counter is spread out and curved, which can limit the way you cook. Storage units can be harder to access in some designs (they may be underneath a countertop overhang, for instance). Plan on wasted storage space unless your cabinets are customized to include creative options.
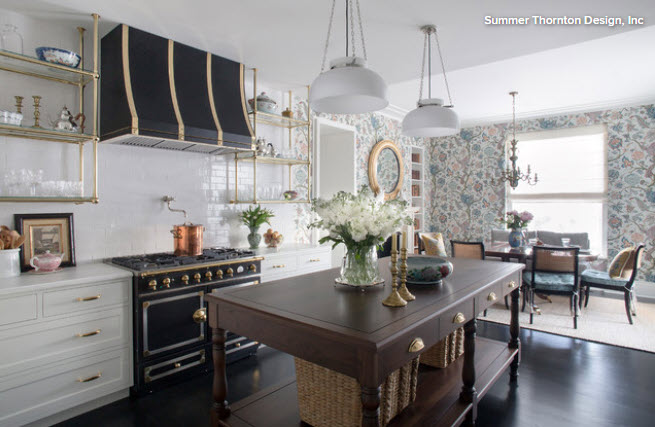
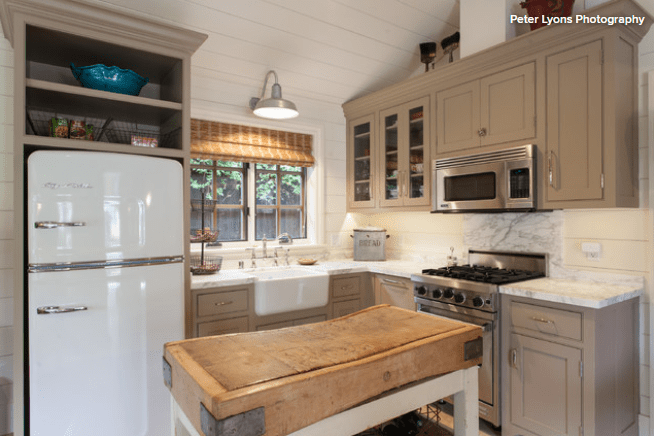
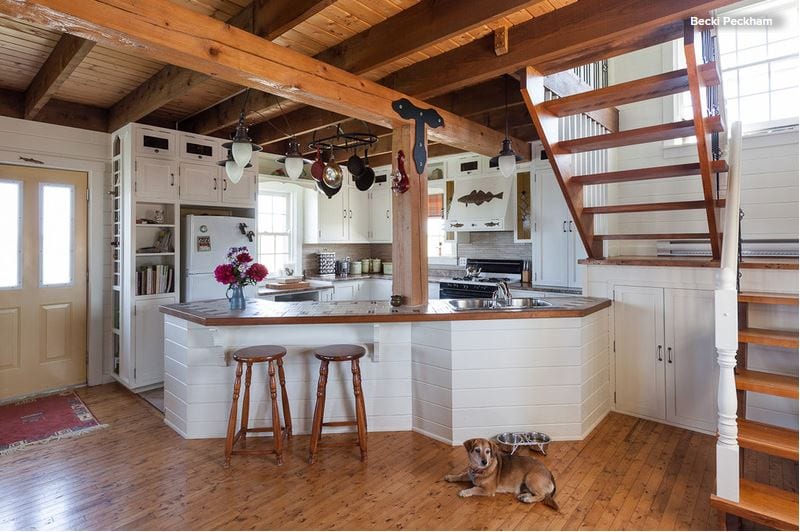
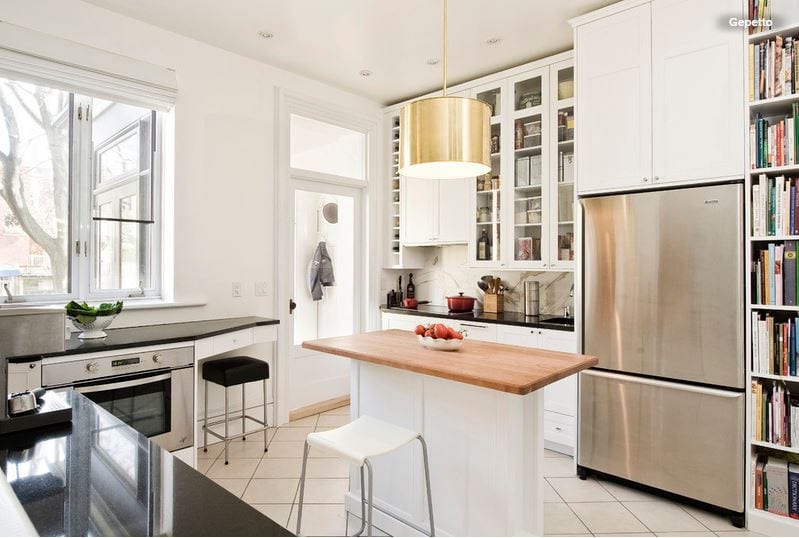
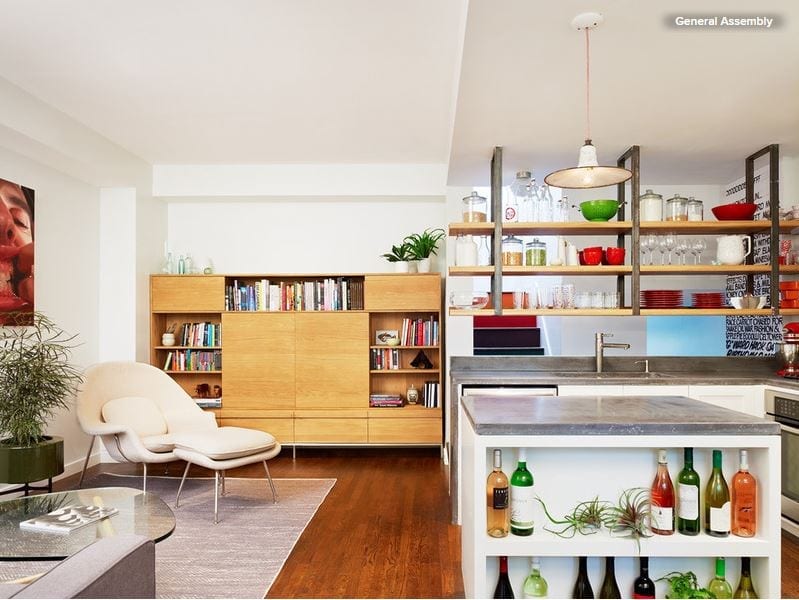
4. Furniture-Style

An unconventional choice, furniture islands can make your kitchen feel like your home’s premier hangout spot. Wide-ranging options can include a custom piece designed by a local carpenter and an antique table or chest of drawers.

Pros. It doesn’t matter if it’s custom-built, an age-old heirloom or store-bought — a furniture piece adds character to your kitchen. It’s one way to put your personal touch on your space and make it your own. The detail and decorative nature of the furniture will catch the eye of guests. These pieces usually aren’t bulky and fit seamlessly within your kitchen. Open-style designs can create fine displays for your decor.

Cons. Furniture pieces weren’t always built for storage, so that antique you had to have may not hold much of your cookware. There’s also the issue of durability. Older pieces may not last in the hustle and bustle of a modern kitchen. Wear and tear can take their toll. Furniture tops can’t take a beating the way granite or quartz can.
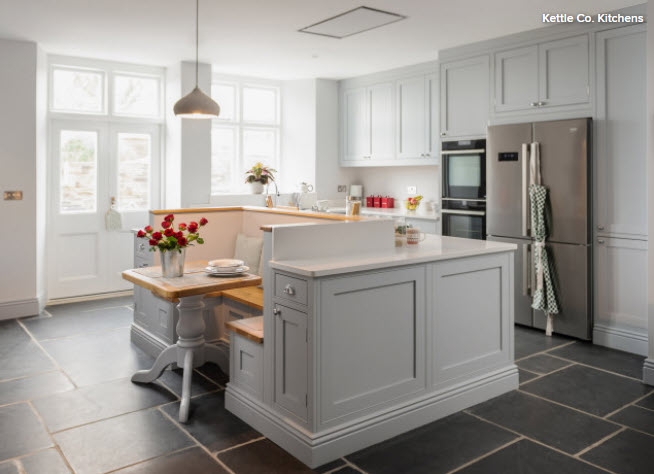
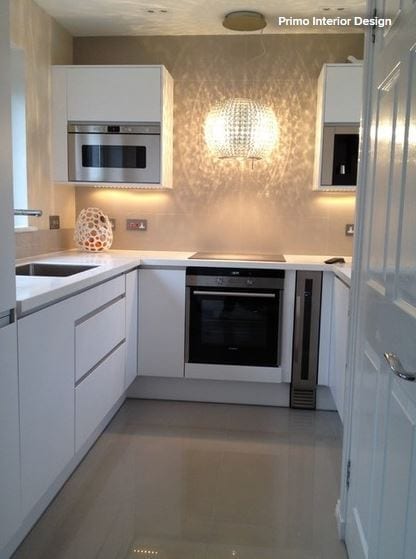
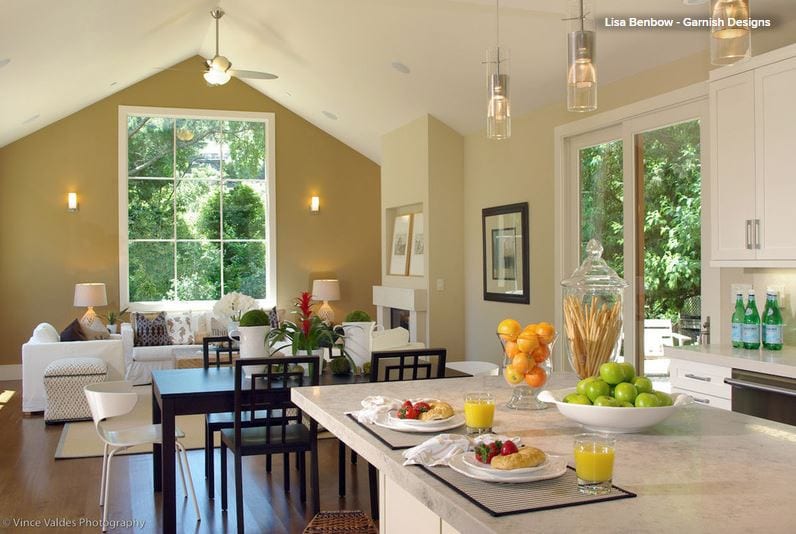
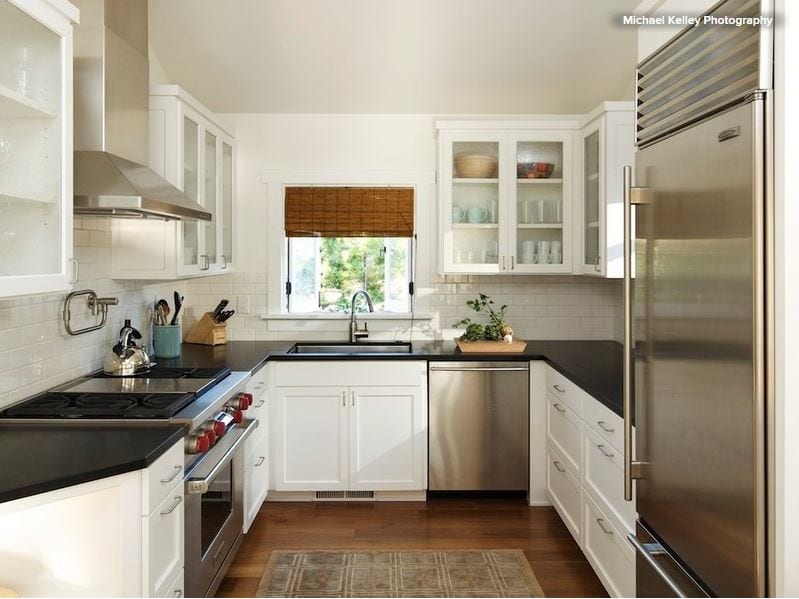
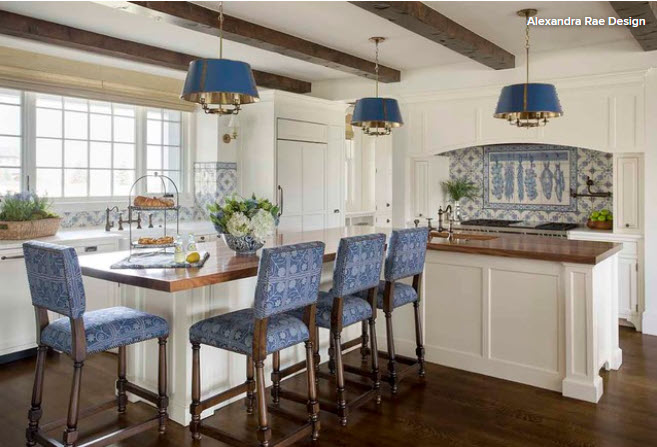
5. U-Shaped

U-shaped islands may be a chef’s dream. Three walls of cabinetry and appliances are enough to increase the efficiency of any kitchen.

Pros. Both highly functional and spacious, U-shaped islands are perhaps the largest and most accommodating. Extra storage space? Check. More workspace? You got it. Room for seating? There’s even that too. They can house more than one appliance if they’re big enough. You may not have to leave your island when you’re prepping food.

Cons. Their sheer size can also be the U-shaped islands’ biggest downfall. Some homeowners may find cooking and cleaning less efficient and may hate going the distance from one side to the other. These islands are bulky and can close off your kitchen from the rest of your home. The double corners will sacrifice accessible storage space unless they feature a Lazy Susan or swing-out device.
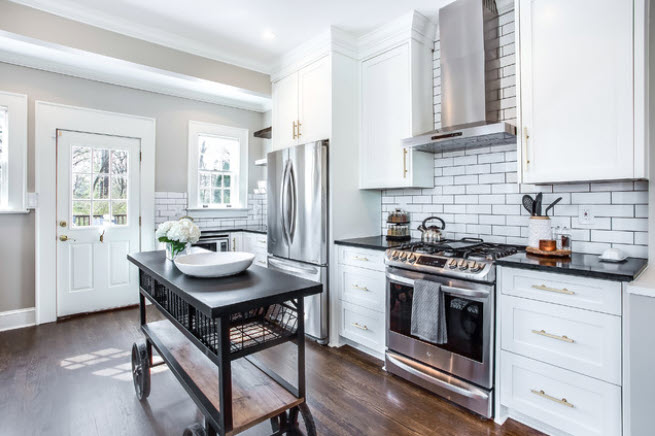
6. Rolling

No room for a built-in island? No problem. Rolling islands are a convenient alternative. You can whisk them around as you roam your kitchen and then tuck them neatly aside when you’re finished cooking.

Pros. Rolling islands are the crème de la crème in versatility. A godsend for smaller kitchens that lack adequate prep space, they can function as a worktop, food tray or a spare surface to place your ingredients. Depending on their size, they’re easy to stow and move. Best of all, they’re extremely affordable compared with cabinetry

Cons. Whipping up meals on wheels isn’t for everyone. Rolling islands are compact, which simply won’t work for some homeowners, even ones who are short on space. They can be a hassle to roll out during meals or to store. Bigger designs may be hard to move for some homeowners. They offer little to no storage.

The 5 Layers of a Well-Lit Kitchen

Develop a layered lighting plan to create a functional, adaptable and illuminated kitchen

By: David Warfel

When planning a lighting scheme for a client’s kitchen, I like to think about cake. Let me explain. On my birthday, a red velvet cake always comes my way, and it includes four layers with a cherry and icing on top. Just like that cake, a well-lit kitchen should also have four layers for different lighting needs. I call these light layers: “doing,” “knowing,” “feeling” and “changing.”

“Doing” lights help you perform manual tasks like prepping and cooking in the kitchen. “Knowing” lights help you navigate your way around a kitchen. “Feeling” lights make a kitchen feel inviting and comfortable. “Changing” lights help you adjust to the time of day and set a desired mood. And finally, the cherry and icing on top are all about adding decorative fixtures that let your personal style shine.

Layer 1: Lights for Doing

Your kitchen lighting scheme should start with creating a functional workspace. Adding lights where you need them the most, such as above countertops, sinks and cooktops, will let you perform manual tasks in a bright and safe atmosphere. We need light to see what we’re doing, especially when using sharp knives and high-temperature burners. You want to protect your fingers, so getting this layer right is important. In the kitchen above, note the strong lighting over the cooktop and the pendant lighting above the countertop. LED lights mounted underneath cabinets are also a great way to add functional lighting to your kitchen.

Layer 2: Lights for Knowing

Designers call it “ambient light,” but it is really just a layer of light to help us know where we are and where we are going. Recessed “can” down lights are a great option here because they light up the floor and bounce light off cabinet fronts to create a bright, well-lit space. Adding toe-kick lighting underneath cabinets and islands is also a great way to help prevent stubbing toes at night. Wall sconces are another way to provide the ambient lighting that can help you better navigate your kitchen.

Layer 3: Lights for Feeling

Showcase lights, also known as accent lights, all have one thing in common: They help a space feel more inviting and comfortable. Whether you use illuminated cabinets, chandeliers, sconces or pendants, showcase lights should be visible from wherever you stand or sit in the kitchen. That way you’ll get the benefit of this feel-good lighting at all times. Showcase lights might also help you perform functional tasks in the kitchen, but their main purpose is to draw attention and make a room feel complete.

Layer 4: Lights for Changing

As the sun changes location in the sky, lighting needs inside the kitchen change as well. During the day, natural light from windows might be all the lighting your kitchen requires. But at night, you’ll want your kitchen brighter for cooking meals and more dramatic for entertaining guests. Adding dimmers to your kitchen lighting is key for setting the mood.

Keep in mind that our eyes require more light as we age. So if you expect to stay in your home for awhile, you might want to add more lights than necessary now so you’ll have them later.

Cherry on Top: Decorative Light Fixtures

The fun part is choosing decorative fixtures that look at home in your kitchen, like this barn-style sconce in a country cottage. Think carefully about your personal style and kitchen design and then determine whether the light fixtures you choose can add any of the other layers of light needed.

Not keen on decorative fixtures? Choosing to minimize visible fixtures is also a valid style choice ideal for streamlined modern designs. You may want to highlight something else, like the backsplash in this kitchen lit by concealed LED strips.

8 Elements of Classic Kitchen Style

By: Rebekah Zaveloff

Many people are at a loss when it comes to defining their style. Some people know what they like but are afraid of getting the terms wrong, or they’re afraid of being pigeon-holed into one style when they feel like they’re in between a few different ones. The truth is, most spaces have elements of different styles and aren’t all one way. 

To sort all this out, join me on a tour of kitchen styles and sub-styles, from Classic to Modern, Industrial to Cottage, and lots in between. Today we’ll start with the most approachable of styles, classic style. 

Read more

10 Ideas to Make Your Outdoor Kitchen Sizzle

Article by: Laura Gaskill

Looking to spice up your grilling area this summer? Try adding one (or more) of these fun features, from grill-side seating to a vintage fridge. As long as the weather is fine, you may find yourself cooking outside more than in!

Pull up to the kitchen bar. Keep guests entertained with bar seats pulled up to the grill, where they can taste hot-off-the-fire nibbles. On its own, this is a great small-space solution; in a more expansive yard, supplement the grill-side seats with a larger dining table.

Get the cooking area under cover. A roof over the outdoor cooking area makes it easier for the grill master to keep grilling even when an unexpected rainstorm pops up. The L-shaped counter space with seating and adjacent dining area and fire pit make this a backyard guests will never want to leave.

Add a full-size fridge. If you cook outdoors a lot, a fridge and freezer can be a big help. Keep them stocked with ice, chilled drinks and the food you plan to grill, and that will free up space in your regular fridge. Of course, not just any fridge will do — a retro style in a cheerful color, like the Smeg shown here, will add to the style of your outdoor space.

Coordinate with color. Grills, decks and outdoor seating tend to be neutral and no-frills, so use a few pops of bold color to wake up your outdoor kitchen. Bright poppy red was used here in artwork, dishes, a chair and a sleek trash can.

Pack in useful details. It’s the little things that can make all the difference in your outdoor kitchen experience, so consider what would benefit you the most — better lighting, prep space, music? This Toronto rooftop kitchen includes a mini fridge, dish storage, speakers for an electronic device and night lighting.

Get cooking in the garden. Highlight your love of ultra-local ingredients with an outdoor kitchen located near your veggie garden. A brick surround that matches the low garden wall helps integrate the kitchen into the larger outdoor space.

Go modern. Concrete and rich wood are a modern minimalist pairing perfect for an urban environment. This outdoor kitchen is outfitted with a pizza oven — a worthy splurge if you love doing a weekly pizza night at home!

Double up on grills and storage. If you’re serious about barbecue, it could be worth your while to invest in two grills: one gas (for quick cooking) and one charcoal (for traditional smoky barbecue). A stainless steel gas grill and a “big green egg” perfect for slow cooking are connected by cabinetry in this Red Hook, Brooklyn, backyard. A sink and plenty of counter space make prepping food easy, and hidden storage below means you can keep outdoor cookware and tools close at hand.

Put a pergola over the grill. A garden structure like a pergola adds architectural interest to the outdoor kitchen and provides a place to attach sconce lighting. And while you wouldn’t want climbing plants dangling directly over the grill (hello fire hazard!), if your pergola is a safe distance from the heat, you could grow plants over it, giving the area a lush green touch.

Bring your indoor style out. The small-scale but well-crafted cabinetry in this outdoor kitchen echoes the interior style. Locating the grill within steps of the kitchen door makes it easy to carry ingredients outside and hot plates of food in, and a built-in bench seat provides a spot for guests to sit and chat while the food is being prepared.

How to Plan a Quintessentially English Country Kitchen

Article by: Lara Sargent

The super modern, stripped-back kitchen might look beautiful in the brochures — and if you’re disciplined enough to keep an all-white room spick-and-span, it can look fabulous in real life too. But if you crave something a little kinder to the chaos of daily life, you probably already have a soft spot for the quintessentially English country kitchen.

The relaxed livability of the painted cupboards, wooden countertops and stone slabs so familiar to this style exudes an irresistible warmth and charm, but there’s room for gentle updates, too. 

So harness the rustic look and make it work for the 21st-century home with these 10 country kitchen must-haves.

Read more

How to Bring the Beauty of Reclaimed Wood to the Bath

Article by: Becky Harris

Reclaimed wood has never been more popular, making its way from basement bars all the way up to elegant master bathrooms. Used on flooring, vanities, accent walls, mirror frames and even tub surrounds, this material adds warmth and rich texture. It’s also a wonderful contrast to the usual bathroom materials, such as glass, granite, marble and tile, which can leave a space feeling cold. “Reclaimed wood can be a once-in-a-lifetime gift,” says Nathan Daves, of Restoring TexasBut using it in a room full of potential splashes and steam takes some extra consideration. “At the end of the day, water is the evil kryptonite for wood,” Daves says. 

Daves also warns that not all reclaimed wood is created equal. A broken-up pallet will not withstand moisture at all like old-growth pine lumber harvested from a pre-1940s barn, for example. Other good choices for moisture resistance are reclaimed teak and old-growth cypress. Whichever wood you use and wherever you decide to use it, check out this list of ideas and advice to see if reclaimed wood will suit your bathroom.

1. Talk to your contractor about the realities of protecting the wood. No matter whether you treat the wood or not, protecting it from direct contact with water is a good idea. “If water is allowed to sit on the wood, it will eventually find its way in,” says Daves, who recommends sealing reclaimed wood used in a bathroom with an oil-based polyurethane. “Anything that coats the wood will eventually be infiltrated and begin breaking down, but woods with high rot resistance will last longer,” he says.

Using wood as an accent wall where it won’t be splashed by water is smart. Here, a high backsplash protects it from direct contact with water.

2. Realize that the material will swell and contract. In this Hollywood actor’s bungalow, salvaged wood mixed with crisp white and vintage accents give the room a modern eclectic look. The designer, Laura Schwartz-Muller, even had a simple matching tub shelf crafted to match. 

Schwartz-Muller understood the importance of treating the reclaimed wood as “a living, breathing thing,” as she describes it, one that will grow and contract. Thus, she used flexible silicone caulking and left a ⅛-inch gap between the sides of the tub and the walls, and beneath the tub top. She sealed the wood with three coats of fully cured polyurethane to protect it from moisture. 


3. Use reclaimed wood for contrast. It’s a wonderful way to add warmth to a modern bathroom. The rough-hewn quality of these reclaimed white oak timbers makes them standouts in this otherwise clean-lined space. 

There is extra maintenance involved, so you have to decide if the look is worth it to you. When these owners opted not to add a glass top to the counter, they were aware that they would need to do a little light sanding and add a new satin-finish polyurethane coat on their countertop every few years. 

Tip: The designers at Burns and Beyerl Architects recommend using reclaimed wood as a countertop in adult bathrooms as opposed to those for kids, as kids are less likely to mop up any splashes and little puddles they might make when using the sink. 

4. Add a different countertop atop a reclaimed wood base. If you’re turned off by the extra maintenance required by a wood counter, this is a good alternative. In this elegant bath, an open vanity base constructed from old barn wood adds a striking material to the textural palette. The designers at Beinfield Architecture treated it with a clear wood sealer. 

Using a fan when you’re steaming up the bathroom is another way to help keep moisture away from your reclaimed wood.

5. Add more than one reclaimed wood accent. Here the vanity counter and mirror create three long horizontal lines of dark rustic reclaimed wood. 

In fact, reclaimed wood is an element these homeowners used throughout their farmhouse, and it ties the rooms to one another. 

6. Consider teak. Teak is one of the most rot-resistant wood species out there, which is why these teak boards surrounding the tub originally were used on the deck of the USS North Carolina battleship. The coloring and knots make the bathtub a focal point in the room.

7. Highlight your home’s history by harvesting wood during the demolition phase and upcycling it in the renovations. In this New Orleans bathroom, interior designer Nomita Joshi-Gupta of Spruce used bargeboards that were original to the house. These bargeboards are at home with water; they are lumber recycled from cargo barges that floated goods down the Mississippi River and were then broken up upon arrival. It was a common construction material in Creole architecture historically. “When we gutted the house, we found bargeboard, and we decided to reuse it in many portions of the house,” she says.

The design team took the best pieces and installed them like paneling, then sealed it with polyurethane. “It is a beautiful texture, and it was nice to reuse and reclaim the home’s own history,” Joshi-Gupta says.

It’s only fitting that this piece of cedar in this floating house in Seattle serves as a unique shower bench, because it was part of an old log float. As it had floated on the water for many years before, the client decided sealing it wasn’t necessary. 

When remodeling his 1902 foursquare home, architect Geoff Prentiss ripped out plaster and preserved the 113-year-old fir lath beneath it. “The lath, usually between 24 and 48 inches in length, was stained in part, which I liked, but also had lots of tiny nails and bunches of sand in it, which was not so good,” Prentiss says. He pulled out the nails, shook the pieces and then very lightly sanded the rough-sawn surface. After installing it on the walls, he used a clear sealer. “There has been no issue in the wood absorbing water, even as the backsplash of the sink,” he says.

8. Create something artful. This beautiful wall is a patchwork of reclaimed wood pieces made by local Sandpoint, Idaho, artist Rob Payne.

9. Combine reclaimed wood with soapstone countertops. The combination of the sanded-down white paint on the reclaimed-wood base and the veins in the countertop tie the two pieces of this vanity together in a unique way. A long trough sink and a frameless mirror create a clean look.

10. Pair reclaimed wood with unlacquered brass fixtures and hardware. The way the material patinates works well with the rustic look of reclaimed wood. 

On this vanity, Studio Marler used recycled wood for the doors and drawer fronts. Surprisingly modern storage solutions hide behind the vintage-looking facade.

11. Use reclaimed wood in a powder room. If the thought of steam from the shower, splashes from daily face washing and toothbrushing, or keeping up a wood countertop has put you off, consider using it in the powder room. 

In this contemporary barn-like home, the main floor’s powder room has a unique reclaimed-wood and Plexiglas surround that glows like a lantern. The architects specified that the Plexiglas be sanded to give it a frosted look. 

Smart Ways to Make the Most of a Compact Kitchen

Article by: Joanna Simmons

We might all dream of a huge family kitchen, but most of us have to make do with something smaller. That said, whatever the size of our kitchen, the demands we place on it tend to be the same. We want it to function well for preparing and cooking meals. We might also like to be able to sit and eat in there, even if just perched at a breakfast bar. And we need space for a lot of different objects, from chunky appliances to silverware, dishes and food. The good news is, with some clever planning and great design, it is possible to have all these functions in one tiny space, as these inspiring spaces demonstrate.

Use every nook and cranny. It sounds obvious, but where space is tight, it’s essential to make use of all of it. This might mean commissioning custom units. Shelves or cupboards designed for your space, rather than bought off the shelf, can exploit even the most awkward corners or weirdly angled rooflines. Luckily, since the number of units you will be able to fit is limited by the small size of the room, a custom design often will be reasonably economical, too.

Enjoy a little rack n’ rail. Wall cupboards can eat into the space in a very small kitchen, but you can still make any wall work for you by adding racks, rails and slim shelves. These can hold things like saucepans, strung up on S hooks, mugs and pots holding cutlery, and even utensils. Covering the wall in blackboard paint helps it to multitask even more, as a place where you could write shopping lists and messages.

Make it streamlined. Chunky and mismatched pieces would eat into the space and make a tiny kitchen feel cluttered. Instead, opt for units with a minimalist look and, as here, a countertop that flows over all the base units and even extends to become a breakfast bar. The minimalist metal legs seen here keep sight lines open. This kitchen is flooded with natural light, so the color on the unit doors invigorates the space without encroaching on it.

Find another home for laundry appliances. It’s not uncommon to find washing machines and dryers installed in the kitchen, but, when space is limited, it’s a good idea to find an alternative home for them. A nook under some stairs can be a good place. Or consider putting a dryer — and perhaps a freezer — in the garage, if you have one.

Choose clever details. There are heaps of clever space-saving elements that can be built into a new kitchen, so if you’re starting from scratch, look for things like slim spice jar storage, knife drawers,toe-kick drawers and integrated chopping boards that can be slid over a sink or pulled out from the wall.

Try freestanding pieces. Freestanding furniture has its benefits in a small kitchen too. If you take the view that where room is tight, it’s important to make every item you place in it shine, then suddenly there is a logic to not building everything in. A freestanding piece containing an oven, sink and cupboards, like this one, looks like a beautiful piece of furniture that fits elegantly into the space.

Raise the ceiling. Rethinking the dimensions of the room and having some architectural work done can make a huge difference to a small kitchen. If yours is in a single-story space, raising the ceiling to expose a sloping roofline would add a huge sense of light and airiness. It also would offer the opportunity to install skylights, which pull in more light than vertical windows. Plus it would create a tall wall against which you can fit cupboards or shelves for maximum storage.

Build up to the ceiling. Floor space may be limited, but vertical space is often the same in a tiny kitchen as in a huge one. So make the most of it by building units that stretch right up to the ceiling — or just nearly. A small gap above tall cabinets can offer just enough breathing room to help keep the room from feeling cramped. Keep infrequently used items on the upper shelves and try using sleek handle-less doors, so the units look streamlined and seamless and don’t dominate the room.

Integrate appliances. You may yearn for a huge, freestanding range complete with five burners, but a small-scale kitchen is not the place to install one. Instead, integrate your appliances for a more streamlined look and a space-savvy solution. Building the microwave into a cupboard will free up countertop space, and why not go for a boiling-water tap to dispense with the need for a kettle?

Work in a portable mini island. In addition to built-in units, a small, movable butcher’s block with shelves, like this one, can prove incredibly useful. It would take up very little room while supplying additional storage and prep space. It would also create the relaxed, freestanding look you may have been craving but thought you couldn’t pull off in a small kitchen.

Open vs. Closed Kitchens — Which Style Works Best for You?

Article by: Vanessa Brunner

For centuries the kitchen was strictly a workspace. Often tucked in the back of the house, it had room for just the bare essentials. But a peek at many new kitchens today reveals a very different approach: the open-concept kitchen at the heart of the home. 

“The kitchen was really a closed-off spot for a long time,” says John Petrie, president-elect of the National Kitchen & Bath Association. “Now people want the kitchen to be an active part of the family home.” Although open-concept kitchens are by far the more popular choice today, some homeowners are embracing elements of the past — namely a separate, more closed-off layout. Could we be shifting back to the kitchens of yesteryear? 

We asked three kitchen experts for their thoughts on the two kitchen styles, and how you can decide which one is right for you.

How the Walls Came Down

Twenty years ago the term “cocooning” arose in the home design world. Home life shifted as people spent more time at home. “Home was a safe place, a refuge and where you wanted to be,” says Petrie.

The desire for a cocoon fueled the open-concept kitchen, allowing homeowners to spend more time with family and friends while cooking and cleaning. “It also showcased a shift to a more casual lifestyle,” says Andrea Dixon of Fiddlehead Design Group. “People weren’t afraid to expose reality — i.e., a messy kitchen.” 

“When the walls came down, the kitchen became an integral part of the home,” says Petrie. Kitchens soon became the center of the house — the room that everything else revolved around. 

Today this layout has become the go-to kitchen style, particularly for families. The combined layout allows for optimum multitasking — parents can prepare dinner, watch the news and help with homework at the same time. “I’m a huge open-concept-kitchen fan,” says Anthony Carrino of Brunelleschi Construction. “I find that the benefits far outweigh those of throwing the kitchen into another room. Ninety-nine percent of our clients ask for an open-concept kitchen.”

The Case for a Closed Kitchen

The kitchen is already the most expensive room in the house to remodel, and turning a closed kitchen into an open plan can add to the cost. Tearing down walls means dealing with plumbing, electrical and structural work on a huge scale. Sometimes the added expense means compromising in other areas. 

For homeowners who’d rather invest in other parts of their kitchen — appliances, materials or cabinetry — reworking the layout may not be worth it. “You have to think about what’s best for you,” says Petrie. When it comes to allocating your kitchen budget, which is more important, he asks, “an efficient, functional kitchen with better appliances? Or an open layout that connects to the rest of your home?”

While most of Dixon’s clients ask for open-concept kitchens, some prefer a closed-off space. “There will always be some people who are uncomfortable with letting guests see their ‘unmentionables,'” she says. “It’s definitely a more formal layout, but it ultimately comes down to personal preference.” 

If you want to leave your smells and mess behind when serving meals, a closed layout could be for you.


“You can get creative with a closed kitchen, too,” says Carrino. If space allows, a small booth, fold-down table or rolling bar can make a closed kitchen more of a social space.

Cons of a Closed Layout

Of course, a closed-off kitchen’s isolation also can be its main downfall. This layout doesn’t allow for direct access from the kitchen to the dining table, or vice versa. And it’s difficult to interact with friends and family while whipping up meals, since most of the room is reserved for the work triangle.

Choosing What’s Right for You

There’s no set formula that can tell you which kitchen layout will work better in your home. Part of having a conversation with a designer is trying to figure out what’s best for you. Start with a list of needs and wants, and go from there. “You’ve got to consider the way you live in your home and the way you use your home,” says Carrino. “How do you use your kitchen? How do you foresee using your new kitchen?” 

Everyone’s needs are different, so don’t let yourself sway with trends. “A family with kids that need supervision might decide to do an open-concept plan with a large multifunctional island,” says Dixon. “But a couple who loves to entertain might opt for a closed-concept space so they can prep courses ahead of time and not spoil the surprise. It totally depends on your lifestyle.” 

Get More From Your Kitchen Island

Article by:

Many kitchen islands open directly into another room. If you don’t require seating on that other side of your island, it’s a great opportunity to make the island serve purposes other than cooking and eating. When planning for an island, consider how it can be used to your advantage, whether it’s incorporating additional display space, extra storage or even strategically separating — or connecting — other spaces. Here’s how you can make your island work harder for you.

Get More Display and Storage

These open shelves wrap around the island to create display space on two sides. This makes for a much more eye-catching addition in an open floor plan. Can you imagine staring at solid planes of material here? Meanwhile, a small countertop at the opposite end still accommodates some island seating. 

Although this island also has shelves below, the real eye catcher is the ceiling-hung shelves, which create a bright, casual cookware display. What a visual feast for diners! 

Where seating is not required, think about incorporating bookshelves along the length of your island — perfect for all those cookbooks. 

Full-height cabinets block kitchen messes, provide storage and hold a TV here. 

Get a Divider or Transition

A simple, narrow dividing wall, which seemingly arises from the island, partially hides the cooking area and creates a stunning art wall. Notice how the sculpture niche is finished to match the cabinetry, creating the transition from kitchen to the living-dining area. 

This island does double duty with a working kitchen side and a buffet dining side, but it doesn’t stop there: The beautifully detailed end wall hides any mess and creates a lovely focal point. 

In this very open space, the island ends in a fabulous display area that looks like furniture. This concept blurs the line between cooking and living areas. 

Want to hide your dirty dishes but still converse with the guests? Use meticulously detailed cabinetry as a horizontal backdrop to your dining area — much more interesting than drywall. A narrow continuation of the countertop even serves as a buffet space. 

In the same space seen from the kitchen side, small cabinets actually form the top of the dining “wall” and provide storage — bonus! 

Get Table Seating

In this kitchen a working island is paired with a built-in banquette, making an attractive, handy spot for dining. This would work equally well with a rectangular island. 

Ease a Level Change

Many homes have a step or two from the kitchen to a living area, typically with a railing of some sort. Why not create a casual dining area as a buffer between the two instead, utilizing some great cabinetry?

Key Measurements to Help You Design Your Kitchen

Article by:

Whether you are moving into an existing kitchen, remodeling the one you have or building a new one, understanding a few key measurements and organizational guidelines can help your culinary life run more smoothly. 

Kitchens provide storage for your food and cookware, give you room for prep and cleanup, and of course also provide a place where you can cook and bake. When it’s thoughtfully arranged, these functions operate logically, making work in your kitchen a better experience. Here’s how to get the ideal setup.

Ideally, refrigeration and dry-goods storage should be located nearest to the kitchen’s entry point. The cooking area should be located toward the dining spaces, and the sink is best positioned between those two functions. This creates what’s called a work triangle. The best work triangle is less than 21 linear feet (6.4 meters). Work triangles that exceed 26 feet (7.9 meters) make moving from one function to another inefficient in most cases.

This cutaway plan illustrates arrangements and dimensions for a modest-size kitchen. Note that the preparation area is split between the island with the sink and the corner of the kitchen. The work triangle is compact. There will always be a few tradeoffs in any space. 

Let’s take a look at the three main functions of a kitchen:

1. Storage
2. Preparation
3. Cooking

Everyone has personal preferences for what works best, so consider this a guide and not a rulebook.


Storage. As noted, designers recommend putting refrigeration and dry-goods storage at the kitchen entry point. Putting your pantry on one side and a countertop that’s 15 to 24 inches (38 to 61 centimeters) on the other is a good idea. This will allow you to easily set down items that have been taken out of the freezer and refrigerator.

The pantry can hold dry goods plus brooms and supplies like paper towels. Use drawers in this area to hold plastic bags, foil and anything that can contain food to be stored. For the cabinets in this area, you will want to have mixing bowls, cake pans, measuring utensils and any other items that aid in assembling meals.

Preparation. Ideally, prep and cleaning space is best located around the sink. Within these areas will be everyday glasses and dishes, along with trash receptacles and the dishwasher. Allow 18 to 36 inches (45 to 92 centimeters) of countertop space on one or both sides of your sink.

Preparation areas are best kept clear of other items, since you will always be taking out bowls, plates and utensils there. Allow at least 36 inches (92 centimeters) of uncluttered countertop space for preparation in a small kitchen. Larger kitchens will have much more. This is one reason that islands are so popular. They provide broad and well-lit surfaces on which to perform the majority of kitchen tasks.

Cooking. The cooking centers should be arranged around the range, cooktop and wall ovens. Place pots, frying pans and baking sheets in the vicinity around your burners and ovens. It is a good idea to place small appliances such as toasters and coffeemakers in this area also, as it will leave your preparation areas unobstructed.

Allow 21 to 36 inches (53 to 92 centimeters) of countertop on either side of your cooktop. If possible, place wall ovens with a free countertop immediately next to them so that you can set down hot food immediately. Place seasonings, breadboards and potholders in nearby drawers and cupboards. Keep serveware toward the dining area.

Recommended Dimensions of Kitchen Elements

The dimensions of all the pieces in your kitchen are important to get right to make the best use of your space. A common refrigerator width is slightly less than 36 inches (92 centimeters). The problem is often the depth. In recent years some manufacturers have designed them to be much deeper than a 24-inch (61-centimeter) base cabinet. You can still buy shallower freestanding refrigerators, but you have to pay close attention to the dimensions listed in its specifications to be certain. The other option is built-in configurations, but they are significantly more expensive. 

Look for a depth of 30 inches (76 centimeters) or less, excluding handles, unless you can design your kitchen space to accept a deeper unit. Another thing to consider is the swing of the refrigerator door. Always examine the swing direction to see if it will meet an obstruction.


Here you can see how the height of the cabinets plays an important part in the configuration. Upper cabinets are normally positioned at 18 inches (46 centimeters) above the countertop and are 30 to 42 inches (76 to 107 centimeters) in height. Consider that your average maximum reach over and into an upper cabinet is 70 to 80 inches (178 to 203 centimeters) above the floor. Cabinets set at above 7 feet will likely need to be accessed with a step ladder. Cabinets above 8 feet are not practical for the majority of people; however, they may serve as storage for seasonal or decorative items, to be reached with step stools and ladders. 

The standard dimensions for base cabinets are 24 inches (61 centimeters) deep and 36 inches (92 centimeters) high. In general people are getting taller, so some homeowners are bumping up the counter height to 38 inches (97 centimeters).


Another important dimension to consider is the distance between cabinets. Entry points can be as little as 36 inches (92 centimeters) when there is a cabinet on only one side. Stay at least 42 inches (107 centimeters) from the face of a cabinet to the one on the other side; 48 inches (122 centimeters) is even better, but going beyond 60 inches (152 centimeters) is too wide in most cases. However, if it is a U-shaped kitchen, you could get away with up to 96 inches (244 centimeters).