What passion drives your desires in the #kitchen? Big #countertops? Wide #pantrys? Or maybe something that slides…
What passion drives your desires in the #kitchen? Big #countertops? Wide #pantrys? Or maybe something that slides…
Article by: Becky Harris
White kitchens have reigned for several years now, but black kitchens are gaining ground. They can add a sleek touch, put the focus on a view and contrast materials like nobody’s business. Whether it’s used in an industrial space in Brooklyn, a fashionable apartment in Australia, a villa surrounded by forest in Sweden or a library-turned-home in Oregon, there are good arguments for going dark in the kitchen in all kinds of homes.
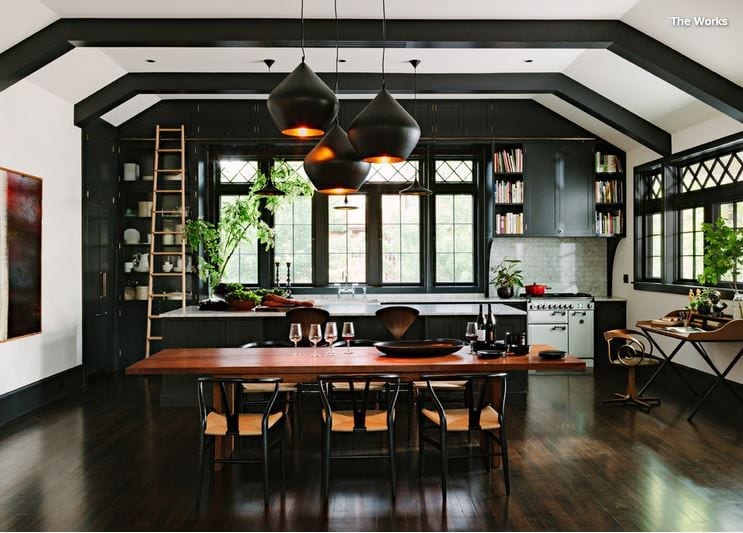
1. In this Oregon library-turned-home, the interior designers at Jessica Helgerson Interior Design let the kitchen recede into the background and put the focus on the fantastic windows, which were painstakingly replicated from the originals. Black was used on the trim and built-ins throughout the open plan. Between the open shelves full of cookbooks and the rolling ladder, one can see the library spirit is still alive and well in the home.
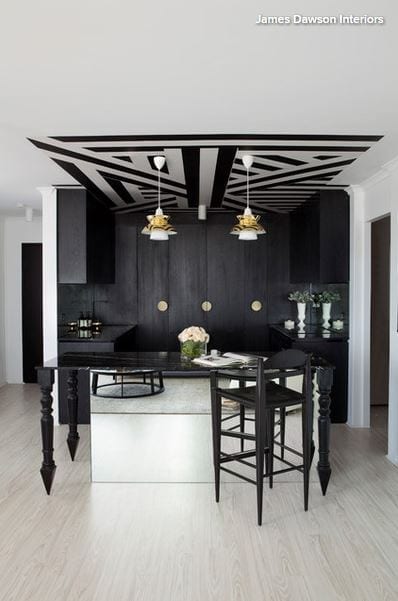
2. In this flawlessly chic Miami, Queensland, Australia, apartment, interior designer James Dawson had the freedom to go graphic. When facing in the opposite direction from the view here, you have a full view of a marina. When facing the kitchen, the eye goes up to an op-art “wallpaper” treatment on the ceiling. (Dawson drew the pattern, then had the wallpaper crew cut and apply the shapes.)
Sleek black wood-veneer cabinets and black marble countertops keep a streamlined look, while mirrored backsplashes on either side bounce the light around. Using the black created a strong contrast that doesn’t compete with the view.
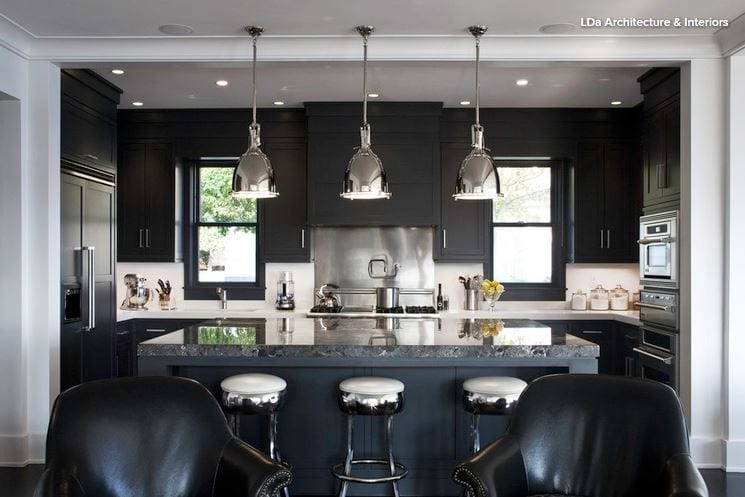
3. This black kitchen also opens to much lighter rooms with coastal views, so it recedes into the background in a sleek, sophisticated way. The designers at LDa Architecture & Interiors were inspired by the rocky Massachusetts coastline right outside the home when choosing the countertop. This large slab creates a stunning middle ground between the black and white.
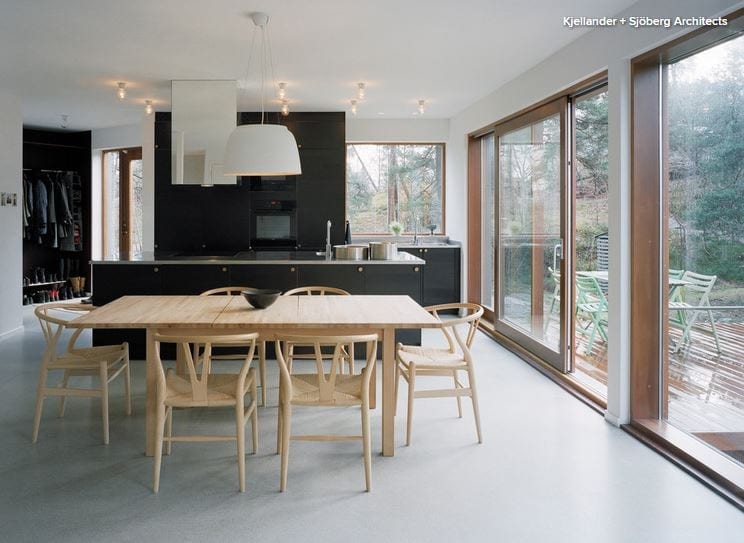
4. This villa perched in the forest outside of Stockholm, Sweden, emphasizes different views, that of trees and moss. (In fact, it is named Villa Vy, and vy is Swedish for view.) Suitably, the designers at Kjellander + Sjöberg Architects put the focus beyond the glass on the trees and the moss by creating a black kitchen. The color also helps the space look less like a kitchen within the open plan.
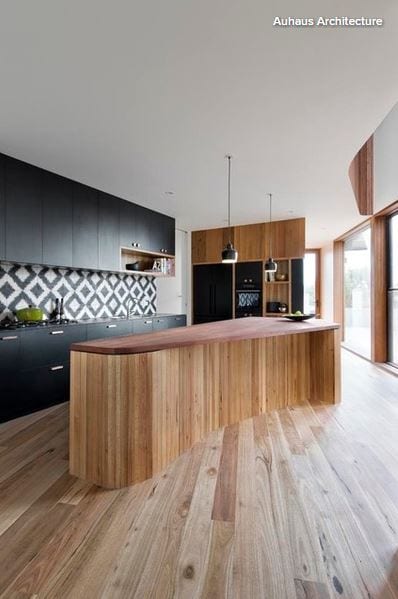
5. The Aussies certainly have the black kitchen thing down. Auhaus Architecture chose a matte black finish for the laminate cabinets here. The finish is just the right complement for all of the natural wood, which includes spotted gum flooring in a Bona Natural finish and an island top of grey box (a highly durable hardwood). Both the woods and the black laminate take a backseat to the stunning graphic Moroccan tile cement tile backsplash.
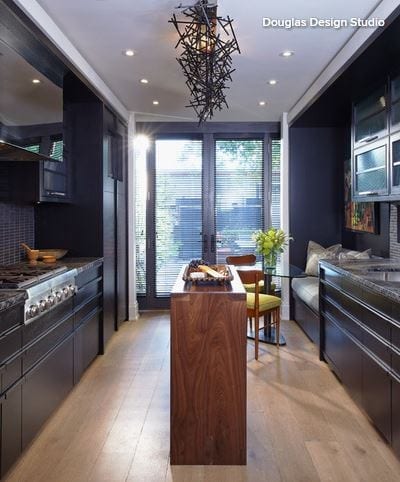
6. Jeffrey Douglas of Douglas Design Studio recommends making sure that a kitchen has good light showing through from different angles before going black. This kitchen gets plenty from the large windows and doors and another window in the backsplash (not shown). This is also a story of wood — the cabinets are Canadian red oak with a charcoal stain. Engineered white oak flooring, a light ceiling and a rich wood island add warmth.
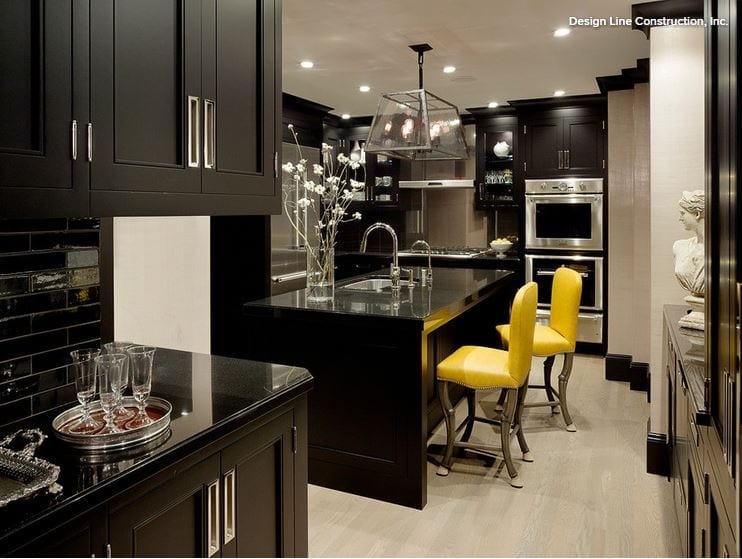
7. Interior designer Candace Cavanaugh specified black-brown when coming up with a custom color for these cabinets. The hue adds an unexpected warmth to the dark room. She then custom designed taxicab-yellow counter stools to add a playful dash of color. The overall look is glamorous and unexpected.
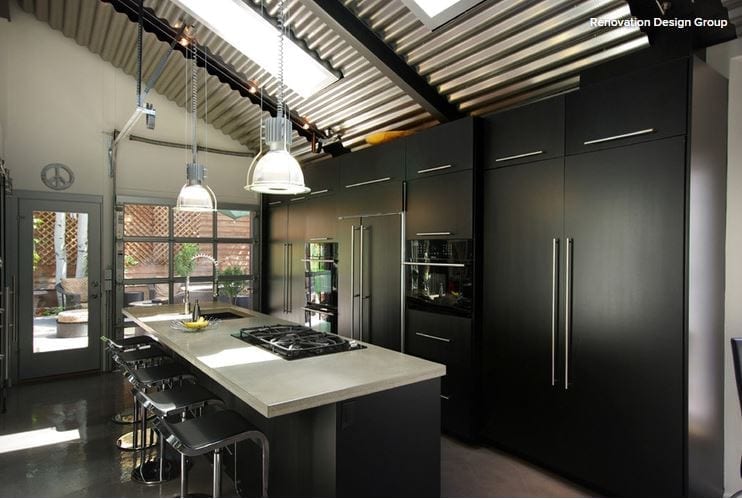
8. Renovation Design Group gave this bungalow the contemporary loft-like feel that the owner preferred. The black cabinets fit right in with the industrial-style corrugated ceiling, glass garage door, concrete countertops and stainless steel accents.
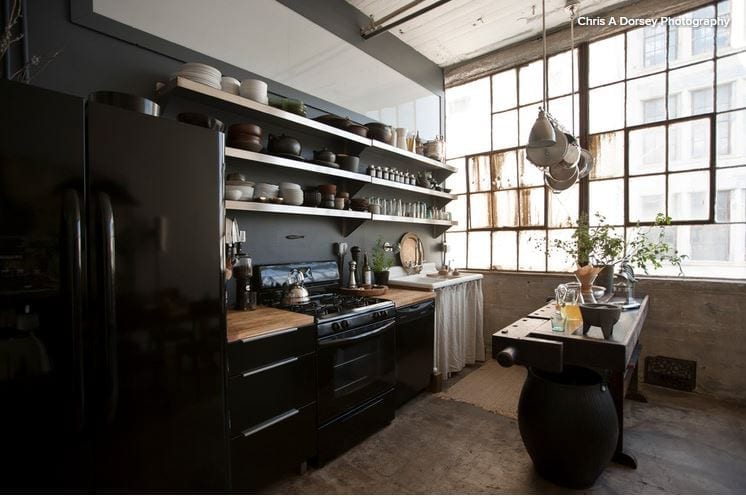
9. This industrial kitchen in Brooklyn, New York, used to be an industrial woodshop. Appropriately, the island is a well-worn vintage workbench. Dark cabinetry and appliances put the focus on items that homeowner Alina Preciado has collected on her worldwide travels, including spices and unique teapots.
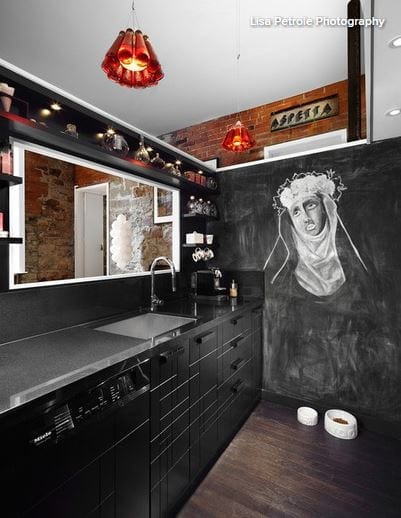
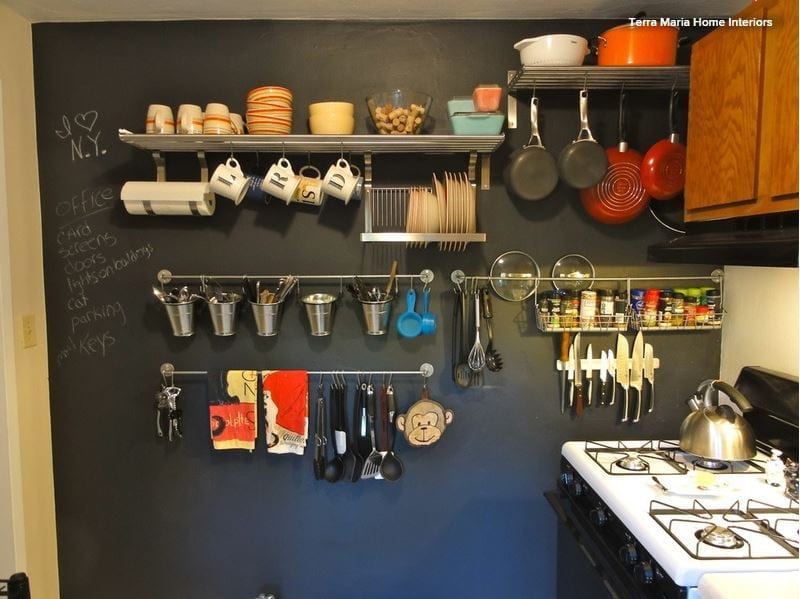
10. In this creative Toronto loft, the galley kitchen’s appliances and cabinets have a sleek, streamlined look, putting the focus on the exposed brick and unusual light fixtures. And, of course, on the chalkboard wall, which invites clever artwork (in fact, this made our chalkboard art hall of fame). Note the way the lighting helps highlight the objects along the top shelf.
Article by: Lara Sargent
The super modern, stripped-back kitchen might look beautiful in the brochures — and if you’re disciplined enough to keep an all-white room spick-and-span, it can look fabulous in real life too. But if you crave something a little kinder to the chaos of daily life, you probably already have a soft spot for the quintessentially English country kitchen.
The relaxed livability of the painted cupboards, wooden countertops and stone slabs so familiar to this style exudes an irresistible warmth and charm, but there’s room for gentle updates, too.
So harness the rustic look and make it work for the 21st-century home with these 10 country kitchen must-haves.
Article by: Laura Gaskill
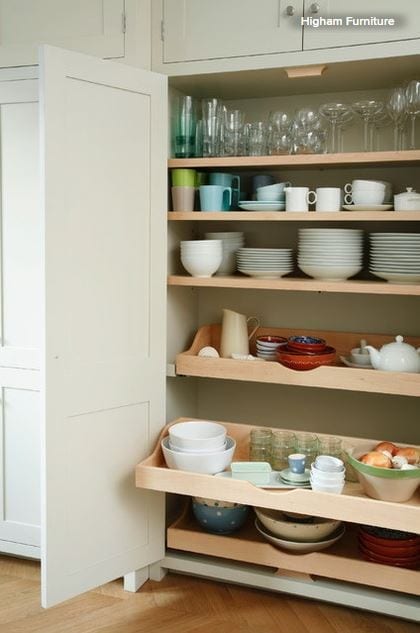
It’s easy to fall in love with beautifully styled open shelves, and to feel swayed by the convenience of keeping frequently used items sitting on the kitchen counter, bathroom sink and desk — but are these methods of storing your belongings really helpful? While there’s certainly nothing wrong with keeping things out in the open, I’ve recently been discovering that making fuller use of hidden storage makes for a cleaner, neater, more peaceful and easier-to-maintain space. Read on and see if you become convinced to give the surfaces in your home a clean sweep.
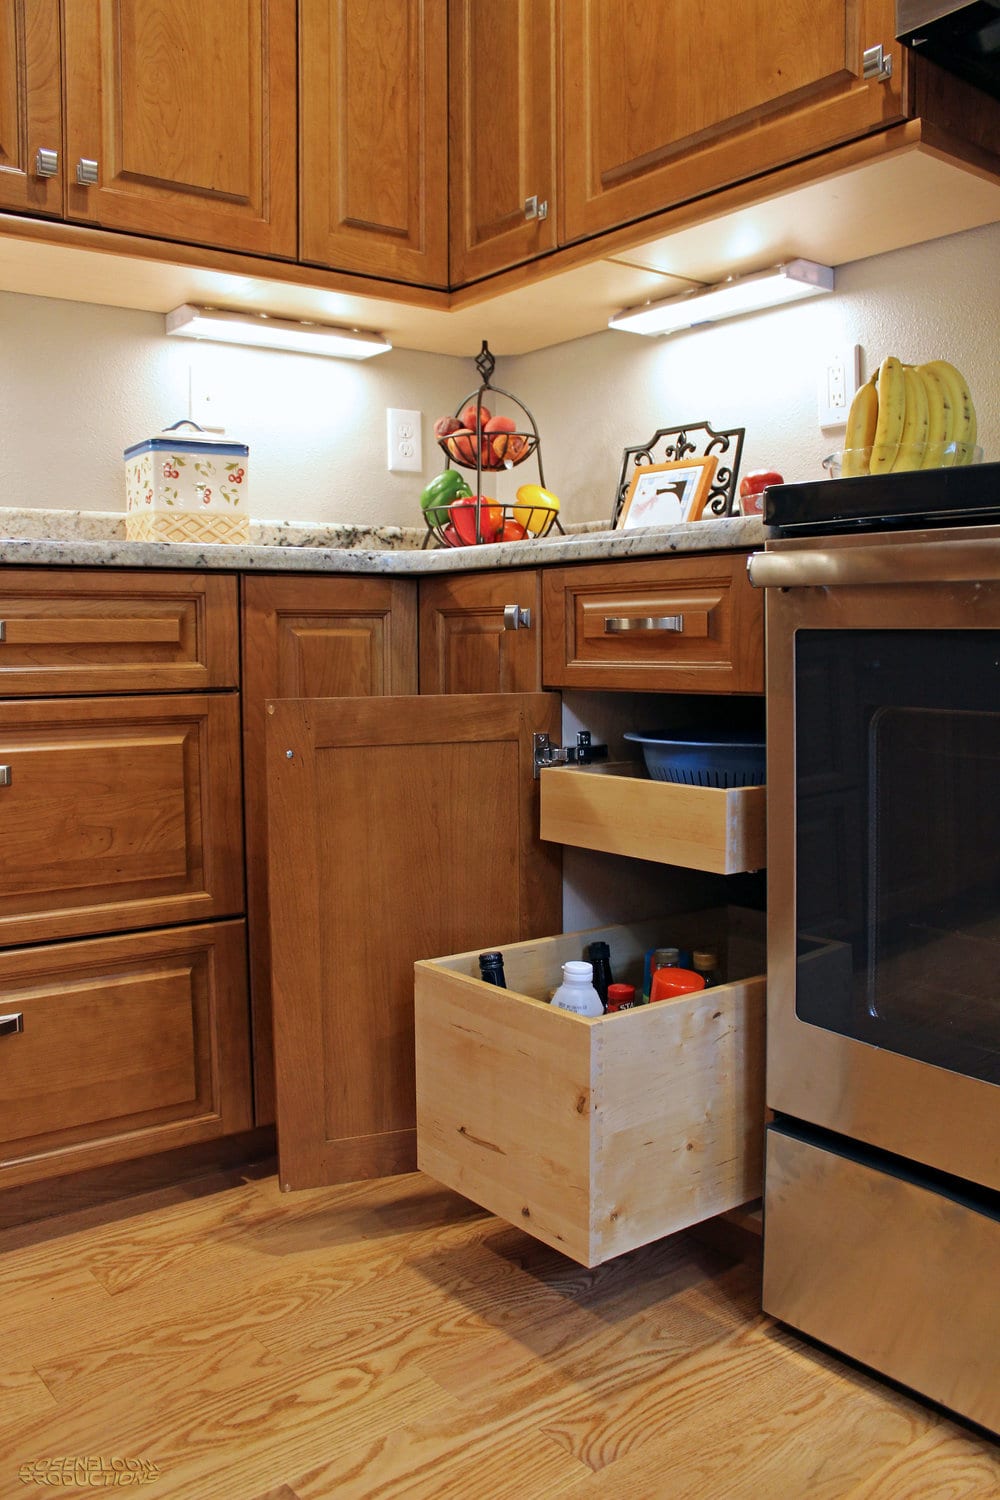
Gain more useful, usable space. It seems innocent enough at first with a simple canister of wooden spoons beside the stove, a knife rack, an attractive cutting board — after all, isn’t it nice to have things within reach? But when the coffeepot, teakettle, mixer, blender, toaster and dish drying rack are all vying for space, it can be hard to carve out enough room to prepare much more than a bowl of cereal. Imagine how luxurious it would feel to start dinner prep with the counters wide open and clear.
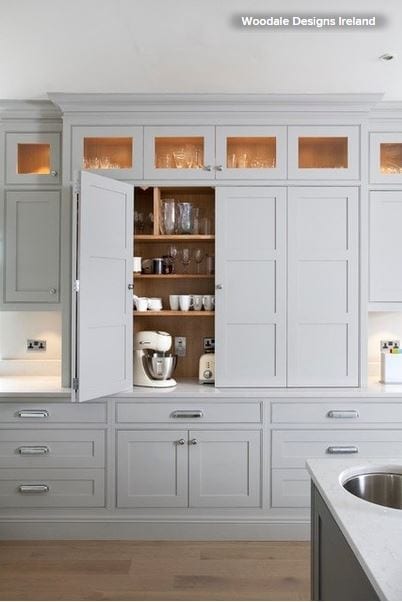
Keep items dust free. Open shelves (when carefully maintained) can be gorgeous, but they also collect dust, and in the kitchen, this is made worse by the addition of cooking oil spattering from the stovetop. If you have open shelving that you don’t plan to change, try keeping a small number of everyday dishes on the shelves, and protect the rest of your kitchen items behind closed doors.
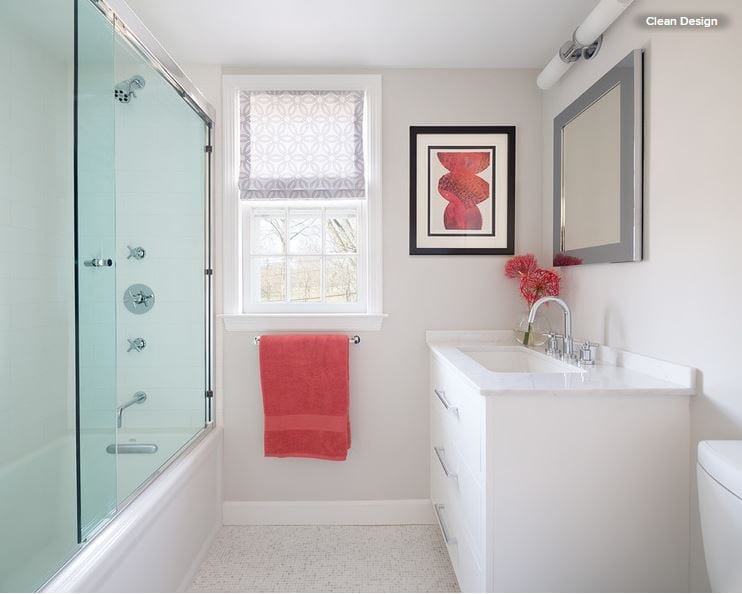
Have less to hide when company is on the way. I recently discovered that by simply cleaning out the medicine cabinet and adjusting the shelving so it could fit some taller items inside, I can easily contain all of the toiletries and toothbrushes behind closed doors instead of on the sink. With only a pretty container of soap and vase of flowers at the sink, a quick swipe with a cloth is often all that needs to be done to get the bathroom party-ready.

Make cleaning quicker and easier. With countertops and surfaces clear, dusting and cleaning take far less time and effort than when those same surfaces are filled with items that need to be cleared off, then returned. Floors free of clutter are ready for a quick sweep or vacuuming, and you’re more likely to get into every corner when nothing is blocking the way.
Make it simpler to avoid accumulating more clutter. When piling stuff on any available surface is the storage method, there is almost no limit to the amount of stuff you can add to the teetering towers of laundry, books and papers. But when putting away is the rule, and you’ve gotten into the habit of keeping surfaces clean and clear, it’s actually easier to maintain a clutter-free home.
Find a place for everything and put everything in its place. If you come home and toss things onto the kitchen table or pile up to-dos on your desk, the clusters of items quickly run into one another, making it harder to find what you need when you need it. By dedicating a certain drawer (or section of a drawer) to each thing you own, you’ll know exactly where to get it and where to put it back when you’re done.
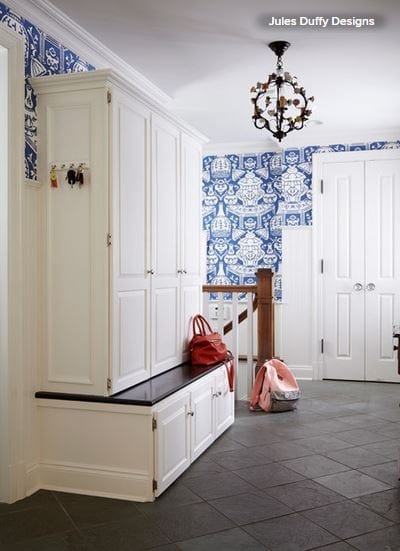
Tame the chaos. You know those perfectly styled photos of busy family mudrooms with cute little backpacks on hooks and rain boots lined up by the door? The reality is often much less attractive. Think muck-covered soccer cleats tossed unceremoniously in the middle of the hall, bags with their contents spilling out and hooks overflowing with all manner of rain gear and sweatshirts. Hide all of this behind neat closet and cupboard doors, and you can at least gain a visual rest from the mess.

Enjoy a more peaceful feeling at home. Even if you choose to clear off only one area in your home — your bedside table, kitchen counter, desk or bathroom sink — the head-clearing, peaceful effect might surprise you. Waking up and coming home each day to a perfectly cleared area is calming and pleasant, and makes everyday tasks and routines easier to handle.
Article by: Kat Bern
You know that feeling when you’re trying to whip up a quick dinner after work and everything in your kitchen seems to be conspiring against you? You can’t find the ingredients you could have sworn you had, things are tumbling off the shelves, and nothing is where it should be. If you know what I’m talking about, then it’s time to declutter your kitchen.
A good way of figuring out what constitutes clutter is to ask yourself two questions: Does it serve you anymore? Does it bring you joy? If the answer to both of these questions is no, chances are you won’t even notice when the item is gone. So let’s have a look at common space wasters and how to get rid of them.
Save the tidying for later. Don’t make extra work for yourself. If you want to make your kitchen more functional, declutter it before you do any tidying. Otherwise you’ll mess everything up in the process of decluttering. And there’s no point tidying up things you’ll eventually throw out, donate or sell.
Purge your pantry. Go through your pantry or the cupboards that hold your cans and jars and remove any out-of-date products. When I recently challenged some of my clients to do this, they couldn’t believe their eyes, finding cans dating back to 2007.
If you think an item is something you might realistically use, pull it out, put it on the side and give yourself a deadline by which to use it (assuming it’s still safe to eat). If you haven’t used it by then, get rid of it.
Minimize the plastic. Next, it’s time to tackle the plastic bags and plastic bottles. Many of us have a tendency to keep things “just in case.” But then instead of keeping one just-in-case plastic bottle, or the few plastic bags we might realistically reuse, we keep 10.
Select a couple of really durable bags and perhaps a bottle or two if you think they might be useful, and create a place to store them neatly in your kitchen. Recycle the rest — you’ll never be able to use them all.

Sort your food containers. Do you find yourself overwhelmed every time you open the dreaded drawer or cupboard with plastic containers? It’s time to take them all out, give the space a good cleaning and match up all of your boxes with their lids. Throw out any that don’t have a match and, if your collection isn’t a neat set like this one, consider storing them with their lids on. It’ll keep them clean while in storage and, although they’ll take up more space, it will make them easier to use.
Cull your dishware. Do you have lots of dishes, including old and new sets mixed together? Figure out exactly how many dishes you need by putting away the older set away for a week and seeing how you get on. If you do just fine without it and you’re not attached, it might be time to donate it to charity.
Prioritize your appliances. Kitchen appliances can be real space wasters. They’re bulky, and a lot of them get only occasional use. That’s why you want to make sure you keep only the ones you use daily, or a minimum of a few times a week, out on the countertop. If you make waffles only as a treat, pack the waffle maker away on a high shelf and take it down only on those occasions. Keeping the countertops clear is a great way to make a kitchen feel larger and less chaotic.
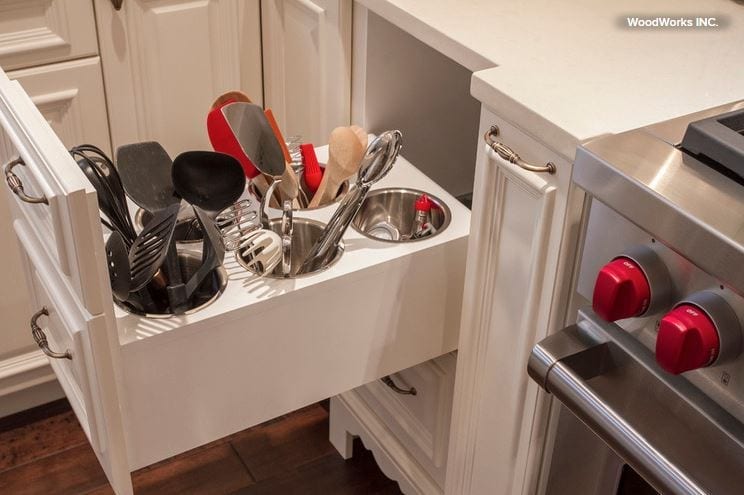
Streamline your utensils. Go through your cooking utensils and donate any you haven’t used in more than a year. Then sort them, putting like with like, and keep them easily accessible near the range. Try to find a dedicated spot for them, whether it’s a spare drawer you can neatly organize or a bit of extra countertop space for some containers.
Get your foils and wraps in order. A great idea for organizing wraps is putting them all into one drawer. But be careful — you don’t want it to become a designated drawer for “a bit of everything.” Make sure you keep the rolls tidily next to one other and, if you wish to add anything else, organize everything with a tray or container. You don’t want random objects lying around — they definitely won’t help when you’re trying to pack a sandwich in a rush.
Sort recipe books and takeout menus.Have a look through all your cookbooks and takeout menus and keep only the ones you actually use. If you haven’t cooked from a book in the past year, gift it to someone who’s looking for new inspiration. You’ll free up some space on your shelf, and the book will make someone else happy.
If you haven’t ordered food from a certain place for a while, the same rule applies — and with so many menus available online, there’s less and less reason to clog up a shelf or drawer with paper copies.
Create a box of items you’re not sure about. If you’re not sure whether you’re ready to say goodbye to some items, put them all in a box, write the date on that box and move it to a garage or loft. If you come across the box in, say, six months, and realize you haven’t been looking for those items, it might be easier for you to let them go. And remember, by getting rid of the old, you’re actually making space for the exciting and new.
Article by: Sara Emslie
Even the smallest of kitchen spaces needs to deliver big when it comes to form and function. No matter how awkwardly shaped or compact your cooking space, design tricks can help make even tiny corners work hard and look good too. These kitchens offer ideas for getting more from less and giving a high-function space a clean, uncluttered appearance.
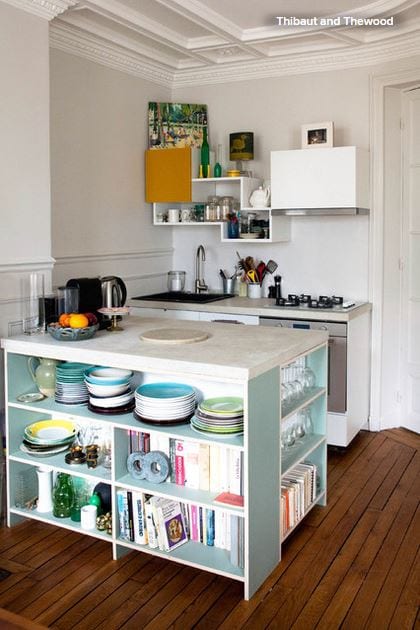
Use open storage as display. If your tiny kitchen is part of a larger open-plan space, consider an island with built-in open shelves. This will add storage and display space and help separate food prep, cooking and clean-up areas from those for other living functions.
Use attractive tableware, accessories and cookbooks to create a pleasing display.
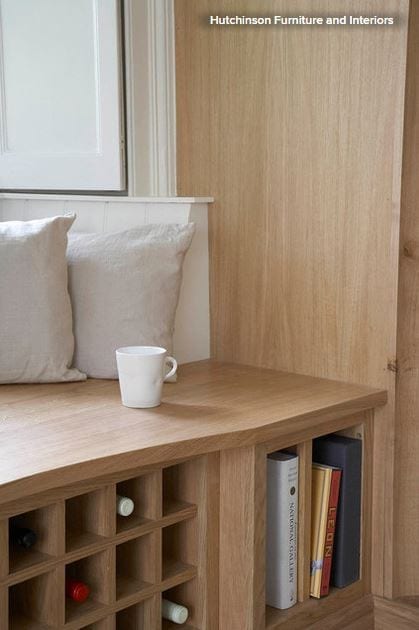
Store high (and seamlessly). A clever way to add storage in a tiny kitchen is to position it high up the wall. Installing storage above seating, such as a built-in bench, can be a particularly smart use of space.
For a clean, contemporary feel, fit the cupboards with push latches, removing the need for a door handle and creating a seamless finish that gives the impression of more space. A ladder stored away — perhaps inside a bench seat — can be used to access high cupboards.

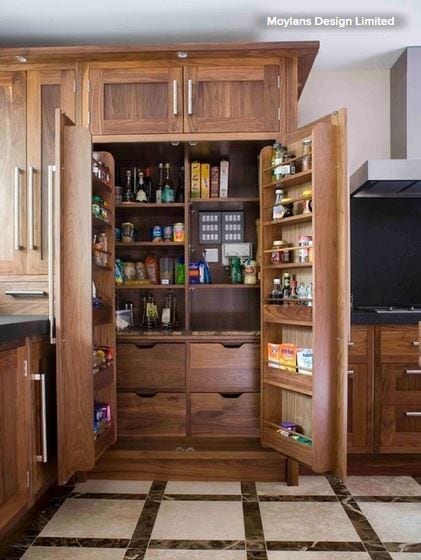
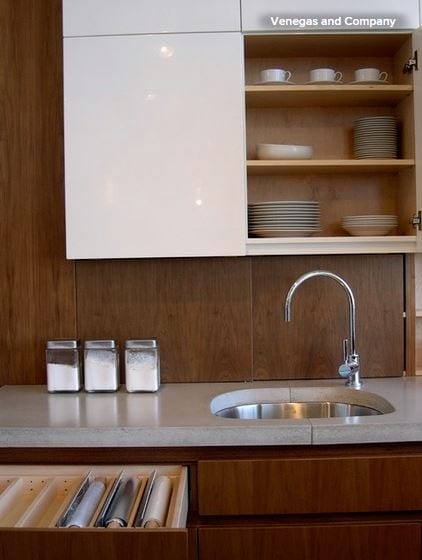
Custom build a pantry cupboard. Well-planned storage makes efficient use of space and can help keep your kitchen organized. Consider a custom all-in-one pantry cupboard if you’re designing a kitchen from scratch. Install custom storage baskets for shelves and rail bars and baskets for cupboard doors to make the most of the space inside.
A cupboard pantry can be used to store everything from food to china and kitchen equipment. And when the doors are closed, it’s all neatly out of sight.

Integrate built-in appliances. Shop around for appliances that will work in compact spaces and consider integrating them into your kitchen design. The framework needed for integrated designs eats up a little more lateral space, but the result will be a neater look.
Think laterally, too — dishwashers are available as pullout drawers and can be paired with a storage drawer with the same front for a fuss-free finish. Microwaves and ovens can be fitted into a bank of wall cupboards, freeing up counter space for other kitchen essentials.
Think industrial. Utilitarian styling is ideal for making the most of a compact kitchen. It echoes the kitchens of days gone by, and its robust aesthetic says it means business, despite being a tiny space. Look for subway tiles, industrial factory lighting and Shaker-style units that combine beauty with utility.
Squeeze in an eating space. Having a space for sitting and eating in a kitchen, no matter how small, doubles the room’s functionality, making it feel more substantial.
A compact breakfast bar, for example, can be both a dining area and an additional work surface for food preparation. To save space, choose bar stools that can be tucked under the counter when not in use. Try giving this tiny tabletop a separate visual identity with bold accessories, such as bright artwork and standout lighting.
A fold-out, wall-mounted table is another option for a small kitchen.
Highlight character with color. Flashes of vivid color are ideal for adding a wow factor to a tiny space. It might be small, but it can still have presence.
Against a pure white background, neon shades really stand out, so use these to emphasize any design features that have character and style. Maximize the different sizes and configurations of drawer and cupboard fronts to create eye-catching color combinations and design appeal.
Stick to a restricted palette, though, and keep clutter stored so as not to overcrowd your little kitchen.
Go for top of the line. Being small on space doesn’t mean a kitchen can’t be big on style. Adopt a high-end approach for fixtures and hardware in an otherwise minimal space to give a compact kitchen a designer look.
Smart handles, inset lighting, state-of-the-art integrated appliances, contemporary faucets and molded draining boards are all design features often found in larger, more expensive kitchen designs, but they can add a big style hit to a tiny kitchen too.
Article by: Mitchell Parker
Norma Rushton and her partner, Randy Dyke, really wanted a waterfront property in the Vancouver area but were quickly priced out of most places. When they lucked into a mobile home on the Stave River about an hour east of downtown Vancouver, they were thrilled at the great location right on the water at a good price. But that’s where their excitement ended. The home was in bad shape and needed major repairs.
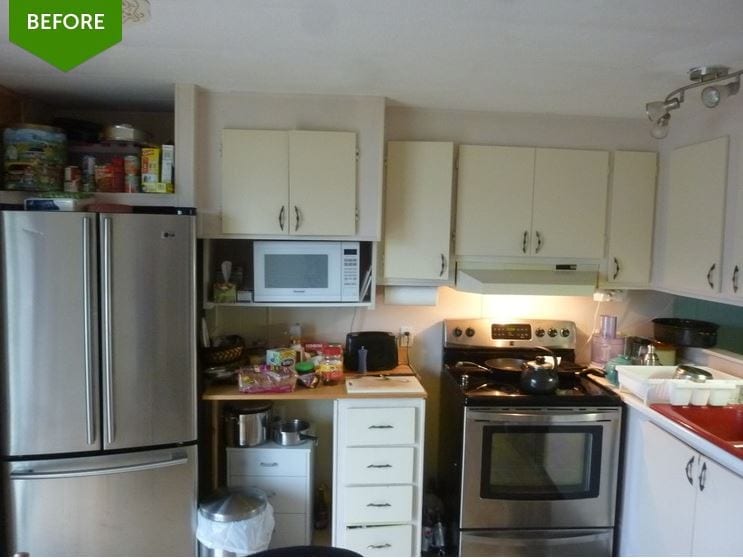
BEFORE: Recently they started adding more storage and function to the original kitchen (shown here), which had been picked apart since it was built in 1970. For example, the backless cabinets had been cut up by previous owners to make room for a larger refrigerator and stove, leaving little storage. “The cabinets were starting to get useless,” Rushton says.
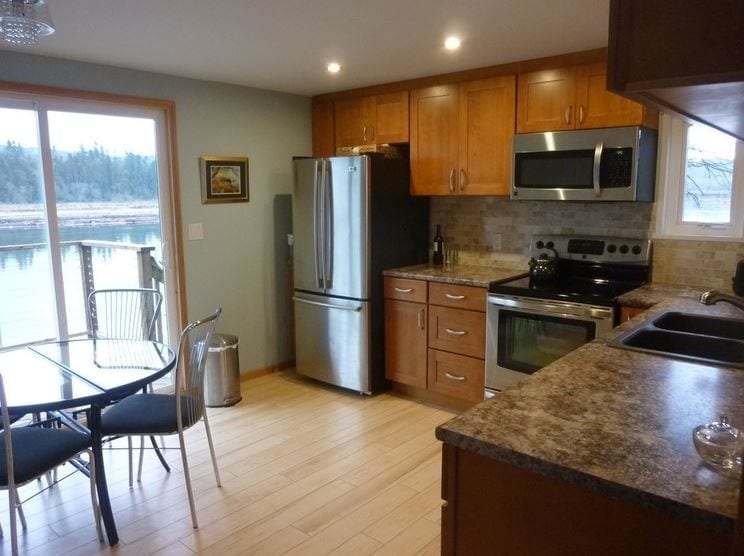
AFTER: Determined, Rushton, a high school theater teacher, spearheaded a complete gut and remodel, choosing all the materials, fixtures and appliances, while Dyke, a retired water taxi driver, did a lot of the work, including installing the drywall, molding, trim, backsplash (twice) and new window and patching the floor. The couple painted everything together. Professionals installed the cabinets and countertops.
But best of all, the couple got discounted help from their contractor neighbor, Milan Vaclavik of Milan’s Home Renos, who took care of the plumbing, framing and electrical work at a friendly rate.
Though the homeowners considered getting granite countertops, they ended up going with Formica instead. “Granite is too hard of a surface,” Rushton says. “I wanted something a little more forgiving.”
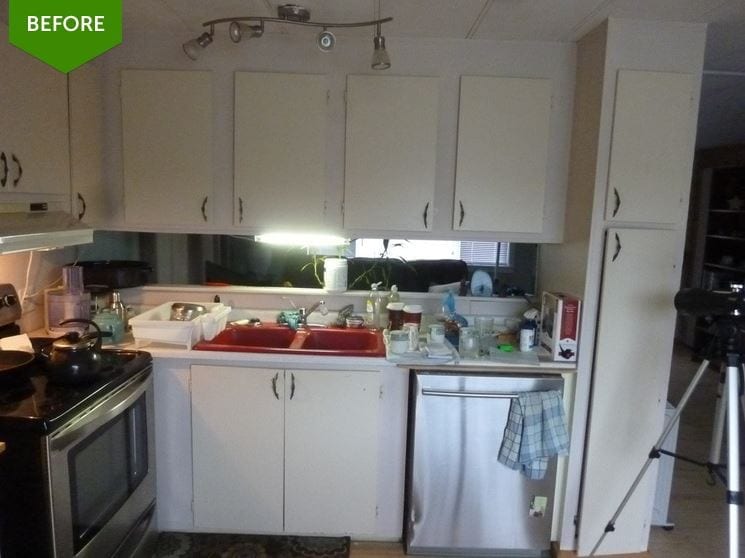
BEFORE: A bank of upper cabinets and a floor-to-ceiling cabinet made things a bit claustrophobic and blocked views between the kitchen and living room. “I wanted to be able to sit in the living room and see out the windows of the kitchen to the water,” Rushton says.
AFTER: They reduced the size of the upper cabinets and did away with the tall cabinet altogether, opening up the sightline between the two spaces. “Now you can actually chat with whoever’s in the kitchen,” Rushton says.
The couple had a couple of remodeling disasters along the way. Rushton had found solid oak cabinets at a discounted price that she really liked, but when they arrived, they were the wrong model. With the renovation already under way, she had to make a tough decision and went with the different cabinets, which ended up throwing off all their measurements.
The backsplash was another compromise. The first one that Rushton put up was “a horrible mistake,” she says. She had found peachy-taupey-colored porcelain tiles that looked great lying on the counter. But as soon as she installed them vertically on the wall, the angle of the light turned them green. A local tile guy informed her that artificial colors tend to do that and suggested a natural stone product instead. “It was either I live with it or let the money go,” she says. “I let it go and went and got marble tile instead.”
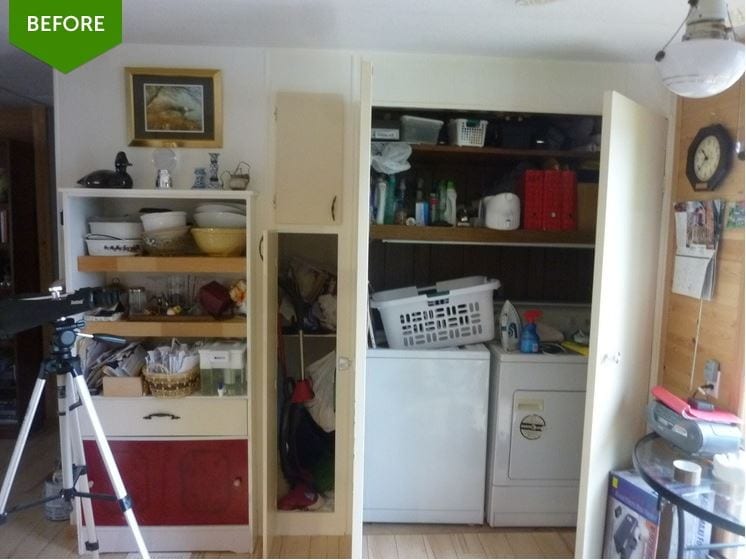
BEFORE: The washer and dryer were shoved into a storage closet in the kitchen, while an old cabinet did the work of storing bowls, platters and mail.
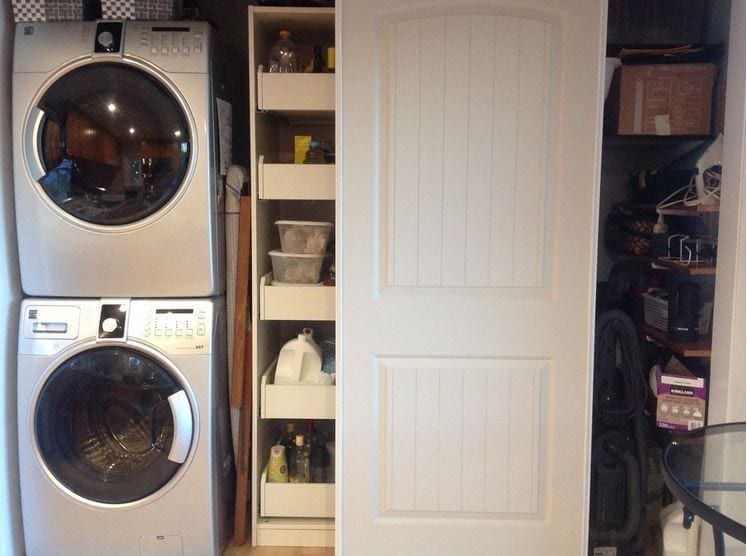
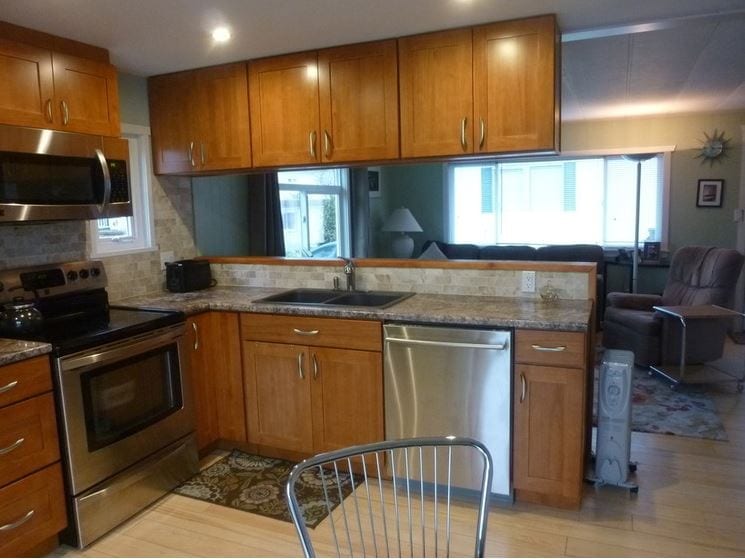
AFTER: The homeowners replaced them with a stacking washer and dryer unit, an Ikea unit of sliding drawers for a pantry and a place for the vacuum cleaner. “It was all about getting what I need for putting things away,” Rushton says.
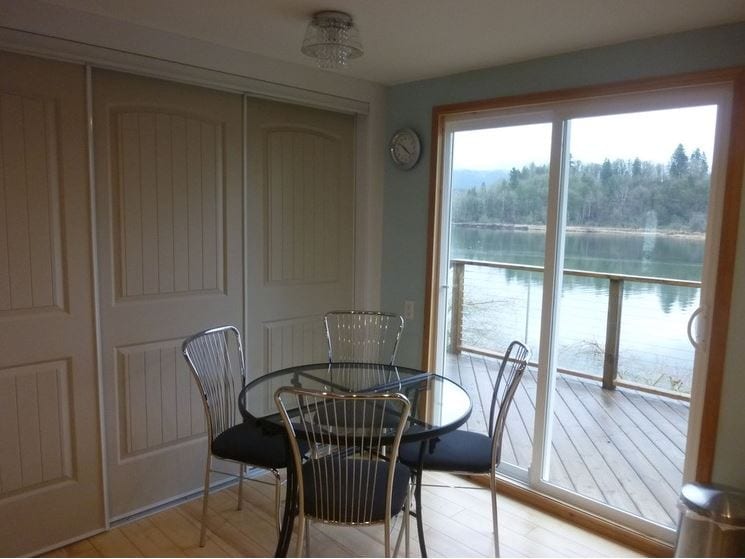
Sliding doors nicely seal off the laundry and pantry area, freeing up clutter near the pristine river view.
Rushton says they budgeted about U.S.$8,000 but the actual cost came in at just over $11,000.
Here’s some of the breakdown:
Cabinets: $2,300
Cabinet handles: $170
Countertops: $675
Closet doors: $250
Washer, dryer, microwave: $2,000
Lighting: $335
New flooring (closet): $85
Wood: $85
Paint: $170
Backsplash: $335
Sink: $250
Window: $60
Labor: $1,000
Ikea shelving: $300
Drywall, insulation, plumbing fixtures, electrical wiring, switches, plugs, power tools, screws and brackets, taxes and other miscellaneous expenses: around $3,200
Article by: Joanna Simmons
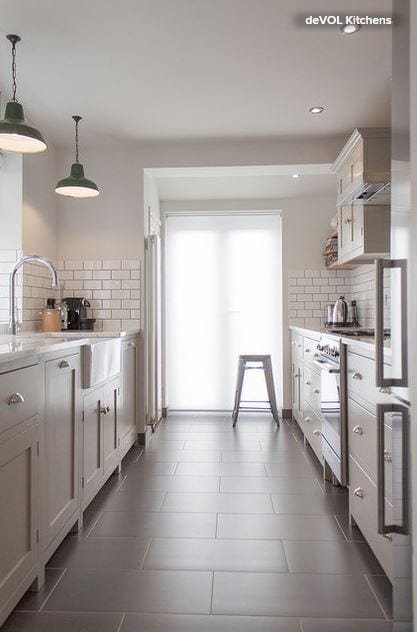
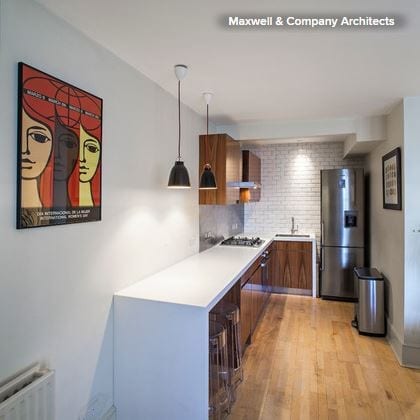
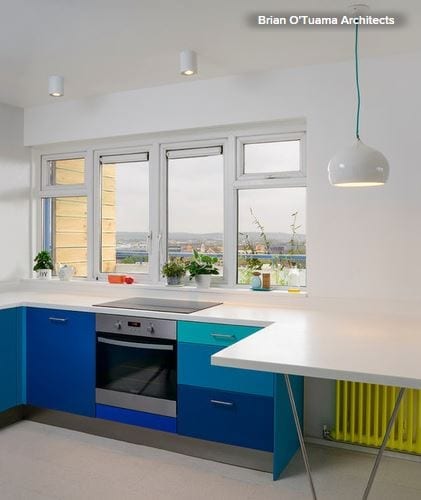
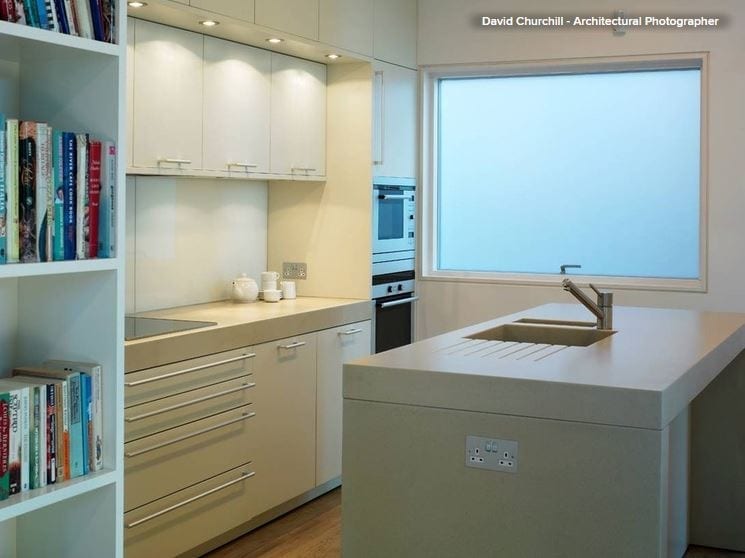
We might all dream of a huge family kitchen, but most of us have to make do with something smaller. That said, whatever the size of our kitchen, the demands we place on it tend to be the same. We want it to function well for preparing and cooking meals. We might also like to be able to sit and eat in there, even if just perched at a breakfast bar. And we need space for a lot of different objects, from chunky appliances to silverware, dishes and food. The good news is, with some clever planning and great design, it is possible to have all these functions in one tiny space, as these inspiring spaces demonstrate.
Use every nook and cranny. It sounds obvious, but where space is tight, it’s essential to make use of all of it. This might mean commissioning custom units. Shelves or cupboards designed for your space, rather than bought off the shelf, can exploit even the most awkward corners or weirdly angled rooflines. Luckily, since the number of units you will be able to fit is limited by the small size of the room, a custom design often will be reasonably economical, too.
Enjoy a little rack ’n’ rail. Wall cupboards can eat into the space in a very small kitchen, but you can still make any wall work for you by adding racks, rails and slim shelves. These can hold things like saucepans, strung up on S hooks, mugs and pots holding cutlery, and even utensils. Covering the wall in blackboard paint helps it to multitask even more, as a place where you could write shopping lists and messages.

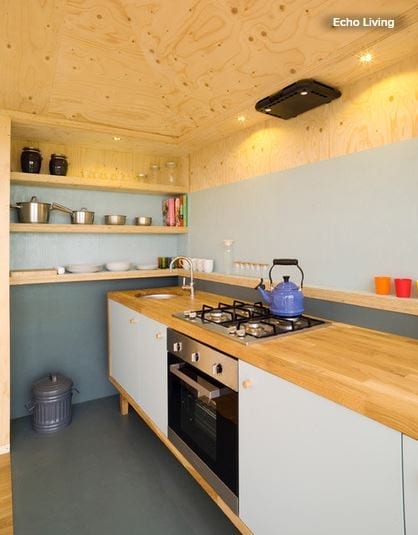
Make it streamlined. Chunky and mismatched pieces would eat into the space and make a tiny kitchen feel cluttered. Instead, opt for units with a minimalist look and, as here, a countertop that flows over all the base units and even extends to become a breakfast bar. The minimalist metal legs seen here keep sight lines open. This kitchen is flooded with natural light, so the color on the unit doors invigorates the space without encroaching on it.
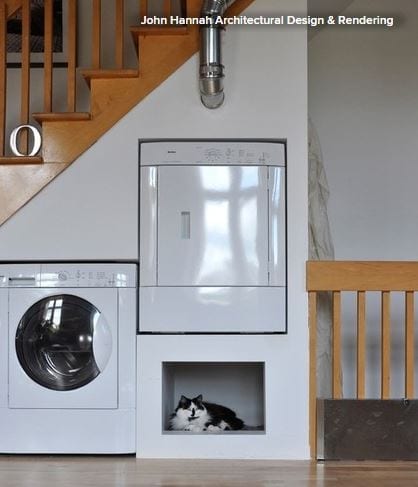
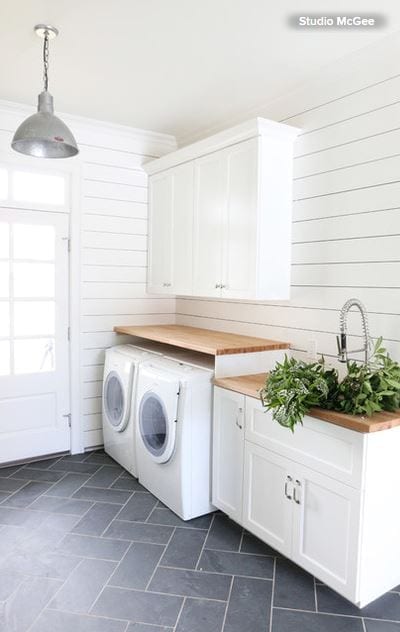
Find another home for laundry appliances. It’s not uncommon to find washing machines and dryers installed in the kitchen, but, when space is limited, it’s a good idea to find an alternative home for them. A nook under some stairs can be a good place. Or consider putting a dryer — and perhaps a freezer — in the garage, if you have one.
Choose clever details. There are heaps of clever space-saving elements that can be built into a new kitchen, so if you’re starting from scratch, look for things like slim spice jar storage, knife drawers,toe-kick drawers and integrated chopping boards that can be slid over a sink or pulled out from the wall.
Try freestanding pieces. Freestanding furniture has its benefits in a small kitchen too. If you take the view that where room is tight, it’s important to make every item you place in it shine, then suddenly there is a logic to not building everything in. A freestanding piece containing an oven, sink and cupboards, like this one, looks like a beautiful piece of furniture that fits elegantly into the space.
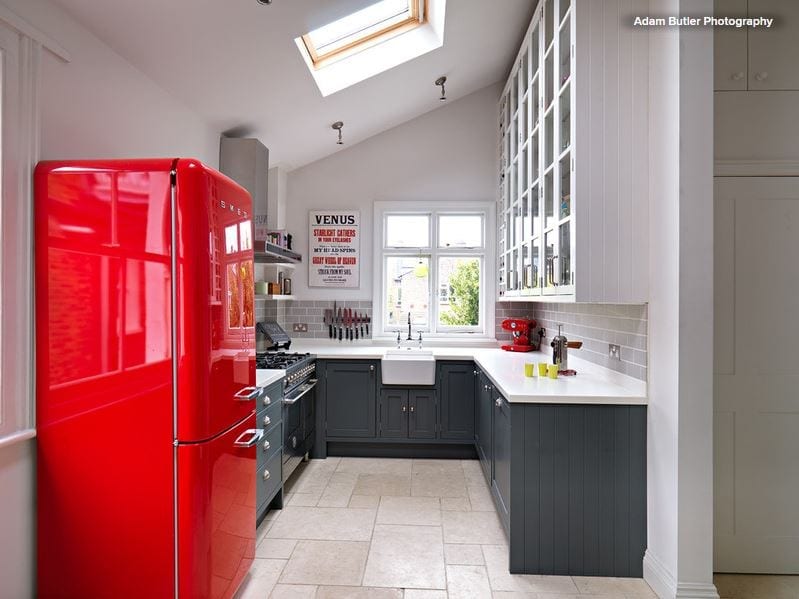
Raise the ceiling. Rethinking the dimensions of the room and having some architectural work done can make a huge difference to a small kitchen. If yours is in a single-story space, raising the ceiling to expose a sloping roofline would add a huge sense of light and airiness. It also would offer the opportunity to install skylights, which pull in more light than vertical windows. Plus it would create a tall wall against which you can fit cupboards or shelves for maximum storage.
Build up to the ceiling. Floor space may be limited, but vertical space is often the same in a tiny kitchen as in a huge one. So make the most of it by building units that stretch right up to the ceiling — or just nearly. A small gap above tall cabinets can offer just enough breathing room to help keep the room from feeling cramped. Keep infrequently used items on the upper shelves and try using sleek handle-less doors, so the units look streamlined and seamless and don’t dominate the room.
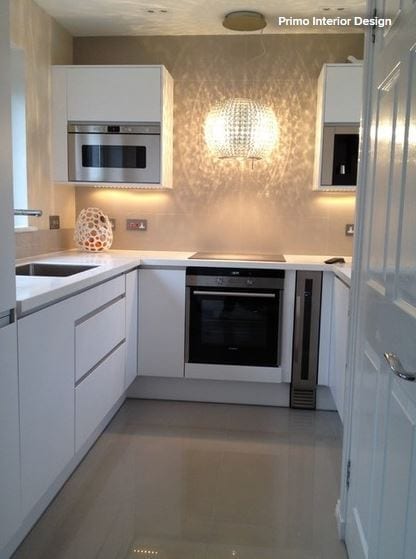
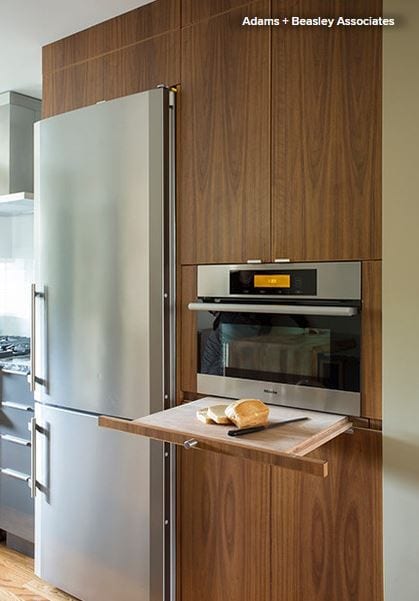
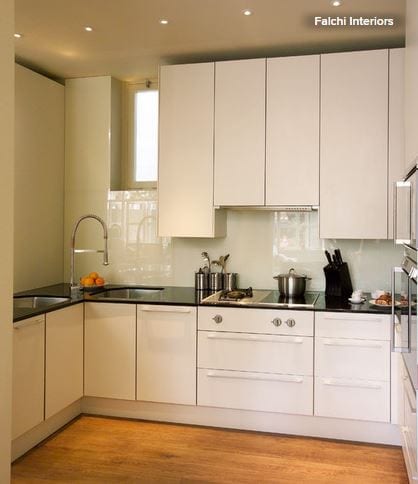
Integrate appliances. You may yearn for a huge, freestanding range complete with five burners, but a small-scale kitchen is not the place to install one. Instead, integrate your appliances for a more streamlined look and a space-savvy solution. Building the microwave into a cupboard will free up countertop space, and why not go for a boiling-water tap to dispense with the need for a kettle?

Work in a portable mini island. In addition to built-in units, a small, movable butcher’s block with shelves, like this one, can prove incredibly useful. It would take up very little room while supplying additional storage and prep space. It would also create the relaxed, freestanding look you may have been craving but thought you couldn’t pull off in a small kitchen.