FREE DESIGNS AND ESTIMATES

The Most Popular Styles and Cabinet Choices in Kitchen Remodels

The majority of Houzz users who remodel their kitchens upgrade the cabinets, and they frequently choose white Shaker-style cabinets. Shaker is a good fit in a transitional-style kitchen, which remains the most common choice among homeowners who change their kitchen’s style as part of a renovation.
These insights on how homeowners are choosing to remodel their kitchens are from the 2020 U.S. Houzz Kitchen Trends Study, which gathered information from nearly 2,600 Houzz users who had completed a kitchen remodel or addition in the previous 12 months, were working on one or were planning to start one in the next three months. Here are five trends for kitchen styles and cabinets based on what these homeowners said.


Kitchen Styles1.png

1. Transitional Is Again the Top Kitchen Style

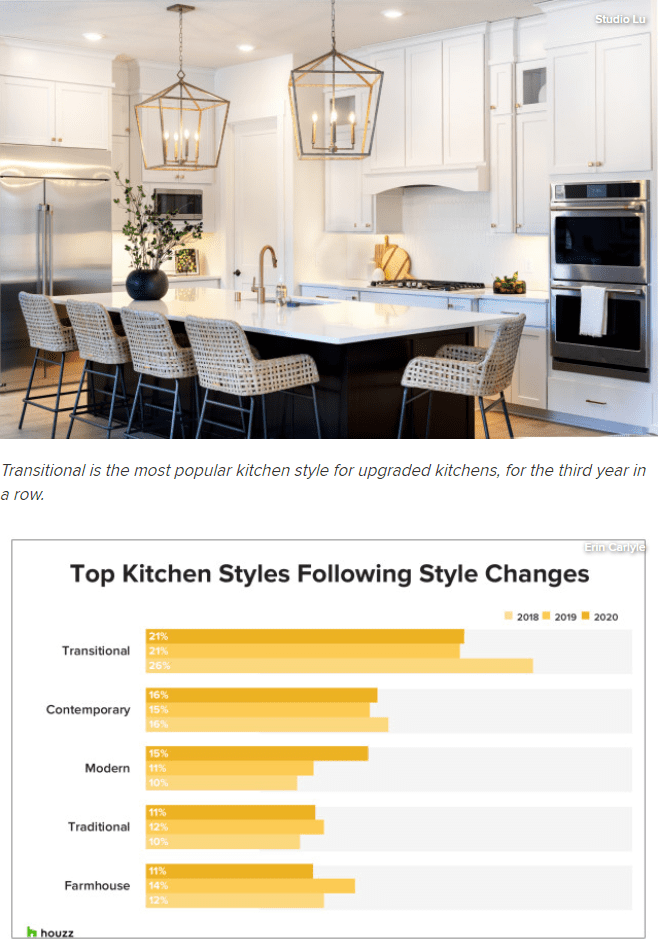
A majority (85%) of renovating homeowners change the style of their kitchen when renovating. And among them, transitional is the most popular look (21%), followed by contemporary (16%), modern (15%) and traditional (11%). Transitional, a blend of contemporary and traditional styles, has been the most popular style for renovated kitchens undergoing a style change for three years in a row.

Farmhouse style, by contrast, has fallen in popularity, this year capturing 11% of kitchen remodels that included a style change, compared with 14% in last year’s study and 12% two years ago. (Farmhouse style also is declining as a choice for renovated master bathrooms.)


Kitchen Styles2.png

2. Nearly All Renovating Homeowners Upgrade the Cabinets as Part of a Kitchen Remodel

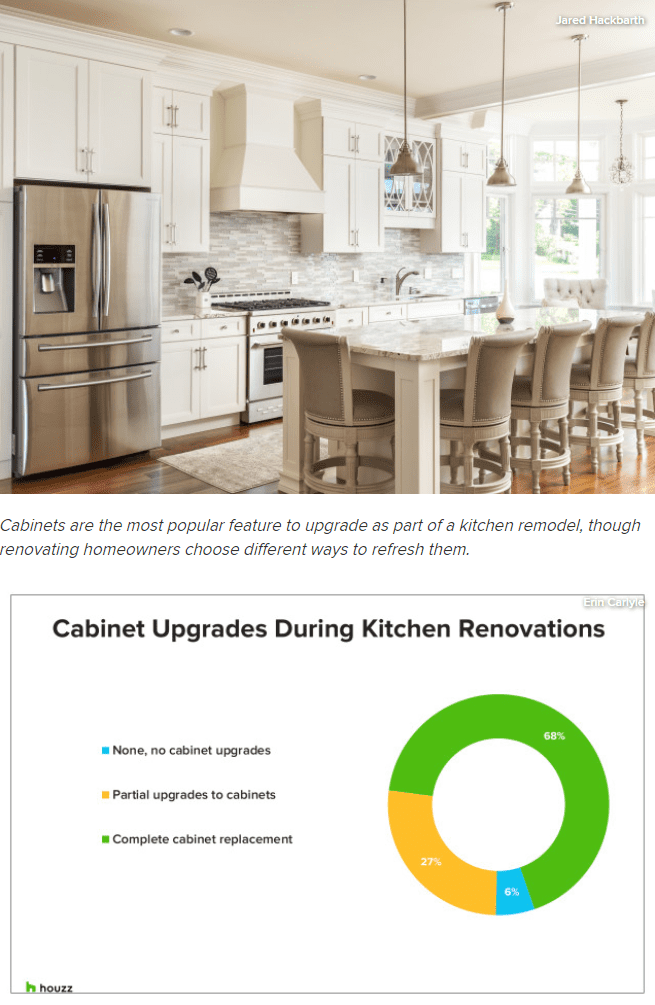
Cabinets are among the most popular features to upgrade as part of a kitchen remodel: Ninety-four percent of renovating homeowners include some work on the cabinets as part of their kitchen projects. The majority (68%) choose to replace all of the cabinets, while 1 in 4 (27%) chooses a partial cabinet upgrade.


Kitchen Styles3.png

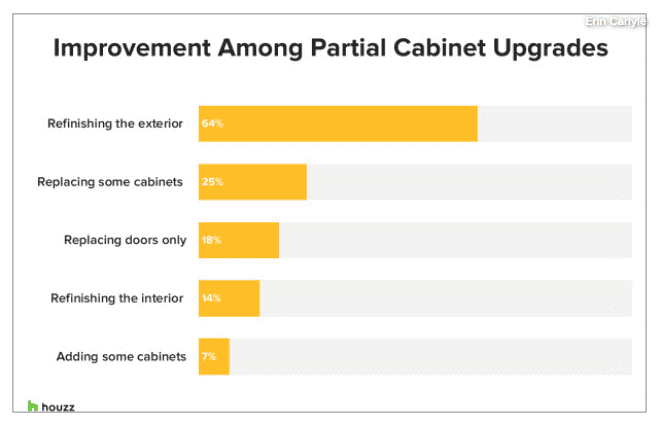
Among homeowners who are only partially upgrading the cabinets, 64% opt to refinish the cabinet exteriors. Twenty-five percent replace some cabinets, while 18% replace only the doors. Refinishing cabinet interiors (14%) or adding cabinets (7%) are other alternatives.


Kitchen Styles4.png

3. White Is the Most Popular Cabinet Color

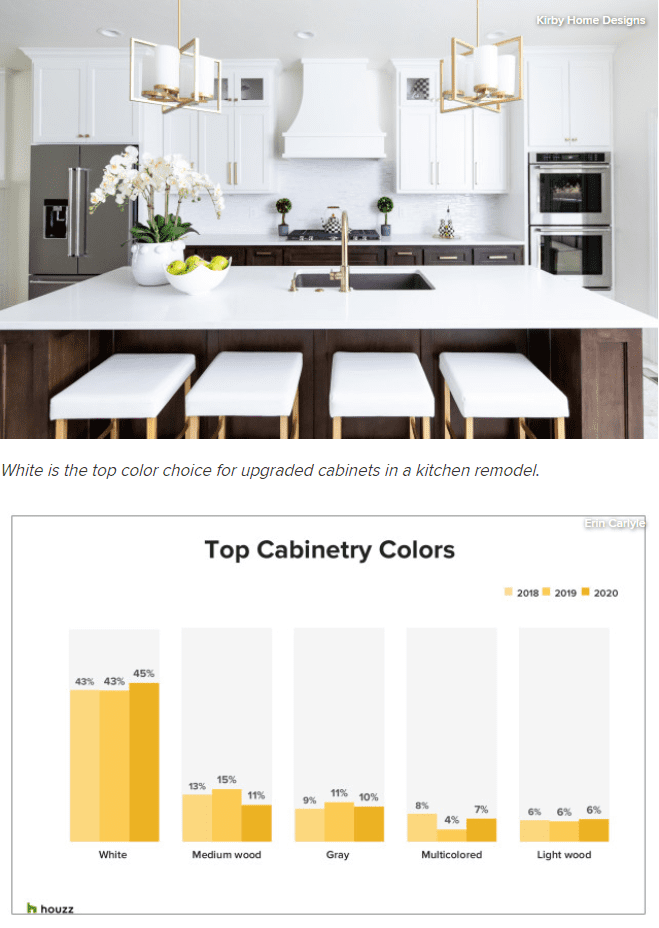
White kitchen cabinets continue their reign, gracing 45% of renovated kitchens, according to this year’s study. Wood-tone cabinets are the No. 2 choice (22%), with medium wood the most popular of the wood tones. Gray is the third-most-popular color choice for cabinets.


Kitchen Styles5.png

4. Shaker Is the Most Popular Cabinet Door Style

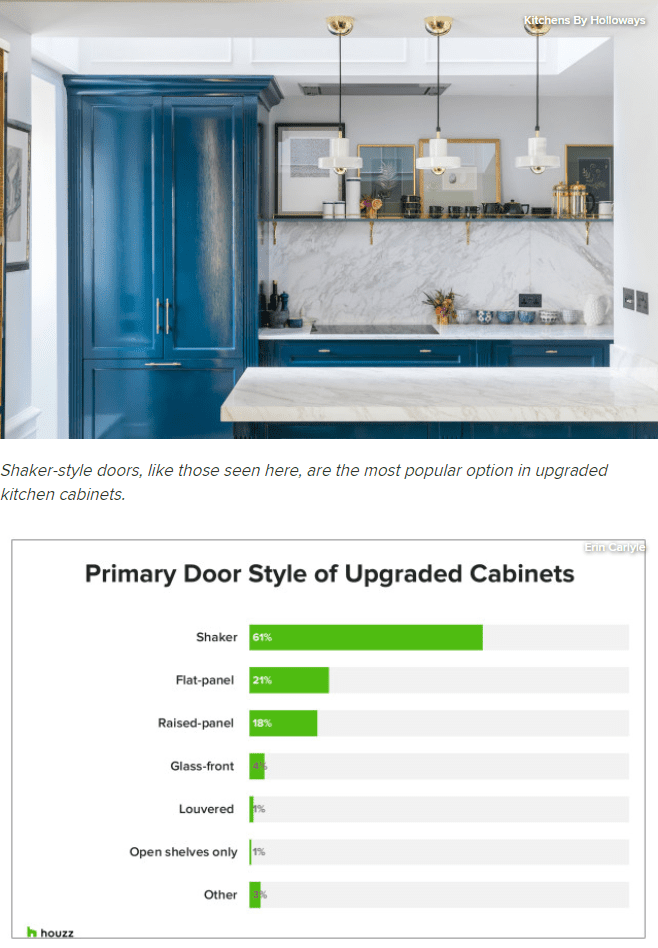
The majority of renovating homeowners who upgrade their kitchen cabinets choose a Shaker door style (61%) for the new cabinetry, with flat-panel (21%) a distant second and raised-panel (18%) the third-most-popular.

The majority of upgraded cabinetry in renovated kitchens is custom (40%) or semi-custom (36%), with stock (12%) and ready-to-assemble (11%) less common.


Kitchen Styles6.png

5. Specialized Cabinet Storage Is Popular

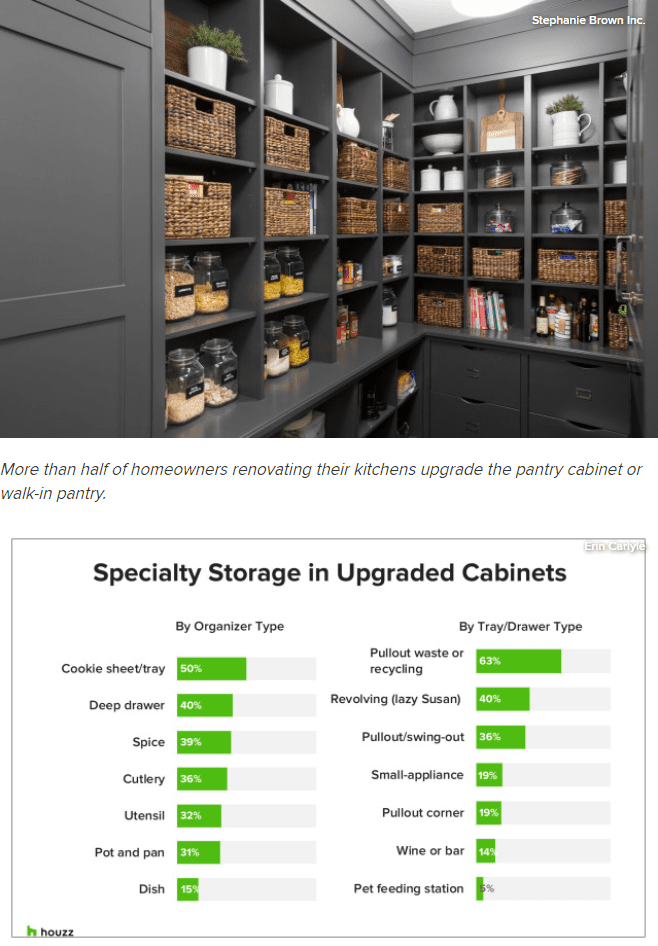
Many new cabinets — inside as well as outside the pantry — contain specialty storage. The most popular cabinet organizers are cookie sheet or tray organizers, chosen by 50% of those upgrading their cabinets. The most popular specialty drawer types are pullout waste or recycling drawers (63%), followed by lazy Susans (40%) and pullout or swing-out drawers (36%).

Additionally, more than half of renovating homeowners upgrade their pantry cabinet (45%) or walk-in pantry (7%).

The 2020 U.S. Houzz Kitchen Trends Study gathered information from 2,598 Houzz users who had completed a kitchen remodel or addition in the previous 12 months, were working on one or were planning to start one in the next three months. The study was fielded between June 19 and July 2, 2019.

5 Favorite Granites for Gorgeous Kitchen Countertops

 Article by: Charmean Neithart

Selecting a countertop material for your kitchen remodel or new build is a big decision. I often encounter clients with a mental block when it comes to making a decision on the numerous considerations, like color and edge detail. Additionally, once the countertop hurdle is over, then there is cabinet selection. 

I like granite and use it often for its durability and its earthy colors that add great texture to a kitchen. I have a few favorites that I have worked with over the years. These granite selections get my stamp of approval because of color, movement and their flexibility in complementing different cabinet styles. Take a look at these countertop selections and how they seamlessly blend with either painted or stain-grade cabinets to make winning combinations.


5BestCountertops1.JPG

1. Bianco Romano

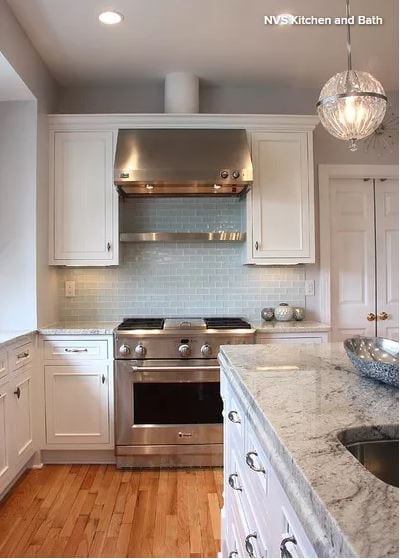
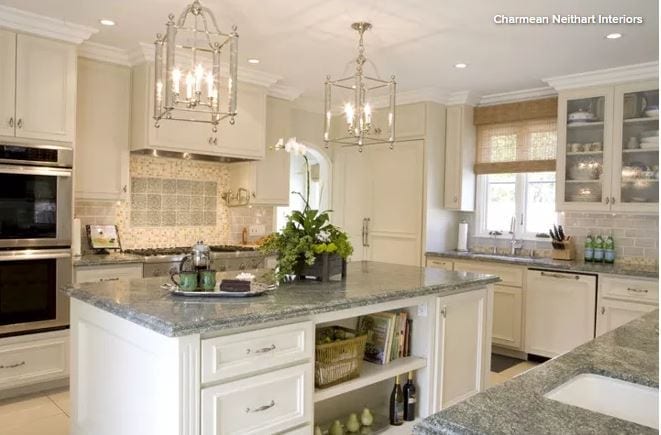
Bianco Romano with painted cabinets. I suggest this granite when I have a homeowner who wants that classic white kitchen. This granite works great with pure white, warm white or beige cabinets. Additionally, nickel or oil-rubbed-bronze hardwareworks great with all the colors of the stone, which include white, cream, gray and a deep bordeaux.


5BestCountertops2.JPG

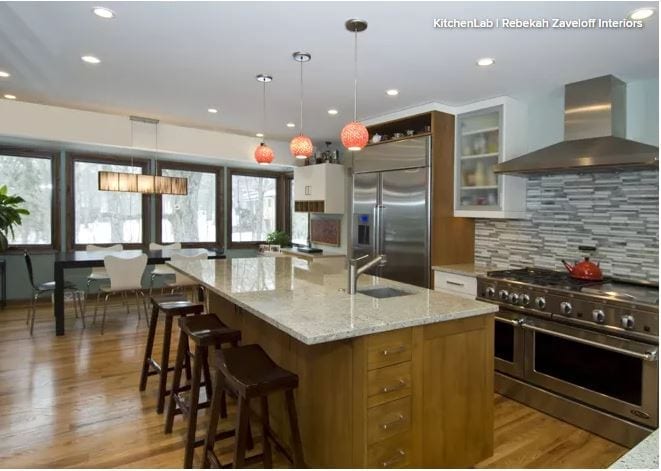
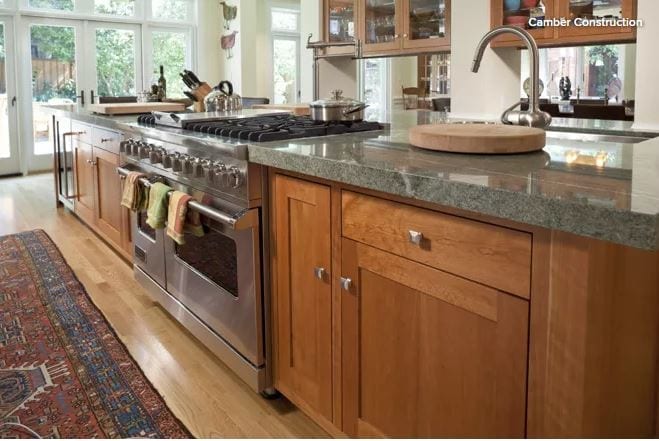
Bianco Romano with stain-grade cabinets. Due to the warm white, beige and gray palette, this granite works equally as well with stain-grade cabinets. I have seen it work beautifully with walnut and medium oak.


5BestCountertops3.JPG

2. Seafoam Green

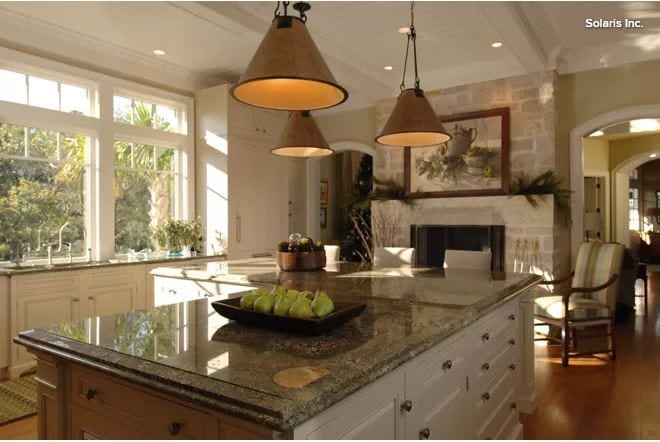
Seafoam green with painted cabinets. This granite is just beautiful. The shade of green is earthy, with gray and brown undertones. There are great markings in the stone that look almost geometric to me. This granite works with painted cabinets and satin nickel hardware. I prefer this stone when it is polished.


5BestCountertops4.JPG

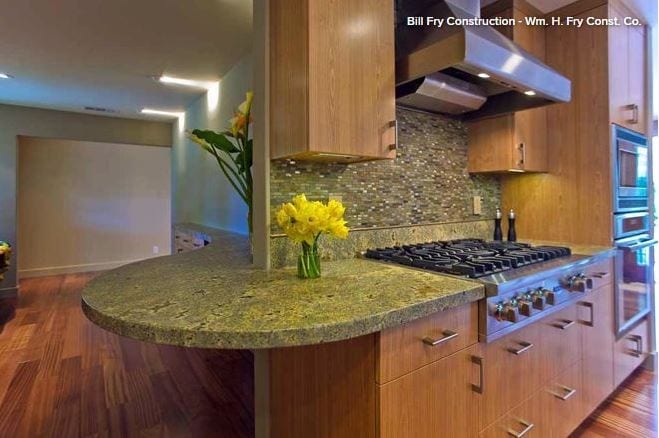
Seafoam green with stain-grade cabinets. If you are looking for a rustic or earthy feel for your home, this is a great combination. Add oil-rubbed-bronze or copper fixtures for the perfect lodge experience.


5BestCountertops5.JPG

3. Costa Esmeralda

Costa Esmeralda with painted cabinets. I first came across this granite when I had a homeowner ask me to create an ocean palette throughout the house. This granite is between green and blue, and of course will vary from batch to batch. The green-blue of the stone blends perfectly with sandy white cabinets and nickel hardware and fixtures.


5BestCountertops6.JPG

Costa Esmeralda with stain-grade cabinets. It’s equally stunning with stain-grade cabinets, for a masculine and warm look. This granite works particularly well in light-filled kitchens; the sunlight highlights the stone’s complex coloring.


5BestCountertops7.JPG

4. Absolute Black

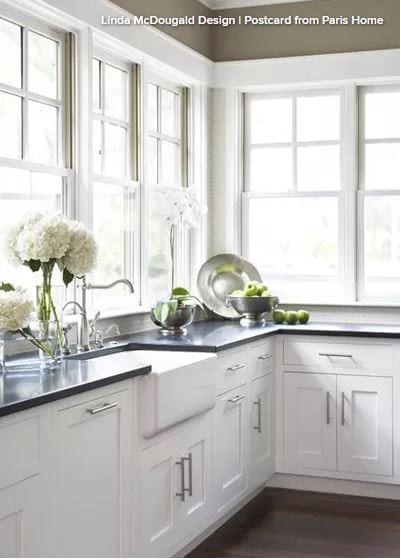
Absolute Black with painted cabinets. This is my idea of a classic kitchen. I love this traditional look of white cabinets and Absolute Black granite, which looks great polished or honed. Painted cabinets in many colors pair perfectly with this granite, and nickel, chrome or oil-rubbed-bronze fixtures and hardware look terrific.


5BestCountertops8.JPG

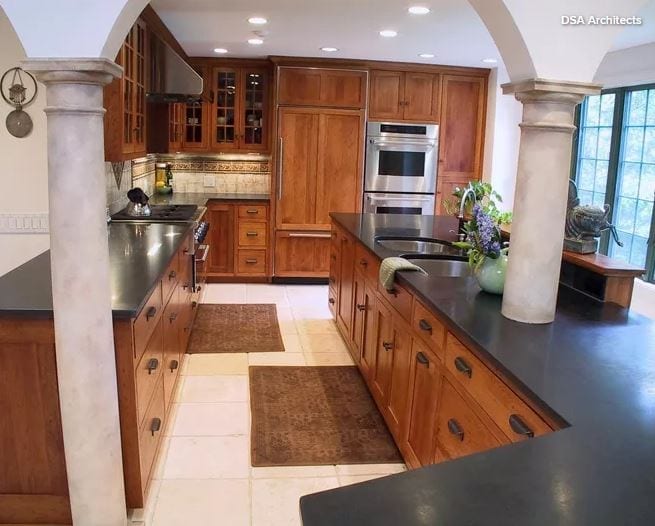
Absolute Black with stain-grade cabinets. Another classic look that can feel rustic or modern. I love Absolute Black with medium oak or walnut. Rift-cut oak also has a great transitional look.


5BestCountertops9.JPG

5. Typhoon Bordeaux

Typhoon Bordeaux with painted cabinets. One of my favorite granite selections, Typhoon Bordeaux comes in cream, gray, brown or brick red. It’s a perfect choice for a light kitchen that has red undertones in the flooring. This granite really can vary by batch, from subtle brick-red veining to strong waves of brick red. Try it with beige or cream cabinets for a warm, light-filled kitchen.


5BestCountertops10.JPG

Typhoon Bordeaux with stain-grade cabinets. I’m a sucker for warmth, so this combination really appeals to me. The brick red and browns in this granite pair beautifully with walnut, oak, mahogany and cherry cabinets. It works well in Spanish homes that feature Saltillo floors. The deep red and brown in the granite and the rustic charm of Spanish architecture are a match made in heaven.

How to Work With Cabinet Designers and Cabinetmakers

Article by: Matt Clawson

When selecting cabinets for your home, there are questions to ask your cabinet designer and questions to ask yourself. Today we take you through that process, helping you define and communicate your vision while sharing tips on working with design professionals.

In the first two installments of this series, we reviewed cabinet basics. We determined the purpose of your cabinet project and its scope, and provided an overview of your cabinet options. You should at least have a cursory grasp of these concepts before you proceed to the next step: choosing your cabinet designer and beginning work.

Once you have a basic understanding of the cabinet possibilities, you’re ready to firm up your cabinet vision. If stock, ready-to-install cabinets work for you, you may not need a cabinet designer, and you will probably save considerable time and money. But for most projects, and certainly all custom and semicustom cabinet installations, the cabinet design and construction processes should be thoroughly planned and examined.


Finding Inspiration

This goes beyond the scope of your project, and cuts more to the picture in your mind of how the installed cabinets should look and operate. You do not need to have all the answers, but you should at least conceptualize what your finished picture might look like. Be prepared for this vision to morph a bit as you get into the design phase, but take the time to form a picture in your mind. 

Is style important to you? If so, find inspiration among the plenitude of cabinet ideas available on Houzz, or you can emulate something you saw at a friend’s home, on television or in a magazine. The point is, find a specific example that shows a cabinet style that attracts you.

Also, it’s important to decide the primary function. Is it display, storage or improved day-to-day efficiency and livability? 

And if you have to prioritize one over the other, is your primary concern style, or is it simply maximizing cabinet function? You should weigh your priorities, though the hope is, with a good designer and proper preparation, you won’t have to totally settle on one element over the other.

Defining the Details

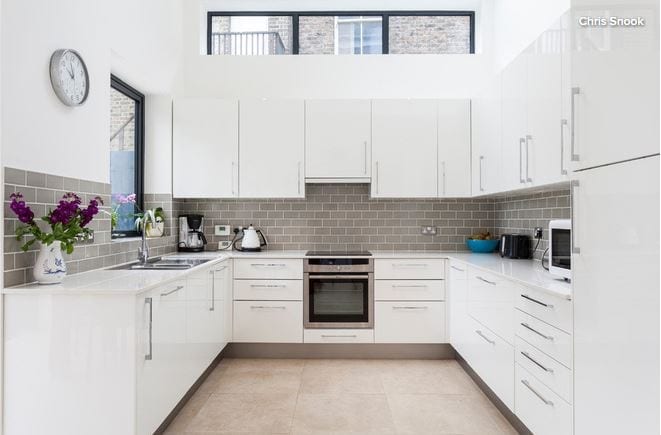
Now let’s take a look at that picture of your project. For the sake of our little exercise, say the photo above is the one you picked. The first question to answer is, why did you pick this one? 

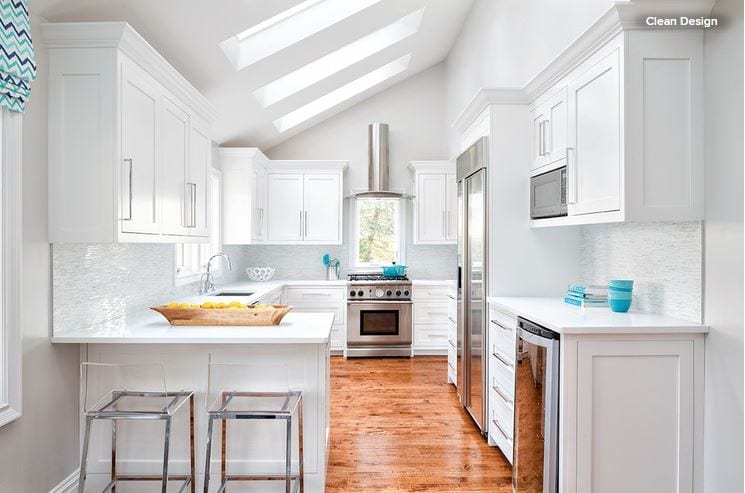
Make sure what you love about this room is in fact the cabinets themselves. These are some of the simplest cabinets you will ever see. There is no display space and there are no visible frills, like crown molding or paneled ends. The cabinets possess a nice high gloss and a stark white finish, and are Euro style (with no visible face frame). They have flat-panel doors and drawer panels, and oversized chrome hardware pulls. They are modern and spartan. 

Do you like all of that? Perhaps what really attracted you to this space was its utilitarian, U-shaped layout, with a full backsplash of uniform beige subway tiles. Maybe you admire the lofty ceiling with a high-set, horizontal window. These parts of the picture relate, of course, only if you too can achieve those elements in your space. Try to look closely just at the cabinets themselves and determine why you like them and what, if any, element you might want to change.

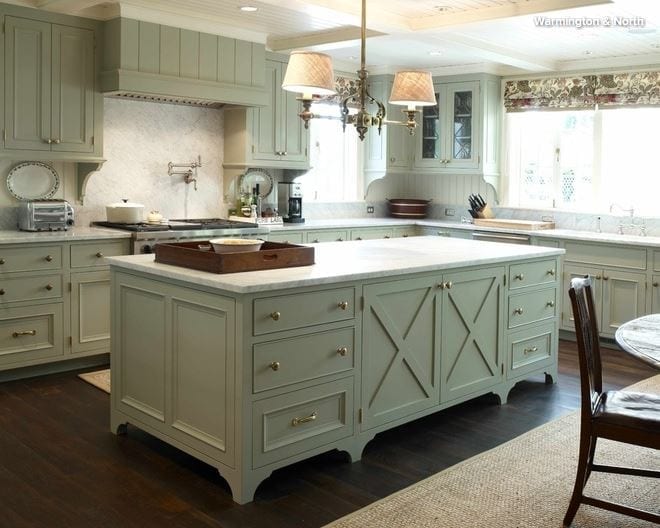
We can also closely examine the more traditional kitchen cabinets seen here, providing another possible example of your vision.

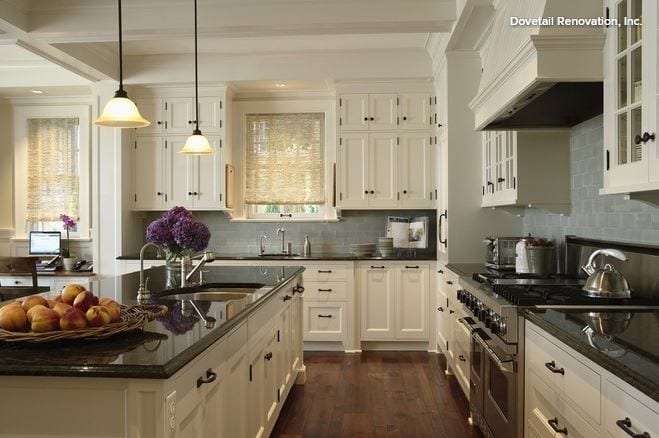
These cabinets are certainly custom-built, constructed with inset construction and using some well-thought-out design techniques to make the space unique. For instance, the drawer banks have two types of drawers. Note the look of the two upper drawers in each base-drawer section — they are not paneled, while the lower drawer beneath them is paneled. This technique produces a freshly elegant effect.

There are also barn-style doors on the island, upper display cabinets flanking the sink and fully paneled cabinet ends. The paneled range hood mirrors the beadboard ceiling and backsplash treatment, and the green painted cabinet finish nicely contrasts the gray-white granite top.

If this look is the one that strikes your fancy, be sure to really investigate each of these features, and try to specifically determine why the cabinets themselves suit you. Do you like the way the corbel details below the upper cabinets precisely relate to the backsplash transition between slab and wood paneling? Do you like the dark floors and the white paneled ceiling? Do you appreciate the brass hardware and fixtures, which might be a resurgent finish choice? Every specific feature of the design that is your inspiration must be examined carefully, so you can properly communicate to your designer exactly what you like about just the cabinets themselves.

Picking Your Cabinet Designer

When it comes to designing cabinets, the usual suspects are architects, designers, builders, specialty cabinet designers and cabinetmakers. Any of these folks might be the right person to design your cabinets, but how do you know which one to choose?

Job title is not really the critical criteria here — expertise is. You need to find out from the person you are considering how many projects he or she has designed. You need to see examples of his or her work. You need to determine if those examples closely match the vision you have for your own project. You need to interview past clients about their satisfaction with both the working experience and the final product. 

You should ask all potential designers to explain the process of working with them. Be sure they expect plenty of communication, and expect to give you the opportunity to review plans and make changes or comments.

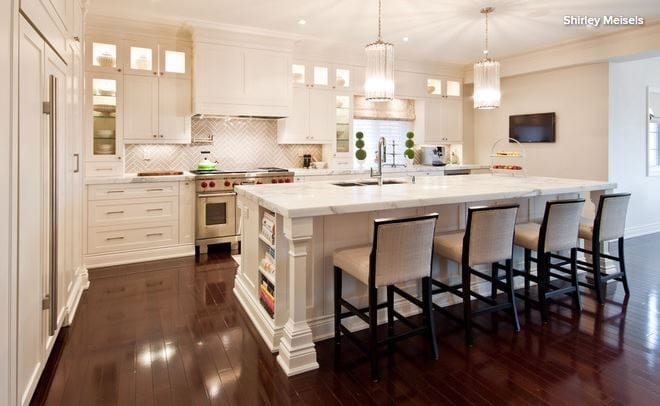
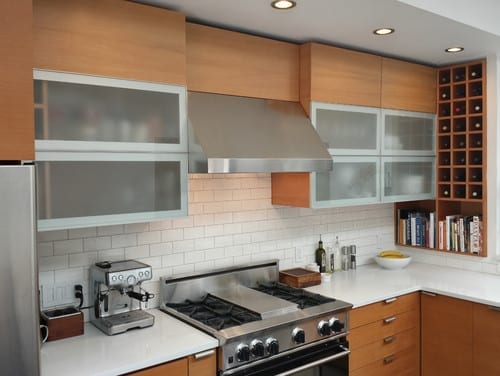
When you’re reviewing past work, unique design ideas can show that a designer is willing to give your project the time it deserves. In the photo shown here, the display cabinetry with wine storage above is a nice example of a small cabinet that maximizes its potential. 

When you share your vision with a prospective designer, how receptive does he or she seem? Do you feel like the designer strikes the right balance between giving advice and listening to your ideas?

Listen. Once you have selected your designer and shared your vision, it is time to listen hard to his or her ideas. All of that experience is worth something, and it’s possible that some of your ideas are flawed in some manner. That’s where a designer can help.

Ask for your designer’s advice, given what he or she knows about your vision and your needs. A good designer will have a method, and you need to be willing to let him or her take the lead, and to listen to this pro on the path to creation. Given your basic understanding of cabinets after reading this series, you will have a head start understanding the decision-making process, and in conceptualizing all the options your designer is sure to present.

Take Your Time Reviewing the Design

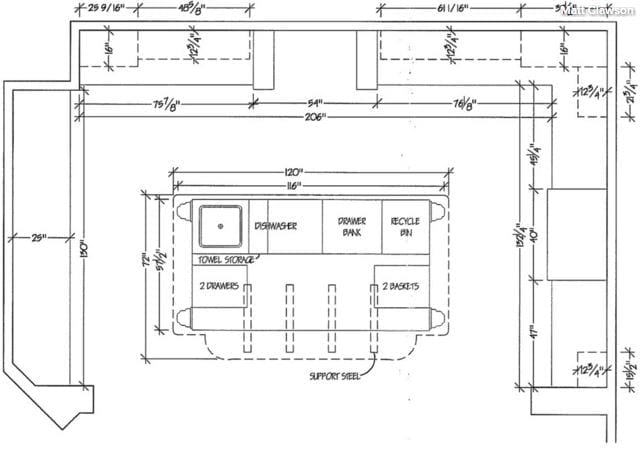
A common mistake customers make is not taking the necessary time to thoroughly review the design before signing an approval. In most cases, your cabinet designer will take a week or more to complete the first design draft after meeting with you. Once you’ve received a set of drawings for sign-off, you should spend time studying each cabinet section. At the very least, the design will include a floor plan (layout), as shown here, and elevations (the cabinet view from straight on). Some designers will also provide a 3-D rendering, which can help you visualize the way the cabinets relate to your space.

If possible, you should walk the room with a tape measure and try to visualize each section. You should make sure nothing is left off that you might have discussed, and you should try to get a feel for how the cabinets will affect your space functionally and aesthetically. Don’t just assume your designer got it right. Your satisfaction matters most, and it is you who must take the time to confirm that the design really is all you want it to be.

Communicate Concerns

You may come up with some concerns, and some of those concerns are likely to be well-founded while others are not. If your designer deviated from some of your expectations, find out why. There may be good reason, or it may be an oversight. Take the time to explain anything that seems amiss to you, and give your designer a chance to explain his or her thoughts before you get worked up.

After the first draft, there are supposed to be changes. A good designer will expect this and be prepared to offer insight while listening to your thoughts.

If, heaven forbid, you find yourself working with a designer who resists changes or does not seem to really hear you, then you may need to get another party involved in the discussion. Sometimes it can be a good idea to involve the builder or architect more actively to smooth out the process.

Compromise

I don’t mean this as a bad thing, but almost all designs are a compromise among competing elements, such as cost, a spouse with different opinions than yours (who knew?) or the style-versus-function dilemma. There almost certainly needs to be some sort of compromise in your plan, and if you have a clear understanding of your priorities, you can properly weigh the few hard choices that are sure to arise.

Get 2 Recommendations and 2 Bids From Cabinetmakers

When working with a cabinetmaker, my advice is to trust your designer and builder. Good builders and designers, who have completed hundreds of jobs for satisfied clients, want to satisfy you too. They know good cabinetmakers, and they have probably developed a good working rapport with more than one. I recommend getting two recommendations, and then two bids for the cabinet construction once the designs are completed.

Your job is to pick the bid that’s best for you. Consider price as well as the advice of your designer and builder. Ultimately it’s a gut decision, but as long as both bids come from reputable cabinetmakers your builder knows and trusts, you have done all you can to ensure a quality finished project.

Patience

Custom cabinets can take two months or more to construct, plus a week or more to install. Once you have made all your design and finish choices, you will have to wait. The installation process can be an exciting time, when you actually see the tangible shapes you painstakingly pored over fill your room. 

Don’t panic during this period. It seems like a long time, and worries can fester, but if you took the time to study this and the other cabinet stories in this series, and found an experienced designer and cabinetmaker to work with, you have done all you can.
The Case for Hidden Storage

Article by: Laura Gaskill

It’s easy to fall in love with beautifully styled open shelves, and to feel swayed by the convenience of keeping frequently used items sitting on the kitchen counter, bathroom sink and desk — but are these methods of storing your belongings really helpful? While there’s certainly nothing wrong with keeping things out in the open, I’ve recently been discovering that making fuller use of hidden storage makes for a cleaner, neater, more peaceful and easier-to-maintain space. Read on and see if you become convinced to give the surfaces in your home a clean sweep.

Gain more useful, usable space. It seems innocent enough at first with a simple canister of wooden spoons beside the stove, a knife rack, an attractive cutting board — after all, isn’t it nice to have things within reach? But when the coffeepot, teakettle, mixer, blender, toaster and dish drying rack are all vying for space, it can be hard to carve out enough room to prepare much more than a bowl of cereal. Imagine how luxurious it would feel to start dinner prep with the counters wide open and clear.

Keep items dust free. Open shelves (when carefully maintained) can be gorgeous, but they also collect dust, and in the kitchen, this is made worse by the addition of cooking oil spattering from the stovetop. If you have open shelving that you don’t plan to change, try keeping a small number of everyday dishes on the shelves, and protect the rest of your kitchen items behind closed doors.

Have less to hide when company is on the way. I recently discovered that by simply cleaning out the medicine cabinet and adjusting the shelving so it could fit some taller items inside, I can easily contain all of the toiletries and toothbrushes behind closed doors instead of on the sink. With only a pretty container of soap and vase of flowers at the sink, a quick swipe with a cloth is often all that needs to be done to get the bathroom party-ready.

Make cleaning quicker and easier. With countertops and surfaces clear, dusting and cleaning take far less time and effort than when those same surfaces are filled with items that need to be cleared off, then returned. Floors free of clutter are ready for a quick sweep or vacuuming, and you’re more likely to get into every corner when nothing is blocking the way.

Make it simpler to avoid accumulating more clutter. When piling stuff on any available surface is the storage method, there is almost no limit to the amount of stuff you can add to the teetering towers of laundry, books and papers. But when putting away is the rule, and you’ve gotten into the habit of keeping surfaces clean and clear, it’s actually easier to maintain a clutter-free home.

Find a place for everything and put everything in its place. If you come home and toss things onto the kitchen table or pile up to-dos on your desk, the clusters of items quickly run into one another, making it harder to find what you need when you need it. By dedicating a certain drawer (or section of a drawer) to each thing you own, you’ll know exactly where to get it and where to put it back when you’re done.

Tame the chaos. You know those perfectly styled photos of busy family mudrooms with cute little backpacks on hooks and rain boots lined up by the door? The reality is often much less attractive. Think muck-covered soccer cleats tossed unceremoniously in the middle of the hall, bags with their contents spilling out and hooks overflowing with all manner of rain gear and sweatshirts. Hide all of this behind neat closet and cupboard doors, and you can at least gain a visual rest from the mess.

Enjoy a more peaceful feeling at home. Even if you choose to clear off only one area in your home — your bedside table, kitchen counter, desk or bathroom sink — the head-clearing, peaceful effect might surprise you. Waking up and coming home each day to a perfectly cleared area is calming and pleasant, and makes everyday tasks and routines easier to handle.

Got a Disastrously Messy Area? Try Triage

Article by: Alison Hodgson

For those of us who are Not Naturally Organized, running a household can be overwhelming. “I don’t even know where to begin” is a common lament. We look at our Naturally Organized family members and friends and wonder how they do it. How do they stay on top of everything? 

The short (and terrible) answer is, they never allow things to get out of hand. 

“Well, that’s not helpful,” you may be thinking. What if — asking for a friend — your house is completely out of hand and has been for some time? Where do you even start?

You start with a system designed especially for disasters: triage.

In medical terms, triage is the process of sorting victims of a battle or disaster into three categories:

  • Those who will probably live whether or not they receive care
  • Those who will probably die whether or not they receive care
  • Those whose lives may be saved by immediate care

But we were talking about houses! What does triage have to do with cleaning?

Consider a personal example. My home (which is not the one pictured here) has an open-concept plan. The front door opens into a small entry, and from there you can see it all: kitchen to the left, living room to the right and a long harvest table straight ahead. 

I told you before how I ignored one end of our dining room table while I focused on keeping our kitchen island clear. The north end of our table was dead to me while I worked to save our island and, really, our entire kitchen. The living room was never in any danger; I had that well in hand from the very beginning. 

Triage worked. I focused my energy on keeping the kitchen counters clean and cleared and allowed my family’s mess to accumulate on the table. Once maintaining the kitchen became habitual, I turned my attention to the table. We’re still building our housekeeping muscle there, but more often than not it’s clear.

In my kitchen I prioritized using the triage system: Everything on the outside (counters, sink, cabinets, appliances) is kept neat and clean, but a few of my cabinets aren’t well organized. My baking cupboard is a jumble, and so is one of the cabinets where I store food storage containers. For the first I need to buy containers to decant my dried goods, and for the other, adding another shelf would probably solve the problem. For now these cabinets are in the first category of triage: They’ll live. I’ll get to them later. 

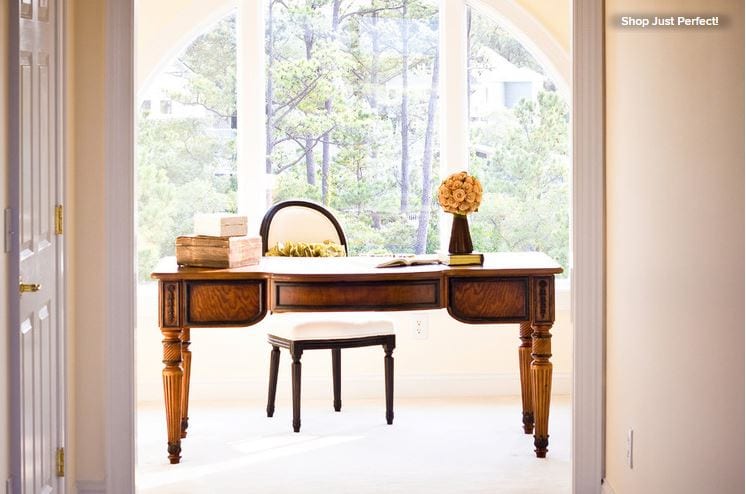
If my desk met this desk at a party and tried to strike up a conversation based on commonalities, “I too am a wooden and horizontal surface” is pretty much all it would have to say.

On the other end of the spectrum is my desk. I have a small study just off the living room, accessible by French doors. There’s just enough room for a daybed, bookshelves and my desk. I keep the daybed neatly made, and it’s a favorite spot where my kids read. The desk is a hellhole, pure and simple, and forever it’s been in the most dire category of triage: as good as dead. I have been willing to shove piles of paper around until I noticed that my Naturally Organized husband (who often brings work home on the weekends) always sets up at our dining room table. I asked him if he would like to work on the desk in the study if I cleared it up, and he said yes, so the desk is getting moved up to the life-saving category.

If you would like to try triage for your own disaster relief, here are a few things to consider: 

Start with what’s visible. This is obvious, but it can go against the instincts of those of us who are Not Naturally Organized. How many times have you said, “We’re getting this place all cleaned up!” and then dumped out drawers, taken everything out of cupboards scrubbed them and then collapsed half-way through sorting everything and ended up with an even bigger mess? Yeah, me too. We tend to swing between perfection and squalor. 

If you’re cleaning the bathroom, just clean it. Scrub the sinks, tub and toilet; sweep the floor; wash the mirror; but do not clean out the cabinet under the sink. When cleaning has become habitual, then you can go for it.

Lower your standards. We love our pretty pictures, and there is a tender ache reserved for beautifully organized spaces. Show me a pantry with containers neatly labeled, and you have my heart. 

The day my house burned down, seemingly out of nowhere my arm shot in the air, and I shouted, “We’re getting a walk-in pantry!” Everyone attributed that to shock, but I was absolutely clear, and today I do have a walk-in pantry with shelves floor to ceiling. I love it. Is it swoonworthy? No. Does it store a ton of food, extra serving pieces, cleaning supplies and small appliances? Definitely, and it’s organized enough.

Don’t trust your instincts. Those of us who are Not Naturally Organized need to check our impulses when we decide to clean and organize. What we’re itching to do is rarely what we ought to do. For example, we have built-in bookcases flanking our fireplace. When we moved a year after the fire, the books I replaced numbered in the hundreds and not the thousands I once owned. As I continued to buy books, I simply set them on the shelves without a lot of organization, and that’s been fine. They’re routinely dusted and pulled forward so they’re always neat, and yet I have been longing to empty all the shelves and reorganize everything. 

This is a little tricky because this needs to be done, but not today. Before I tear into that project, I need to install some shelves in the study and really, of all the things I have going on, it’s a lower priority. My books are totally in category one. They’ll live without rearranging.

How to Make Your Garage a Storage Powerhouse

Article by:

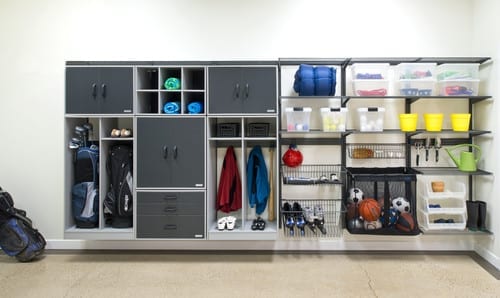
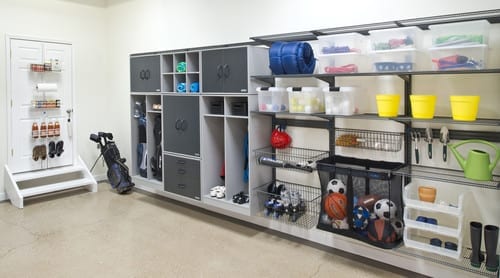
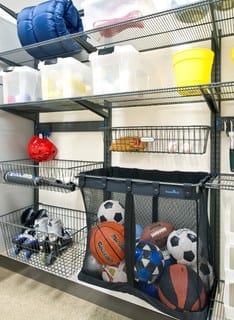
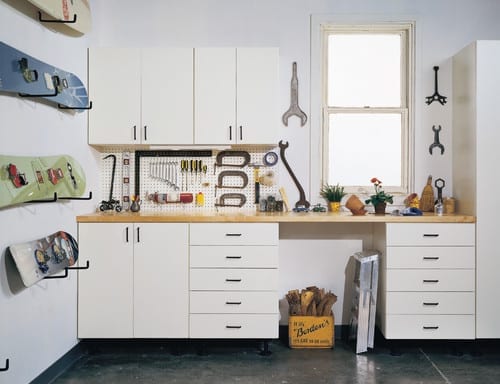
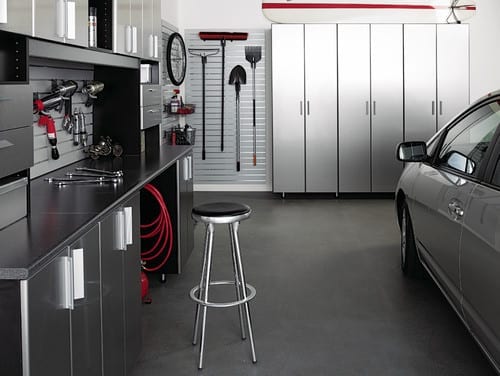
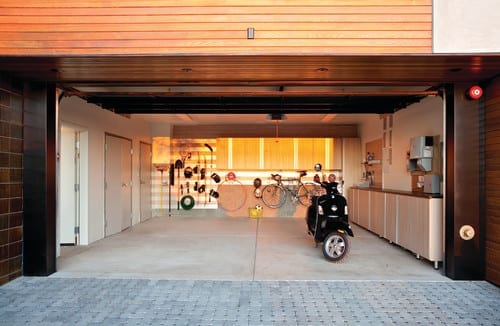
Garages often turn into repositories for everything from sports equipment to holiday decorations. But with planning you can turn your garage into a harmonious space with room to actually — wait for it — park the car. 

Why: “The garage is definitely the most underutilized space in the house,” says Amanda Le Blanc, a professional organizer (she owns The Amandas in Birmingham, Alabama) and spokesperson for Organized Living. “I prefer the garage to the attic for storage, because a garage actually has less temperature fluctuation.” 

How: Ginny Scott, chief design officer at California Closets, says to start by determining what you need to store. “You need to think of your goal first. Do you want to store overflow from the pantry? Do you want to make a Costco closet? Do you need a workspace like a potting or tool bench? Maybe you need a place to stash sports equipment. Once you have determined what you want to do, that will inform the kinds of shelving, cabinets or lockers you need,” she says. 

Le Blanc says knowing yourself will help you figure out what kind of storage you need. “It’s all about how you function in a space,” she says. “An organization system won’t change the type of person you are.” 

She says that although a garage lined with storage lockers and cabinets has a clean look — an important factor for garages that open at the front of the house and are visible to the neighbors — if you are of the “out of sight, out of mind” school, closed storage is not for you. “If you are that type of person, then go for open shelves and labeled bins,” she says. 

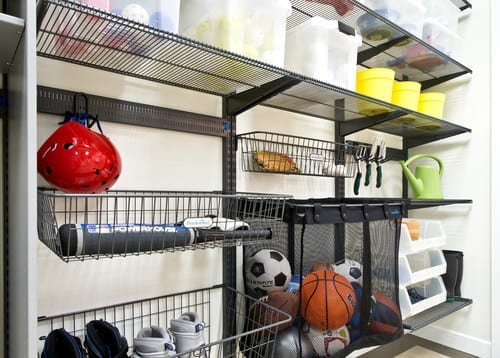
Le Blanc says for kids’ items and sports equipment, open shelving is almost always the answer. “I tell parents to forget about lids with kids,” she says. “If there’s a barrier, it seems to keep them from putting things away.”

Whether you are installing shelves that are open or in cabinets, Scott suggests choosing adjustable units for the garage. “It’s more important here than elsewhere,” she says. “We may not change the way we use our pantry much, but what we use in the garage varies from year to year and season to season.”


Scott adds that it’s also important to choose storage units that are made from durable materials; items stored in the garage are often heavy, so you want shelves that won’t buckle or bend. She also says in the tighter confines of the garage, you are more likely to bump, brush or spill things on your storage system, so an easy-clean material such as a high-grade laminate is often best. 

Cost: It depends on material selection. “The good news is that garage storage is often less expensive than regular closets, because we usually use simple materials and hardware, and we usually don’t use glass inserts,” says Scott.

She says an 8-foot run of open shelving in a garage could cost $1,000 to $2,000 (rough estimate). A row of storage lockers of the same length might cost $2,000 to $3,000. 

Project length: From consultation to installation, this kind of project could take three to five weeks, Scott says.

Permit: “Unless we are doing something structural or adding electricity, no permit is generally needed,” says Scott.

9 Ways to Configure Your Cabinets for Comfort

Article By: Jennifer Ott

Those of you building or renovating a kitchen face countless decisions. Just for the cabinetry you have to select the materialframe typedoor stylehardware and more. 

I hate to add to your list of selections to make, but there are a few details to think about when it comes to ergonomics, too; how you configure your cabinetry can make your kitchen a comfortable and efficient workspace for you and your family.

1. Minimize uppers. Wall cabinets can be a stretch for many to access — or altogether out of reach for some — so consider removing wall cabinets and putting in a bank of windows instead. This is an especially smart move if doing this will give you a nice view. 

2. Be shallow. Instead of wall cabinets, I like to install shallow floor-to-ceiling pantries. They’re an efficient use of an interior wall, where you can’t have a window anyway. By limiting the depth to just 6 to 9 inches, you are forced to line up your dry goods in a single row, making everything easier to find.


3. Go for open shelves. If you really need wall-mounted storage, try installing a few open shelves. They’re a more efficient way to store items, because you (and your guests) can see where everything is, and you don’t have to open and close cabinet doors to access things. Limit the stored items to those you use often so they are less likely to collect dust. 

4. Lift up, not out. For those who want closed wall cabinet storage, take a look at horizontal cabinets. There’s only one door you need to open to see everything in the cabinet, and you don’t have to step out of the way as you open and close it. 

5. Install drawers. When it comes to base cabinets, I can’t recommend drawers over doors strongly enough. Deep drawers can hold almost anything you need to store in a base cabinet. Plus, it’s much more efficient to just pull the drawer out and have all the contents on view right in front of you than having to open two doors and root around for what you need.


6. Avoid corners. If you can design your kitchen to not have corner cabinets, do so. Corners tend to cause traffic jams in kitchens, and corner cabinets can be awkward to use. 

7. Or make the best of your corners. If you can’t avoid corner cabinets, then at least make them as functional and easy to use as possible with fully rotating lazy Susans or clever corner drawers.


8. Upgrade cabinetry.Soft-close door hinges and drawer glides are more must-haves. It is totally worth the small extra charge for these features, which allow you to shut doors and drawers with one efficient push and no slamming.


9. Vary countertop heights. While the standard kitchen countertop height is 36 inches, there are many tasks that are more comfortably performed on a lower or higher surface. This is especially true for those who are taller or shorter than average. 

Typically you want your forearms to be at or near level when you’re working at the countertop. But for us tall folks, that’d require a surface height of 42 inches or more — a difficult height for kids or shorter members of the household to use. 

The solution is to set up areas with differing countertop heights to accommodate the various statures of the users and their tasks. Extra storage room in the cabinet underneath is an additional upside to taller work surfaces.

Cleaning Up in the Laundry Room

ARTICLE BY ANITA SHAW

Downstairs, lurking somewhere in a dark corner of an unfinished basement, is a cramped area housing the washer and dryer. It’s an image most people can relate to as, at one time or another, we have stood in a “laundry room” like this.

Well, that image can be banished from memory, as today’s laundry rooms are not only bright and airy, they are places where people actually enjoy spending time. They are incorporating many amenities from other areas of the home and acting as gathering spaces for a variety of activities. And, the desire for these spaces to incorporate high-end design and functionality is definitely on the rise.

“I consider laundry spaces to be almost on the level with kitchens and baths,” states Tina Kuhlmann, principal designer, Primrose Design Interiors in San Diego, CA. “People are in and out of there all of the time. It’s a really integral part of the kitchen and the family.”

While storage is a necessity in the laundry room, Lee Taylor, showroom manager for Taralla Kitchen and Bath in the Bronx, NY, notes, “the look of the cabinets and countertops are sometimes more important. These rooms have become an extension of the kitchens and living spaces.”

laundry room

Photo: Kelly Keul Duer and Virginia Vipperman | Designer: Cameo Kitchens

Laundry necessities

The approach to designing today’s laundry rooms is much the same as with other rooms, according to designers. It’s critical to understand how clients not only wash and dry their clothes, but also use the surrounding space.

Families tend to do laundry in different ways, so it is important to know their habits, stresses Mike Macklin, designer, Cameo Kitchens in Falls Church, VA. “If the family brings their laundry down in baskets and promptly takes the basket back to their rooms, open shelving is a practical way to go. But, if the laundry tends to pile up, storage behind doors may be a better idea.”

“I put a lot of things behind doors because I know people are messy,” stresses Kuhlmann. “Very few of us live like the catalogs look.”

Of course, a surface to act as a folding area is critical, and one size does not fit all. “When I’m dealing with empty nesters, they often ask for a place to fold that is nice and at back level, so there isn’t a lot of bending over,” comments Kuhlmann.

“Many of our customers opt to use washers and dryers that fit under the counter,” notes Macklin. “This provides a counter space more than long enough to fold and organize clean laundry.”

An oversized sink is an important element, according to several designers. “I always include a laundry sink with a pull-down faucet,” states Kuhlmann. “The pull-down faucet is really nice because you can get in there and spray those stains out or pretreat.”

It can also be used to wash delicates and, once those delicates are washed, areas for hanging become very important.

“Sometimes I’ll do a tall hanging cabinet for delicates because people don’t always want to dry them in a dryer, and they don’t really want to look at them, either,” reports Kuhlmann. She has created cabinets to hang delicates that function like a closet. She includes open-weave bronze or copper on the door, sometimes backed by fabric, to allow for air circulation for drying.

“Drying racks and drip areas are a big deal,” adds Lynley Serratt, CKD, CBD, Allied ASID, director of sales and marketing, Palmer Todd in San Antonio, TX. She reports that her firm has done pull-out drying racks in the space between the top of the front-load washer and dryer and the cabinet above.

laundry room cabinets

Photo: John Lennon Photography | Designer: Tina KuhlmanAnd, while ironing may be akin to drudgery, ironing boards are important to the room’s design. However, tucked away and out of sight is the preference for this household item. Kuhlmann likes to put the ironing board behind a finished door panel so that it looks like it’s part of the cabinetry.

Laundry plus

In addition to the items people expect to find in the laundry room, there are several surprise amenities that are finding their way into the design. Charging stations for the family’s multitude of electronic devices have found a home here, as have beverage refrigerators and flat-screen televisions.

Of course, innovative storage is a must, especially in rooms that serve multiple purposes.

“Organized space for coats, hats, backpacks and sports equipment is essential [when this area is combined with a mud room], and bench seating can be an effective means of hiding these necessities,” reports Macklin.

“These rooms are used by all members of the house on a daily basis for staying organized, and for keeping the clutter out of the rest of the house,” she reports.

“I tend to like drawers in the laundry room that aren’t as deep – maybe three or four of them. That way, you don’t lose things in the bottom,” remarks Kuhlmann. If a larger drawer works better for the space aesthetically, she will often add a hidden drawer within the larger one that can roll fully to the back of the drawer.

Lighting – both natural and installed – is key to the space for both function and spirit. Since time will be spent in a laundry room that serves multiple purposes, windows that bring in daylight are essential to the overall design. And, according to Kuhlmann, good undercabinet lighting is important, especially for matching dark socks!

People also like to personalize the space with add-on features. “You can explore your personality a bit more in this room because, typically, it’s just one family member running the show, unlike a kitchen or bath where you have to compromise,” explains Jenny Rausch, CKD, president, Karr Bick Kitchen and Bath in Brentwood, MO.

laundry room cabinets

Photo: Denash Photography | Designer: Jenny Rausch

She has created laundry rooms with glass tile, marble tops and crystal chandeliers. “If you love an expensive backsplash tile, the good news is that, in a laundry room, you probably won’t need that much of it,” she stresses.

Kuhlmann agrees. “A tile backsplash is a significant amount more money, but you can have a lot of fun with it. It gives the difference between looking at a dry wall surface and that punch of design.”

Kuhlmann also likes putting solid surface countertops in the laundry room when she can. “Nobody wants to be scrubbing tile grout,” she comments.
Rausch stresses that the laundry room can be just as profitable as a kitchen because the same materials are used in both spaces. “Lighting, cabinets and tile carry high margins, and all can be done to the max in these dream laundries,” she comments.

“It’s important to pay attention to all of the details,” continues Rausch. “It’s not just a laundry room – it can be a sanctuary.”

While the idea of laundry room as sanctuary may not have caught on as of yet, the laundry room as mud room, gift wrapping center or craft space certainly has.

Wrapping areas are very popular in the laundry room, according to Kuhlmann, and she will incorporate storage for rolls of ribbon and wrap, scissors, tape and the like.

Kuhlmann has done laundry room dog washes, too. “I’ll install a shower pan and a handshower low on the wall for when your pet comes into the mud room and has muddy feet,” she explains.

“We expect more requests for laundry room renovation in the future, as customers seek to maximize every inch of their home,” concurs Macklin. “The laundry room will be more of a home center and an important component of the home’s design.”
“Call it what you will, the laundry room has become this wonderful multi-use space that’s not just about laundry anymore. It’s almost like a secondary multi-purpose room adjacent to the kitchen, and if we educate our clients in that general direction, they’re going to want it that much more,” states Kuhlmann.
(You are reading an article originally posted on ForResidentialPros.com)