FREE DESIGNS AND ESTIMATES

How to Plan a Quintessentially English Country Kitchen

Article by: Lara Sargent

The super modern, stripped-back kitchen might look beautiful in the brochures — and if you’re disciplined enough to keep an all-white room spick-and-span, it can look fabulous in real life too. But if you crave something a little kinder to the chaos of daily life, you probably already have a soft spot for the quintessentially English country kitchen.

The relaxed livability of the painted cupboards, wooden countertops and stone slabs so familiar to this style exudes an irresistible warmth and charm, but there’s room for gentle updates, too. 

So harness the rustic look and make it work for the 21st-century home with these 10 country kitchen must-haves.

Read more

12 Breakfast Nooks Cool Enough for a Dinner Party

Article by: Susan Redman

Nothing brings a family or group of friends closer together than sharing a meal. It’s even better when they are comfortably rubbing shoulders as well. Kitchen nooks and dining alcoves are ideal for such intimacy, making the dining experience especially enjoyable. Here are 12 inspiring kitchen nook designs to install in your dream home.

1. First-class compartment. In keeping with the warm, minimalist elements featured elsewhere in this California ranch house, this nook has cedar ceilings, Sheetrock walls,exposed timber framing and structural steelwindows. The site for the house is edged with mature evergreen trees and opens to a field with views out to the Pacific Ocean. With its panoramic-size window and glorious outlook to a countryside vista, this sleek dine-in nook is a stylish way to eat at home. 

2. Norwegian wood. In this country kitchen, designed by architect Christine Fikseaunet, a simple window seat with an upholstered banquette cushion is paired with a wood table to create a casual dining setting. With the addition of a small screen in the corner of the nook, it also allows for communal television viewing among family members or friends.

3. Covered dining. This dining space has a wood alcove built up and over a table, creating an elegant dining space that looks like a private dining booth in an upscale bistro. The mix of materials, from the timber paneling to the channeled upholstery and stone table, adds sophistication to the alcove’s slick urban look.

4. Rough hewn. This industrial-style dining arrangement is easy to copy. Find a wood trestle table and some midcentury modern chairs, and fit them into a small area of your home, preferably with a window view. The tight space and brick and plaster walls give the dining area a congenial air.

5. Bright and breezy. This built-in banquette needs little more than a small table and a couple of light-colored chairs to complete a fine-looking and functional kitchen nook. The window bench extends from the end of the kitchen cabinets to create an ideal space between two big windows. The banquette can also double as storage with a hinged lid seat covered by cushions.

6. Budget box. Make the most of a breakfast nook by installing a complete compartment that keeps diners out of the way of the cooking action in the kitchen. Additionally, those on a budget will benefit from copying the style of the boxed-in nook pictured here. Inexpensive wood can be painted white to make the area bright. To add value, choose a more expensive tabletop and treat it with a good sealant oil to keep it looking good with use.

7. Geometric play. This small dining nook was designed by Kimball Starr Interior Design in San Francisco. Starr says her clients wanted the area off the kitchen to be used as an activity nook for playing board games with friends; she added a touch of grown-up glamour with impressive geometric pendants and a custom banquette upholstered in a playful fabric.

8. Cool and clean. This spectacular dining banquette is sited in the middle of a living space in a renovated 1960s apartment in Melbourne. It was decorated by interior design company Mr. Mitchell within a stand-alone, all-white cube. This “allowed us to introduce the macramé screen, which is a fun reference to the retro era of the apartment,” says Mr. Mitchell director Andrew Mitchell. 

The banquette is a focal point of the home, providing an intimate place for family gatherings or a quiet place for reading or working.

9. Retro kitchen and dining nook. This small eating nook would work well in a house with midcentury aspirations. It’s plain and simple but has been well decorated with a set of shelves that also acts as a divider. 

The wall map is a retro classroom touch that can encourage guests to share after-dinner stories of their world travels. Decorating the area with fun travel posters from faraway places can also encourage the exchange of personal travel stories and tips for future adventures.

10. Garden fresh. Children’s colorful artwork has been framed and hung to personalize this charming nook. This is a great idea for families, especially when a kitchen nook is also used as a homework and craft center. 

Installing a small U-shaped nook is a clever way to divide a kitchen with a generous expanse of floor. Take advantage of the extra room and install a nook big enough to accommodate plenty of dinner party guests.

11. Corner nook. Custom woodwork and banquette seating can create a sophisticated corner nook in the kitchen. In this L-shaped arrangement, the wood grain of the built-in banquette is matched to the kitchen countertops and complemented by a white table and cabinets. To add color and interest, it has been decorated with a variety of flea market finds.

12. Dramatic flair. In an all-white kitchen, introduce color and texture with bold and cheerfully patterned upholstery. Brighten up the nook with glass pendants, a colorful table setting and freshly picked flowers. Note how the pullout drawers under the benches provide storage — a perfect place in which to keep all your board, card and trivia games for after-dinner fun. 

Why You Should Embrace a Solid Slab Backsplash

The effect is stunning, and yet the cost can be minimal. Here’s what to know about using full slabs of stone in your kitchen

A solid slab backsplash is a custom look that says luxury in a kitchen of any size. But it doesn’t require a luxurious budget. Take inspiration from this trendy yet timeless look, and give your next kitchen remodel a solid head start.

Read more

How to Bring the Beauty of Reclaimed Wood to the Bath

Article by: Becky Harris

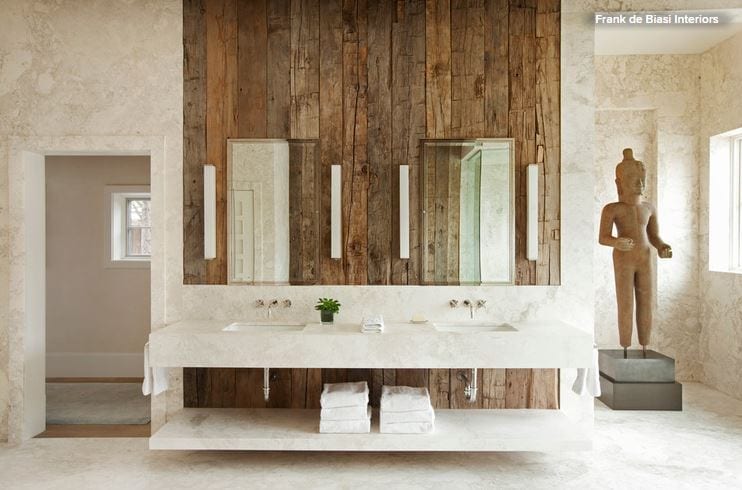
Reclaimed wood has never been more popular, making its way from basement bars all the way up to elegant master bathrooms. Used on flooring, vanities, accent walls, mirror frames and even tub surrounds, this material adds warmth and rich texture. It’s also a wonderful contrast to the usual bathroom materials, such as glass, granite, marble and tile, which can leave a space feeling cold. “Reclaimed wood can be a once-in-a-lifetime gift,” says Nathan Daves, of Restoring TexasBut using it in a room full of potential splashes and steam takes some extra consideration. “At the end of the day, water is the evil kryptonite for wood,” Daves says. 

Daves also warns that not all reclaimed wood is created equal. A broken-up pallet will not withstand moisture at all like old-growth pine lumber harvested from a pre-1940s barn, for example. Other good choices for moisture resistance are reclaimed teak and old-growth cypress. Whichever wood you use and wherever you decide to use it, check out this list of ideas and advice to see if reclaimed wood will suit your bathroom.

1. Talk to your contractor about the realities of protecting the wood. No matter whether you treat the wood or not, protecting it from direct contact with water is a good idea. “If water is allowed to sit on the wood, it will eventually find its way in,” says Daves, who recommends sealing reclaimed wood used in a bathroom with an oil-based polyurethane. “Anything that coats the wood will eventually be infiltrated and begin breaking down, but woods with high rot resistance will last longer,” he says.

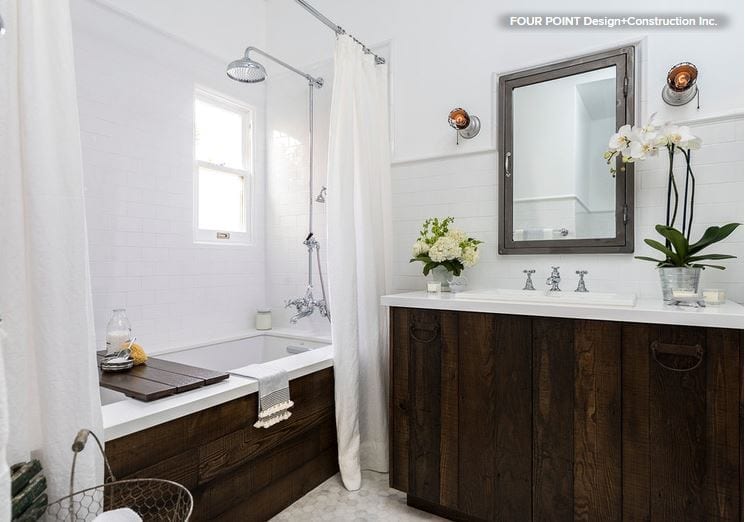
Using wood as an accent wall where it won’t be splashed by water is smart. Here, a high backsplash protects it from direct contact with water.

2. Realize that the material will swell and contract. In this Hollywood actor’s bungalow, salvaged wood mixed with crisp white and vintage accents give the room a modern eclectic look. The designer, Laura Schwartz-Muller, even had a simple matching tub shelf crafted to match. 

Schwartz-Muller understood the importance of treating the reclaimed wood as “a living, breathing thing,” as she describes it, one that will grow and contract. Thus, she used flexible silicone caulking and left a ⅛-inch gap between the sides of the tub and the walls, and beneath the tub top. She sealed the wood with three coats of fully cured polyurethane to protect it from moisture. 


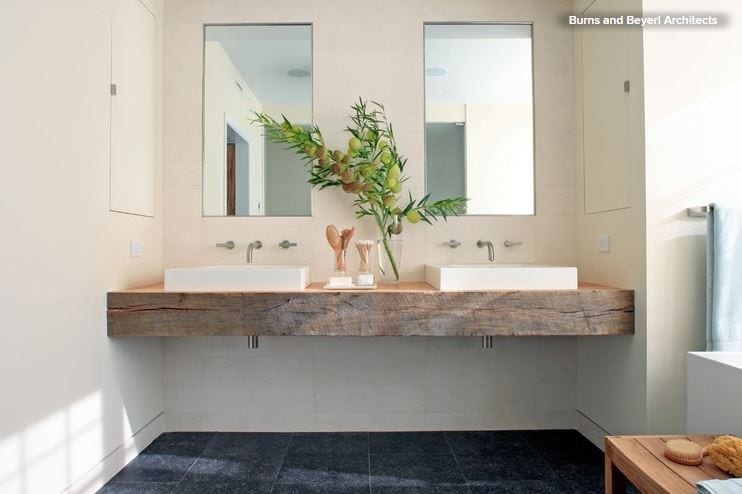
3. Use reclaimed wood for contrast. It’s a wonderful way to add warmth to a modern bathroom. The rough-hewn quality of these reclaimed white oak timbers makes them standouts in this otherwise clean-lined space. 

There is extra maintenance involved, so you have to decide if the look is worth it to you. When these owners opted not to add a glass top to the counter, they were aware that they would need to do a little light sanding and add a new satin-finish polyurethane coat on their countertop every few years. 

Tip: The designers at Burns and Beyerl Architects recommend using reclaimed wood as a countertop in adult bathrooms as opposed to those for kids, as kids are less likely to mop up any splashes and little puddles they might make when using the sink. 

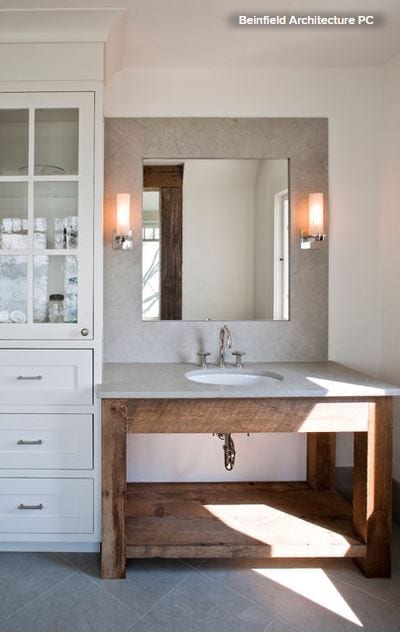
4. Add a different countertop atop a reclaimed wood base. If you’re turned off by the extra maintenance required by a wood counter, this is a good alternative. In this elegant bath, an open vanity base constructed from old barn wood adds a striking material to the textural palette. The designers at Beinfield Architecture treated it with a clear wood sealer. 

Using a fan when you’re steaming up the bathroom is another way to help keep moisture away from your reclaimed wood.

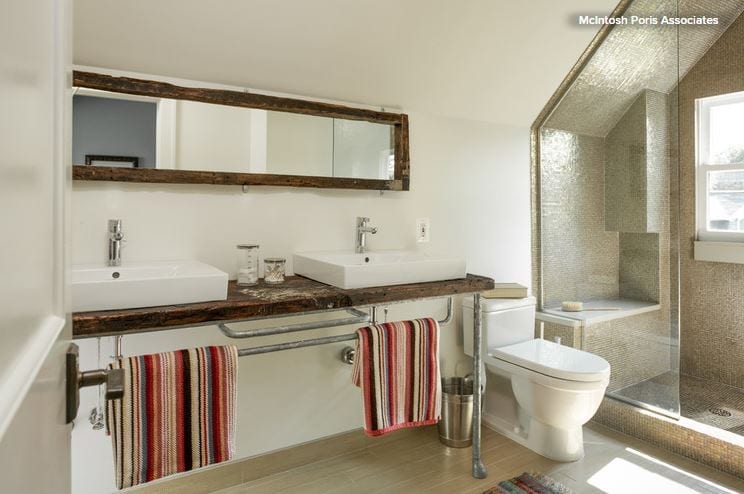
5. Add more than one reclaimed wood accent. Here the vanity counter and mirror create three long horizontal lines of dark rustic reclaimed wood. 

In fact, reclaimed wood is an element these homeowners used throughout their farmhouse, and it ties the rooms to one another. 

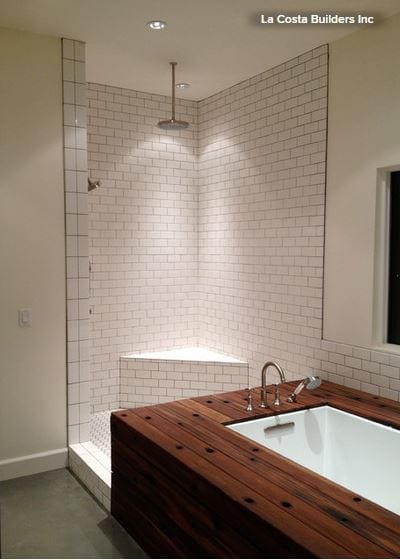
6. Consider teak. Teak is one of the most rot-resistant wood species out there, which is why these teak boards surrounding the tub originally were used on the deck of the USS North Carolina battleship. The coloring and knots make the bathtub a focal point in the room.

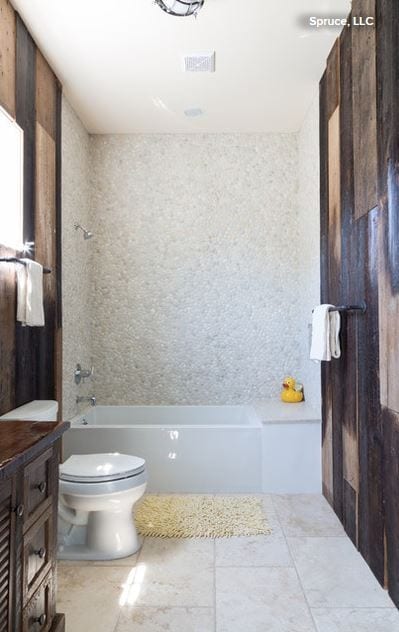
7. Highlight your home’s history by harvesting wood during the demolition phase and upcycling it in the renovations. In this New Orleans bathroom, interior designer Nomita Joshi-Gupta of Spruce used bargeboards that were original to the house. These bargeboards are at home with water; they are lumber recycled from cargo barges that floated goods down the Mississippi River and were then broken up upon arrival. It was a common construction material in Creole architecture historically. “When we gutted the house, we found bargeboard, and we decided to reuse it in many portions of the house,” she says.

The design team took the best pieces and installed them like paneling, then sealed it with polyurethane. “It is a beautiful texture, and it was nice to reuse and reclaim the home’s own history,” Joshi-Gupta says.

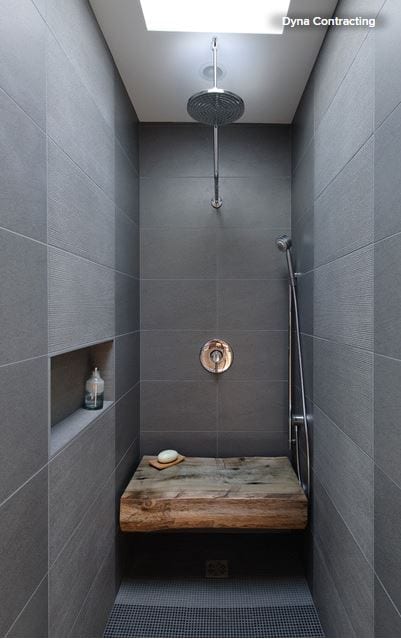
It’s only fitting that this piece of cedar in this floating house in Seattle serves as a unique shower bench, because it was part of an old log float. As it had floated on the water for many years before, the client decided sealing it wasn’t necessary. 

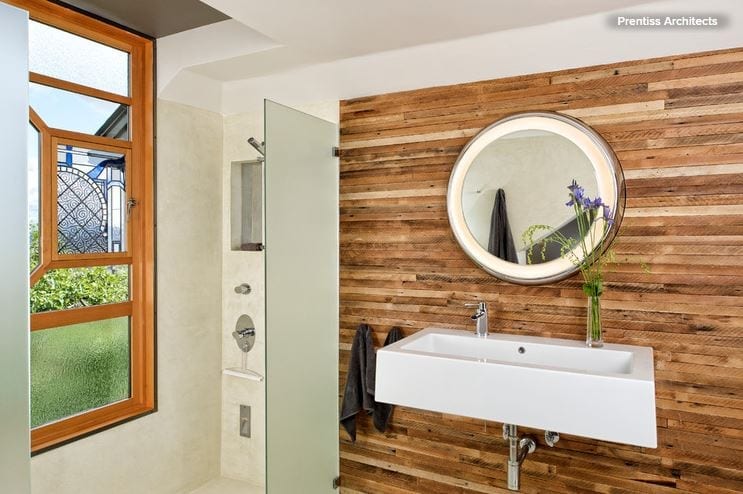
When remodeling his 1902 foursquare home, architect Geoff Prentiss ripped out plaster and preserved the 113-year-old fir lath beneath it. “The lath, usually between 24 and 48 inches in length, was stained in part, which I liked, but also had lots of tiny nails and bunches of sand in it, which was not so good,” Prentiss says. He pulled out the nails, shook the pieces and then very lightly sanded the rough-sawn surface. After installing it on the walls, he used a clear sealer. “There has been no issue in the wood absorbing water, even as the backsplash of the sink,” he says.

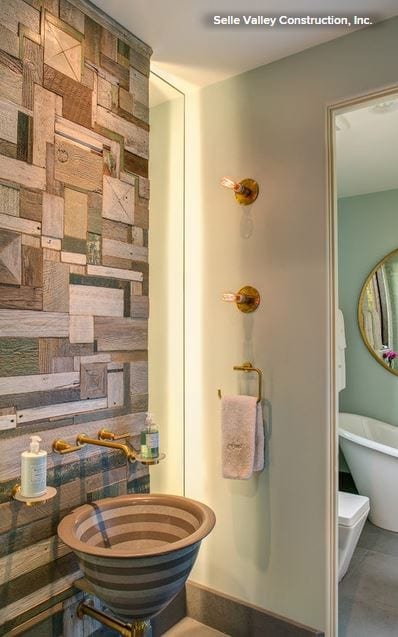
8. Create something artful. This beautiful wall is a patchwork of reclaimed wood pieces made by local Sandpoint, Idaho, artist Rob Payne.

9. Combine reclaimed wood with soapstone countertops. The combination of the sanded-down white paint on the reclaimed-wood base and the veins in the countertop tie the two pieces of this vanity together in a unique way. A long trough sink and a frameless mirror create a clean look.

10. Pair reclaimed wood with unlacquered brass fixtures and hardware. The way the material patinates works well with the rustic look of reclaimed wood. 

On this vanity, Studio Marler used recycled wood for the doors and drawer fronts. Surprisingly modern storage solutions hide behind the vintage-looking facade.

11. Use reclaimed wood in a powder room. If the thought of steam from the shower, splashes from daily face washing and toothbrushing, or keeping up a wood countertop has put you off, consider using it in the powder room. 

In this contemporary barn-like home, the main floor’s powder room has a unique reclaimed-wood and Plexiglas surround that glows like a lantern. The architects specified that the Plexiglas be sanded to give it a frosted look. 

10 Ecofriendly Tips and Tricks for Cleaning Your Home

Article by: Luisa Rollenhagen

Chemical based cleaning products have drawbacks: They’re pricey, they may trigger health issues and their manufacture, use and disposal can harm the environment. So if you’re approaching a spring cleaning of your home this year, why not consider these effective all-natural cleaning alternatives?

Lemon

Lemons are nature’s cleaning wunderkind. They have powerful antiseptic and antibacterial properties and are a natural deodorizer due to their high acidic content. Here are some suggestions for how to use lemons in your home: 
Have your copper pans lost their shine? Dip half a lemon in salt or baking powder to scour your pans to their former glory.Mix a bit of lemon juice with baking soda to remove stains from plastic containers. Combine lemon peel and white vinegar in a jar, allow to marinate for a few days, then strain out the peel to use the vinegar as a cleaner. A small dish containing vinegar and lemon juice will absorb odors.Rub a slice of lemon across your chopping board to disinfect the surface.

Baking Soda

Baking soda, like lemon, is another one of nature’s cleaners. Also known as sodium bicarbonate, this mildly alkaline substance functions as a gentle abrasive, deodorant and more. 

A thick paste of baking soda and water can be useful in removing surface rust. A more liquid mixture of baking soda and water can function as an all-purpose light cleaner that’s particularly effective on grease. 

Clean your oven. A thick paste of baking soda and water can be applied to the bottom of the oven to clean it. Let it sit for a couple of hours or overnight before scraping it off and wiping the surface.

Brighten the bowl. Baking soda also is a winner in the bathroom. Throw a cup of baking soda into the toilet bowl and let it sit for more than an hour. Then add a cup of white vinegar, let the mixture sit for a while longer, and flush.


Safely clean your clothes. Baking soda also is a great addition to your laundry room. When added to your washing machine, it can soften your clothes and remove any unpleasant odors.

Fun fact: If your clothes happen to be contaminated with uranium, add a cup of baking soda to the wash to get rid of that pesky nuclear radiation. This sounds like a joke, but it’s not. Apparently scientists have discovered that sodium bicarbonate will bind with depleted uranium dust and remove it from clothes, which chemical detergents can’t manage. Talk about an all-purpose cleaner. Nonetheless, don’t go playing in uranium dust anytime soon, kids.

White Vinegar

Mentioned a couple of times already, white vinegar is a weak acetic acid that can be used in almost all aspects of home cleaning, as it has strong antibacterial properties. 

Vinegar diluted in water is an effective stain remover for various textiles. It’s also a great natural deodorizer, and can be combined with various other natural products, such as lemon juice, to absorb odors. Simmer vinegar with water on the stove while cooking to prevent cooking odors. Vinegar can help remove strong scents left over from fish, onion and garlic too.

Refresh your dishwasher. If your dishwasher could use a thorough cleaning, ditch the expensive chemical tabs and instead fill a dishwasher-safe bowl with two cups of white vinegar and set it on the top rack. Let the otherwise empty dishwasher run one cycle to get rid of any odors and bacteria.

Descale your kettle. Vinegar is your friend again here, although you can use lemon juice, too. Pour a 50/50 mixture of white vinegar and water into your kettle, allow it to boil, then rinse the kettle out once it cools down a little but is still warm.

Make your windows shine. Vinegar to the rescue again. Fill an empty spray bottle with a 50/50 mixture of white vinegar and water and use a microfiber cloth to wipe down your windows and avoid any streaking. This also works wonders for mirrors.

Keep those tiles sparkly. The grout between tiles in the bathroom can quickly accumulate mold, which is both unsightly and unhealthy. Remove it by mixing one part carbonated water with one part white vinegar and spray it on the moldy areas. 

If the grime still doesn’t scrub off, add two parts baking soda to the vinegar-water mix to make a thick paste. Let the mixture sit on the grout for at least 15 minutes before scrubbing it off. 

10 Pair-Ups for Black in the Kitchen

Article by: Laura Gaskill

It can be cool and modern, elegant and traditional, or something in between — black in the kitchen may be having a moment, but this classic color isn’t going anywhere. As in other rooms, remember that a little bit of black can go a long way, so consider the size of your room and the amount of natural light before committing. From cabinetry and tilework to floors, here are 10 ideas for incorporating the deepest, darkest hue into your kitchen design.

1. Black and white striped tile + polished concrete. Give simple subway tiles a fresh treatment by alternating horizontal rows of black and white tile. Varying the width of the stripes makes the look more dynamic; stainless steel appliances and polished concrete counters add a sleek, modern note.

2. Black floors + warm gray walls. Black stained wood floors and white cabinetry are warmed up by “greige” walls, a cozier alternative to stark white. Dark floors paired with a lighter hues on the walls and ceiling can make a room feel taller. Bright window shades and stools, plus a large framed beach photograph, give this space a playful feel.

3. Bicolor black and white walls + oak counters. Can’t decide between black and white? Split the difference: Paint the lower half of the kitchen black and the upper half white for a creative look. In this kitchen a line was drawn around the room and everything below it — including the bottom portion of the upper cabinets — was painted black, and everything above it white.

4. Shiny black appliances + aqua cabinets + brass hardware. Black appliances and a black sink surround add a polished note to this pale aqua kitchen. The bright brass gooseneck faucet and hardware stand out like jewelry against the watery-hued cabinetry.

5. Black counters + chocolate backsplash.Who says black and brown don’t go together? On the contrary, sleek black counters paired with glossy chocolate brown subway tiles make for a rich combination. The rest of this kitchen was done in crisp white, which keeps the space feeling light and spacious.

6. Black counters + black grout + white tile. For such a simple, easy change, swapping out light grout in favor of dark makes a big impact — not to mention it’s easier to keep looking clean! Classic white subway tile installed in a herringbone pattern calls attention to the spaces between more than if it were laid in straight rows.

7. Black cabinets + black trim + dark stained wood floors. If your kitchen is part of a larger, open-plan space, deep, saturated color can make the space feel kitchen-like. In this room, dark stained floors, black cabinets and black trim are enhanced by sculptural Tom Dixon pendant lights and a Carrara-marble-topped island.

8. Black cabinets + white and wood. Black cabinetry paired with white counters is a clean, simple and modern look. Stylish pendant lights, plus a few details in white and wood — like the paint-dipped stools shown here — keep this combination from feeling too simple. 

9. Black lower cabinets + white subway tile + white floors. Increase the sense of space in a small kitchen by using black on lower cabinets, and forgo uppers in favor of open shelves installed on a glossy white subway tile wall. High-gloss finishes on cabinet fronts and tilework help maximize light.

10. Black cabinets + pops of color.Sometimes what you put on your counters and shelves is just as important as the material they are made of. Here, a handful of brightly hued accessories pops against jet-black counters and cabinets.

Foolproof Ways to Declutter Your Kitchen

Article by: Kat Bern

You know that feeling when you’re trying to whip up a quick dinner after work and everything in your kitchen seems to be conspiring against you? You can’t find the ingredients you could have sworn you had, things are tumbling off the shelves, and nothing is where it should be. If you know what I’m talking about, then it’s time to declutter your kitchen.

A good way of figuring out what constitutes clutter is to ask yourself two questions: Does it serve you anymore? Does it bring you joy? If the answer to both of these questions is no, chances are you won’t even notice when the item is gone. So let’s have a look at common space wasters and how to get rid of them.

Save the tidying for later. Don’t make extra work for yourself. If you want to make your kitchen more functional, declutter it before you do any tidying. Otherwise you’ll mess everything up in the process of decluttering. And there’s no point tidying up things you’ll eventually throw out, donate or sell.

Purge your pantry. Go through your pantry or the cupboards that hold your cans and jars and remove any out-of-date products. When I recently challenged some of my clients to do this, they couldn’t believe their eyes, finding cans dating back to 2007. 

If you think an item is something you might realistically use, pull it out, put it on the side and give yourself a deadline by which to use it (assuming it’s still safe to eat). If you haven’t used it by then, get rid of it.

Minimize the plastic. Next, it’s time to tackle the plastic bags and plastic bottles. Many of us have a tendency to keep things “just in case.” But then instead of keeping one just-in-case plastic bottle, or the few plastic bags we might realistically reuse, we keep 10. 

Select a couple of really durable bags and perhaps a bottle or two if you think they might be useful, and create a place to store them neatly in your kitchen. Recycle the rest — you’ll never be able to use them all.

Sort your food containers. Do you find yourself overwhelmed every time you open the dreaded drawer or cupboard with plastic containers? It’s time to take them all out, give the space a good cleaning and match up all of your boxes with their lids. Throw out any that don’t have a match and, if your collection isn’t a neat set like this one, consider storing them with their lids on. It’ll keep them clean while in storage and, although they’ll take up more space, it will make them easier to use.

Cull your dishware. Do you have lots of dishes, including old and new sets mixed together? Figure out exactly how many dishes you need by putting away the older set away for a week and seeing how you get on. If you do just fine without it and you’re not attached, it might be time to donate it to charity.

Prioritize your appliances. Kitchen appliances can be real space wasters. They’re bulky, and a lot of them get only occasional use. That’s why you want to make sure you keep only the ones you use daily, or a minimum of a few times a week, out on the countertop. If you make waffles only as a treat, pack the waffle maker away on a high shelf and take it down only on those occasions. Keeping the countertops clear is a great way to make a kitchen feel larger and less chaotic.

Streamline your utensils. Go through your cooking utensils and donate any you haven’t used in more than a year. Then sort them, putting like with like, and keep them easily accessible near the range. Try to find a dedicated spot for them, whether it’s a spare drawer you can neatly organize or a bit of extra countertop space for some containers.

Get your foils and wraps in order. A great idea for organizing wraps is putting them all into one drawer. But be careful — you don’t want it to become a designated drawer for “a bit of everything.” Make sure you keep the rolls tidily next to one other and, if you wish to add anything else, organize everything with a tray or container. You don’t want random objects lying around — they definitely won’t help when you’re trying to pack a sandwich in a rush.

Sort recipe books and takeout menus.Have a look through all your cookbooks and takeout menus and keep only the ones you actually use. If you haven’t cooked from a book in the past year, gift it to someone who’s looking for new inspiration. You’ll free up some space on your shelf, and the book will make someone else happy. 

If you haven’t ordered food from a certain place for a while, the same rule applies — and with so many menus available online, there’s less and less reason to clog up a shelf or drawer with paper copies.

Create a box of items you’re not sure about. If you’re not sure whether you’re ready to say goodbye to some items, put them all in a box, write the date on that box and move it to a garage or loft. If you come across the box in, say, six months, and realize you haven’t been looking for those items, it might be easier for you to let them go. And remember, by getting rid of the old, you’re actually making space for the exciting and new.

Big Ideas for Compact Kitchens

Article by: Sara Emslie

Even the smallest of kitchen spaces needs to deliver big when it comes to form and function. No matter how awkwardly shaped or compact your cooking space, design tricks can help make even tiny corners work hard and look good too. These kitchens offer ideas for getting more from less and giving a high-function space a clean, uncluttered appearance.

Use open storage as display. If your tiny kitchen is part of a larger open-plan space, consider an island with built-in open shelves. This will add storage and display space and help separate food prep, cooking and clean-up areas from those for other living functions. 

Use attractive tableware, accessories and cookbooks to create a pleasing display.

Store high (and seamlessly). A clever way to add storage in a tiny kitchen is to position it high up the wall. Installing storage above seating, such as a built-in bench, can be a particularly smart use of space. 

For a clean, contemporary feel, fit the cupboards with push latches, removing the need for a door handle and creating a seamless finish that gives the impression of more space. A ladder stored away — perhaps inside a bench seat — can be used to access high cupboards.

Custom build a pantry cupboard. Well-planned storage makes efficient use of space and can help keep your kitchen organized. Consider a custom all-in-one pantry cupboard if you’re designing a kitchen from scratch. Install custom storage baskets for shelves and rail bars and baskets for cupboard doors to make the most of the space inside. 

A cupboard pantry can be used to store everything from food to china and kitchen equipment. And when the doors are closed, it’s all neatly out of sight.

Integrate built-in appliances. Shop around for appliances that will work in compact spaces and consider integrating them into your kitchen design. The framework needed for integrated designs eats up a little more lateral space, but the result will be a neater look. 

Think laterally, too — dishwashers are available as pullout drawers and can be paired with a storage drawer with the same front for a fuss-free finish. Microwaves and ovens can be fitted into a bank of wall cupboards, freeing up counter space for other kitchen essentials.

Think industrial. Utilitarian styling is ideal for making the most of a compact kitchen. It echoes the kitchens of days gone by, and its robust aesthetic says it means business, despite being a tiny space. Look for subway tiles, industrial factory lighting and Shaker-style units that combine beauty with utility.

Squeeze in an eating space. Having a space for sitting and eating in a kitchen, no matter how small, doubles the room’s functionality, making it feel more substantial. 

A compact breakfast bar, for example, can be both a dining area and an additional work surface for food preparation. To save space, choose bar stools that can be tucked under the counter when not in use. Try giving this tiny tabletop a separate visual identity with bold accessories, such as bright artwork and standout lighting. 

A fold-out, wall-mounted table is another option for a small kitchen.

Highlight character with color. Flashes of vivid color are ideal for adding a wow factor to a tiny space. It might be small, but it can still have presence. 

Against a pure white background, neon shades really stand out, so use these to emphasize any design features that have character and style. Maximize the different sizes and configurations of drawer and cupboard fronts to create eye-catching color combinations and design appeal.

Stick to a restricted palette, though, and keep clutter stored so as not to overcrowd your little kitchen.

Go for top of the line. Being small on space doesn’t mean a kitchen can’t be big on style. Adopt a high-end approach for fixtures and hardware in an otherwise minimal space to give a compact kitchen a designer look. 

Smart handles, inset lighting, state-of-the-art integrated appliances, contemporary faucets and molded draining boards are all design features often found in larger, more expensive kitchen designs, but they can add a big style hit to a tiny kitchen too.

10 Countertop Mashups for the Kitchen

Article by: Katie Pegler

Mixing materials for kitchen countertops has many benefits. For one, you can save money by using a less expensive material for your perimeter countertops while splurging on something more luxurious for an island top. Plus, mixing materials is a great way to add visual interest to your kitchen and avoid the overabundance of one color or material. With that in mind, designers are pairing marble with walnut, granite with reclaimed wood, engineered quartz with maple butcher block and more to create diverse surfaces for working, eating and gathering.

Marble Island With Wenge Bar

“Our overall design was form meets function throughout this kitchen design,” says Ashley Luberger, design associate at Osborne Cabinets and Millwork. “The island is the key focal point of this space, so we wanted to add interest combining heights and different materials to create a cohesive space.” 

Osborne designed and fabricated the island cabinets and wood top, made out of African wenge wood. “The wood has a really dark natural color along with a really tight grain pattern, creating a contemporary feel,” Luberger says. Collaborative Design Group chose the marble top.

The wood top was selected for the lower eating area because it is more durable than marble, which was used only on the island to avoid stain concerns. 

Marble Perimeter With Walnut Island

A white kitchen was a must for the owners of this Minneapolis home. However, both the husband and wife grew up in houses with wood countertops and were keen to incorporate wood. Nicole Bostman, owner and lead designer at Dezaar Interiors, found a happy medium by pairing a white marble countertop and oversize walnut island. “We wanted to introduce the warmth of wood to balance all the white, which can sometimes look a little cold and clinical,” Bostman says.

Walnut Countertops With Marble Island Top

In this Nunica, Michigan, kitchen by Meiste Homes, the perimeter countertops are oiled walnut, while the custom island is topped with a 10-foot slab of Arabescato marble with a built-up ogee edge. 

Be sure to follow proper maintenance routines for each material. Wood can chip and warp, especially in wet areas, such as near the sink. And marble can stain and chip. 

Quartz Perimeter With Maple Butcher Block Island

Before the remodel of this Los Angeles contemporary home, the owners had white marble countertops. Gabriel Abikasis, president of Kasis Construction, recommended engineered quartz as a durable alternative.

To add depth, texture and contrast to the white cabinets, Abikasis used 2-inch-thick maple butcher block in a clear satin finish for the island. 

Granite Perimeter With Reclaimed-Wood Island

This design of this kitchen reflects the homeowners’ desire to retain the old elements of the 1930s cabin.The main countertop is Jet Mist honed granite, while the island has a reclaimed-wood top fabricated by Grothouse Lumber. The wood island is sealed and cannot be used for cutting directly on. “The contrasting wood counter warms up the kitchen and makes it feel more cabin-like than if everything was dark granite,” says Kelly Ennis, principal at Ennis Nehez

Photo by Colin Cadle Photography – Discover kitchen design ideas

Granite Island With Walnut Chopping Block Extension

Much thought was put into this kitchen, because it’s in the “forever home” of its owners, in Dartmouth, England. They wanted to make the most of the new space and were meticulous in defining their kitchen right down to listing what items each cabinet would need to store, so that Distinctive Living Kitchens could plan for the correct cabinet sizes and functionality.

The inspiration for the granite came from an existing granite countertop in the laundry room, which Distinctive Living Kitchens matched to the Shivakashi granite counters that are paired with the end-grain walnut chopping block island extension. 

Granite Island With Walnut Butcher Block Extension 

This Ottawa, Canada, home was built for a couple who wanted an environment conducive to entertaining large groups of family and friends, so a large, functional kitchen with good flow was key. “In addressing the functionality, I wanted to create a space that looked aesthetically balanced with functional and decorative elements,” says Nathan Kyle, senior interior designer at Astro Design Centre.

The island counters have silver wave granite surrounding the prep area mixed with walnut butcher block for the eating area. The inclusion of two materials was necessary to create the length that was required without having a seam in the countertop, and created a length that was ideal for entertaining. The butcher block also allows for a warmer touch on the area where people can rest elbows, versus a cold surface. 

“Using a two-toned kitchen allows for the back wall, which is utilitarian in nature, to stand on its own and juxtapose itself with a more detailed decorative island,” Kyle says. 

Concrete Island With Wood Inlay

For this contemporary Kansas City, Missouri, kitchen, Studiobuild blended poured concrete for the majority of the island and juxtaposed it with a wood inlay surrounding the cooktop on the same plane. Not only does this look have more visual interest, but a large island for eating and working eliminated the need for an eating nook.

Pietra Cardosa Stone Perimeter With Maple Island

For this center kitchen island, Brooks Custom used a 2-inch-thick premium wide-plank maple top. The light-colored wood contrasts with the dark Pietra Cardosa stone countertop along the perimeter of the kitchen. The seemingly simple finish on the island ties the modern farmhouse look together. 

Basaltina Perimeter With Walnut Island

Here a walnut island surface warms the basaltina perimeter and helps add contrast to the white kitchen. It offers the perfect fusion of natural materials and lower maintenance. “There is always a balance to strike between durability offered by manufactured options and the beauty and soul of living materials,” says interior designer Joelle Nesen of Maison.

9 Ways to Save on Your Kitchen Remodel

Article by: Kelli Kaufer

When you’re investing in a home remodeling project, you want to make sure that the results not only please you but add value to your home and save you money. Never is that more true than in a kitchen remodel, where costs can added up so quickly that your budget can all of a sudden seem like pennies in a jar. To avoid that and keep costs in line, and yet still get the kitchen of your dreams, here are a few of my favorite ways of getting the most out of a tight budget.

1. Go with ready-to-assemble cabinets. The biggest cost in a kitchen remodel is new cabinets. The most expensive option is going custom, for which the cabinetry is designed, built and installed to specifically fit your space. Exotic woods, ornate details and period styles will add to the cost and delivery time but result in a one-of-a-kind kitchen. Custom cabinets can cost $10,000 to $60,000, as cabinets can range from $250 to $1,500 per linear foot.

If your budget doesn’t allow for custom, but you need new cabinets, ready-to-assemble (RTA) is a good option. Ready-to-assemble or semicustom cabinets can sometimes be half the cost, from around $125 to $900 per linear foot depending on the material, style and cost of installation. If you are a do-it-yourselfer, you can assemble these yourself; if not you will need to hire a contractor. Semicustom cabinets are selected from existing designs and are prefabricated offsite in standard sizes, with limited options in terms of sizing, styles, materials and finishes.

In-stock cabinets are for customers who want to grab their cabinets right off the shelf and get going. These stock cabinets come in standard sizes, shapes and colors. Since the cabinet dimensions are not based on your kitchen, space-wasting fillers may be required to make the cabinets fit. These cabinets are very affordable for remodelers on a budget. Cabinets can range from $75 to $400 per linear foot.

Keep in mind, though, that costs will vary by location.

2. Keep existing cabinets if possible. If your cabinets are good quality and you like the style, resurfacing is a great option. It’s amazing how color can transform a kitchen and a few coats of paint can give life to a once-drab space. Resurfacing and painting make for the most cost-effective option, but ensure that you take the steps needed to get a beautiful finish. 

A simple paint job might cost a few hundred dollars. But for a more extensive refacing job, $5,000 to $15,000 is likely if new veneer is added to the face of the cabinets.

3. Choose open shelving where possible.Open shelving creates interest in the space as well as saves money. Using salvaged wood or painted planks from your local hardware store for shelving is a cost-effective and functional option to display everyday dishes (items that don’t spend enough time on the shelf to accumulate dust).

Open shelving can save a few thousand dollars, but while it may be tempting to do away with fitted cabinets altogether, they’re still valuable and efficient for storage, particularly if you have a small kitchen and a lot to pack into it.

4. Consider alternative countertop materials. There is a wide range of countertops to choose from — solid surfaces, recyclable products, concrete, tile, stone and more. Granite is still a popular choice for countertops, but at $50 to $100 or more per square foot installed, it can push any budget over the top. Consider using two different surfaces instead, such as making the outside perimeter butcher block and the island granite. This can cut the cost in half.

If granite is not in the budget but you like the look of stone, consider laminate, an inexpensive alternative. The costs ranges from $8 to $20 per square foot, including installation. Laminate has come a long way with its high-definition selections and new cut-edge profiles. The new laminates look so much like stone, you could be easily fooled. 

5. Keep appliances where they are. If your plan is to get new cabinets, think about keeping your appliances where they are. Moving the mechanics and electrical for appliances can be costly, not to mention the ceiling on the floor below and the walls may need to be cut into to expose the mechanicals. These are costs that many homeowners don’t think about when planning a kitchen remodel.

Keeping the appliances where they are will save you thousands of dollars. More often than not, moving an appliance 1 foot costs as much as moving it 6 feet, depending on where the mechanicals are located.

6. Look at different options for islands. A 6-foot island with new cabinets can run $800 and up. Instead of using cabinets for your kitchen island, think of repurposing a piece of furniture. An old table or a dresser is a great alternative to bring unique character into the space. Keep an eye on Craigslist, the Houzz Shop, salvage stores, estate sales and garage sales. Depending on how resourceful you are, you can save yourself hundreds of dollars.

Tip: When looking for a piece, make sure it is countertop height (36 inches).

7. Opt for a cutout rather than removing a wall. Many homeowners want to open the space between the kitchen and their family room to create an open floor plan. When removing a wall there are many things to consider. Is it load bearing? Does it have venting, water pipes or electrical running through it, which will need to be rerouted? After removing a wall, the ceiling, other walls and floor may need to be cut into and repaired.

A less expensive option to consider is a cutout. Not only does it open a room, but it can provide extra countertop space and an area for additional seating. You will still need to check for mechanics and plumbing, but the floor and ceiling will not need to be repaired, which will save you money.

8. Try track lighting instead of recessed lighting. Adding recessed lighting can become a bigger project than planned. Holes need to be cut into the ceiling, electrical wiring needs to be added, and there may be hidden costs in repairing the ceiling. The overall cost for a single recessed light is $100 to $150, including the costs for materials and an electrician. This can add up quickly.

To keep costs down, think about track lighting. There are many styles, shapes and finishes. They give off plenty of light for tasks in the kitchen and, when placed on a dimmer, give off a nice ambient light.