FREE DESIGNS AND ESTIMATES

6 Reasons to Hire a Home Design Professional

Article by:

Who hasn’t heard that regular trips to the dentist can prevent the spread of tooth decay? Even though sitting in that chair isn’t the most enjoyable way to spend time, most of us know that a dentist has the knowledge and expertise to check all aspects of our oral health. Similarly, residential designers (architects, interior designers and others) bring a wealth of knowledge and skills to make sure all aspects of remodeling and custom home projects go as smoothly as possible. 

Talk with almost anyone who’s ever tried to do a construction project without pro help, and you’ll likely hear one statement over and over again: “I wished I had hired a designer.” Even in smaller projects, like a one-room remodel, once you open up those walls, situations arise for which only an experienced professional can apply his or her creative problem solving to save time and money. 

Here’s why it’s worth it to hire a designer. 

1. You’ll save time. You may not know how structural choices can impact the installation of the mechanical system. Or about options for new materials or technologies that might be cheaper, better or more appropriate than what you are familiar with. Figuring those things out takes time, and lots of it. A skilled professional will have this information at the ready for you. 

Plus, with advances in technology, new building envelope techniques are coming on the market with increasing frequency, and new, tougher energy-efficiency requirements are transforming how walls are constructed and bringing an end to many traditional building practices. So it’s more crucial than ever to have someone on your team who understands how your building assembly meets current building code requirements. 

These codes are typically complex texts that are difficult for those outside the building industry to understand. When designers submit drawings to the building authority, a plans examiner reviews them and issues a revision notice to address any variances from the current codes and construction standards. 

A well-informed designer with up-to-date knowledge of building science can get building projects through with the minimum number of revisions. Since each revision takes time to be completed, having fewer revisions will allow you to get your permit faster. Low-quality or incomplete documents can delay your construction. Hiring a designer will help ensure that your project meets relevant codes so it can progress smoothly through your municipality’s process.

This could save you many sleepless nights and potentially weeks on your project trying to determine what is needed to satisfy the code requirements. 

2. You’ll get their expertise and understanding of the overall construction process. The basic function of a designer is interpreting your needs and coming up with a professional plan for any building project. Although you may hire him or her only for this task, the designer will also provide a wide variety of other resources to make sure the whole building process goes off without a hitch. 

Depending on your needs and budget, a designer can guide you through the relevant building application process, research planning legislation, assist in the hiring of surveyors and general contractors, recommend subcontractors and manage the construction phase of a project on your behalf to ensure that building plans are accurately followed.

Trying to do this yourself would mean hours and hours of research and potential delays. 

There are many types of designers working in the home building industry. Some are licensed professionals; others are builders who have expanded their services into design as well as construction of custom homes and home renovations. 

Design-builders and unlicensed designers make up a large contingent of the individuals working in the procurement of custom homes and renovations. They tend to be cost effective and can be the right fit for your project, so long as you find a reputable person to work with. 

Architects are generally more expensive to hire but bring to a project a broader set of skills 
and talent that can result in both an exceptional project and an exceptional experience. This 
results from the additional work an architect puts into coordinating everyone involved in your project, as well as the unique skills and knowledge related to current technology, materials and construction processes. 

That said, not every project requires an architect, and not every design-builder can deliver on your vision. The rule of thumb is that the more unique and challenging the project is, the better suited an architect is for it. 

3. They speak the language. Because so much information on your project is communicated using two-dimensional drawings, there are many conventions on how planssections and elevations are interpreted. Your project revolves around translating the 2-D drawing to 3-D construction using wood studs, insulation and other materials. 

There can be misinterpretations of these drawings, which gives rise to confusion about how building elements go together. Especially if the drawings show something that the contractor might not be familiar with. Or if the contractor is busy and hasn’t had the time to really look at certain parts of the drawings, critical elements of the details can be overlooked. A designer knows how to stay on top of this.

On a recent project a client who was supervising his own construction project found the contractors hadn’t correctly followed the detail drawings. They had inadvertently switched the location of the vapor barrier from the warm side of the building envelope to the cold side, where the wall meets the floor. Doesn’t sound like much, but most problems with mold and rot in building are cause by prolonged periods of condensation occurring within the wall and floor assembly. 

Over time the presence of moisture will give rise to the mold’s bacteria and fungus, which lead to rot and structural failure. The only way to fix this was to rip out several courses of brick all around the house, costing the client almost $10,000.

Having someone onboard who speaks the language can prevent these costly missteps. 

Modern Bedroom by Austin Architects & Designers Specht Harpman Architects 

4. They’ll be your advocate. If you’re having problems with contractors on your project, it might be tough for you to verify that they are properly carrying out the intent of the drawings, or even which contractor is actually responsible for the issue. 

It can be hard to know where the responsibility for one contractor ends and the other begins. Time and again we’ve seen things get overlooked or improperly constructed early in the process, which affects contractors later in the job. And if that earlier contractor has left to another job, it’s oftentimes difficult to get the person back onsite to fix those mistakes. Plus, it’s costly for new contractors to fix another’s mistakes. 

We had one client who didn’t elect to procure our construction management services. He had to bring in a second team of drywall contractors near the end of the project to fix the poor job done by the initial subcontractors, who wouldn’t come back to fix areas that weren’t up to standard. It cost the client an additional $3,500 out of his pocket to fix the mistakes that weren’t caught earlier.

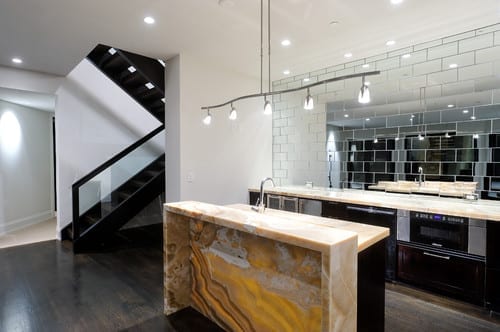
Substandard drywalling can cause a whole host of problems at the finishing stage, not the least of which is uneven tile, because the tile contractors can’t get a straight line to adhere tile. Problems that may not be very apparent when looking at a whole wall of drywall under construction lighting are magnified when the tile is on and the pot lights are showing areas where the tile doesn’t meet properly or is uneven.

Contract administration can be accessed on a fixed fee or an hourly basis. Expect to budget 3½ to 4½ percent of your construction cost to this for a typical project. 

5. You’ll get their design sense and attention to detail. A designer translates your needs to functional spaces but also makes them beautiful. Good designers are consummate three-dimensional thinkers and can use their abilities to find special opportunities in a design that might not easily be understood in two-dimensional drawings. Additionally, they are always keeping up-to-date on trends in local and international design. 

If you want a space that has lasting appeal and adds to the value of your investment, you need to hire a designer. Designers have the skills to include the features that will maximize your house, while making sure your project runs smoothly. 

Not all architectural details are reflected in drawings. Architects can also specify plumbing fixtures, expected quality levels, finishes, electrical fixtures and other related information that’s communicated in drawings or in specifications written for the contractors working on the project. If the architect does not prepare written specifications, then you could be faced with change orders, which can slow down the process. 

Change orders are instructions to the contractor to make an onsite change from what’s specified in the contract documents. It can simplify construction based on site conditions, but it also can add costs when it requires redoing part of the construction due to oversights. 

6. You’ll get access to other skilled pros. Being in the design business means meeting lots of other pros who also work on residential projects. From structural engineers to painters, your designer probably has quite the network of skilled contractors who can get the job done within the given budget. 

And, again, the point here is that the additional cost for a quality design team can mean savings in the long run. I think one of the contractors we are working with said it best with a quote at the bottom of the company letterhead, which reads, “The bitterness of poor quality remains long after the sweetness of low price is forgotten.” 

5 Common Bathroom Design Mistakes to Avoid

Article By: Dylan Chappell

Adding to or remodeling your house is one of the most exciting and creative processes you can go through. But with all that responsibility comes pressure to make informed decisions that will last for decades. How can you make sure to get the right design for your lifestyle, stay within your budget and maximize the return on your investment? Start with a great design for every room in your house — including (or especially) the bathroom.

Bathrooms, whether big or small, should always be well thought out and carefully located, and should function with multiple users in mind. We’re long past the era where there was one bathroom for every three bedrooms in the house, and everyone had all the time needed to use it. Today’s bathrooms need to be beautiful, use space efficiently and serve the users functionally. Avoiding the common design blunders below can help you be happier with your bathroom for the long haul.  

1. No view out. No one likes a dark, damp bathroom with bad circulation — it’s no fun spending time in a space like that. If you’re building or relocating a bathroom, try to site it on an outside wall with windows. If windows are not an option, installing an operable skylight can allow for the fresh air and natural light needed to make the space feel comfortable.


2. A clear view in. I once worked on a large remodel for which the existing design had a bathroom in the dining room — seems kind of like a conflict of interests, right? Whenever possible, avoid locating the bathroom directly off one of the home’s public rooms — like the kitchen, living room or dining room. 

This doesn’t necessarily mean you have to put in long hallway, but create some sort of formal separation to break up the line of sight. The last thing you want is to be sitting in the living room with a glass of wine and looking straight into the bathroom at the toilet.


3. Making it all about the toilet. That leads me to my next blunder: Avoid making the toilet the first thing you see in the bathroom, and avoid any sight lines to it from adjacent rooms. I like to put the toilet and shower in their own room while keeping the sink separate. This allows someone to take a shower while someone else gets ready at the sink. In the bathroom floor plan here, the wall between the two rooms adds only a couple of inches to the overall size of the bathroom but doubles the room’s functionality. 

Eclectic Bathroom by Brooklyn Artists & Artisans Green Mountain Construction & Design 

4. Curbed-shower enthusiasm. curbless shower makes a bathroom feel bigger and look cleaner — plus, it’s very practical for aging-in-place homeowners, since it adheres to universal design principles. This look is fairly easy to achieve in a new bathroom or a remodel — just make sure you mention it to your architect or contractor prior to construction. 

5. Thinking bigger is better. That’s right: Bigger isn’t better; better is better. Whether you’re designing a large master bathroom in your dream home or trying to figure out how to squeeze in an extra bathroom for your growing family, the most important aspect of your new bathroom is that it has a great design that functions efficiently for your specific lifestyle. 

The truth is, great design is less about how a bathroom looks (although it’s always nice when it looks fantastic) and more about how it works. Great design translates to a house that functions better, costs less to build, is more efficient to maintain and gets you more for less.


8 Stunning and Soothing Shower Designs

Article By: Shane Inman

Modern amenities for the shower such as rain heads, body jets, steam showers and hand wands allow you to easily wash away the stress of the day. Take a look at these incredible spaces — from a stained-glass surround, to a soothing and meditative shower, to a Roman bathhouse-inspired space — to see how designers are taking advantage of today’s materials and accessories. 

Middle ground. Divide your master vanity right down the middle with a stunning shower, like this glass enclosure made of two floor-to-ceiling panels and a door at the end. The textural shower wall creates an instant focal point, too. 

All around. Have your shower give your tub a hug. This shower enclosure encapsulates a full array of body jets and shower heads, while the round tub sits snugly in the middle of the design. I love how the unique shower shape has doors on both sides! 

Behind closed doors. These stained-glass doors open into a heavenly shower experience enhanced by an oversized rain head. The light spilling through the colored glass could even become a form of chromotherapy, where colored light restores balance and energy.


All in one. Save time and space by positioning your bathtub inside your shower. The frameless enclosure holds both the shower and the freestanding bathtub in one stunning area. 

Ancient history. Repeat history and re-create a Roman bathhouse feeling with arched doorways and marble tile. A stainless-steel tub and a luxurious shower with multiple shower heads and body jets can soothe you just as much as an ancient spa, but with all the modern amenities.


Sleek and modern. This super-modern shower steps away from everything traditional. The vanity’s glass backsplash defines the entire space, separating the vanity area from the adjacent shower. With mirrors on one side and towel hooks on the other, the single piece of glass manages to serve both spaces effortlessly.


Soothing and meditative. The dark and cool color palette in this shower creates a serene feeling, reflected by the colorful koi mosaic floor. I love how the wall-to-wall bench allows you to soak in the jets, rain heads and steam in utter relaxation. 

Center stage. This bold shower immediately calls out as the room’s main attraction. Two vertical towers that hide the plumbing appear as columns to the eye. The seamless transition from the shower floor to the floor beyond is stunning — although it’s certainly not for the shy. 


Your Space Can Help You Get Down to Work. Here’s How

Article By: Laura Gaskill

Do you work best in the middle of a bustling scene or do you need utter peace and quiet? Are you a minimalist or a stuff lover? Do you do your best thinking while gazing out a window or would you rather be on your feet, moving things around? Designing your home office with your organizing and working style in mind will help create a personalized space that suits you to a T. 

See if one of these eight ideas for customizing your workspace does the trick for you. 

If you like to move around: Give yourself several options of places to work within a space — a traditional desk along one wall can hold your laptop, while a round table in the center of the room is available to sit and read, make notes or brainstorm. A standing-height desk is another great option if you like to move around, and it is healthier than sitting to boot. 

If you like to be surrounded by bustling activity: Do you work best in cafes and other busy spaces? Then consider designing a workspace you can share with your kids or housemates, or set up shop in the kitchen where the action of everyday life can flow around you. Be sure to make room for speakers, and turn on favorite music or podcast while you work. You could even try listening to real coffee shop sounds courtesy of Coffitivity, a free online site that provides ambient background noise while you work. 

If anything remotely office-y makes you squirm: There is no rule that says you must outfit your home workspace with a desk and desk chair. A dining table can be called into duty as a spacious desk, and any comfortable upright chair can be used as a desk chair, as long as you are not logging many hours at a time in it. 

If you do choose a proper desk chair for ergonomic reasons, there are still many ways to bring more home into your home office — try a cushy rug, colorful wallpaper, a pretty table lamp and artful accessories. 

If you are a daydreamer: Rather than fight the tendency to daydream, embrace it. Set up your desk in a spot with a view — upstairs looking out a window (but far enough from the window that glare is not an issue) could be ideal. Or, place your desk facing out into a large room, so your eyes have somewhere to go when you glance up from your work. In a tight spot, try hanging an inspiration board, wallpaper, artwork or a mirror, and use plants to create a sense of depth. 


If you are a visual person: For visually minded folks (myself included), keeping important materials in view is a must. Try creating your own giant calendar using chalk paint in different hues. Or craft a giant bulletin board where you can pin to-do lists, calendar items and inspiration. Just be sure to limit what you put up to the truly essential, and edit regularly — too much visual stimulation and it becomes hard to focus.


Contemporary Home Office by Other Metro Furniture and Accessories AVP ARCHITECT VIEW PRODUCTS BY IMASOTO


If you are easily distracted: If the slightest noise or activity makes you lose your concentration, you need to cultivate a private space. Try to wrangle your own room if at all possible. If that can’t be done, choose the quietest, least-used room, and do what you can to protect your own corner. 

The desk shown here, with its built-in screen reminiscent of a study carrel, is ideal for blocking out distractions while you work. You could also use a decorative folding screen or open-backed shelving to carve out workspace within a larger room.


If you are a minimalist:A few just-so pieces are all you need to outfit your workspace. Perhaps a beautiful live-edge wood desk, like the one shown here, will help inspire you to keep your space as clear as your minimalist heart desires. Make the move toward a paperless office, and you can do away with nearly all files and drawers.


If you like to surround yourself with stuff: The polar opposite of the minimalists in their paperless offices, stuff lovers feel more comfortable with a happy amount of clutter. An L-shaped desk is great for those who like to toggle between spread-out papers and working on a laptop, and plenty of file drawers and cabinets provide storage for anything you might need close at hand.

Tell us: When and where do you do your best work?

Open vs. Closed Kitchens – Which Style Works Best for You?

Article By: Vanessa Brunner

For centuries the kitchen was strictly a workspace. Often tucked in the back of the house, it had room for just the bare essentials. But a peek at many new kitchens today reveals a very different approach: the open-concept kitchen at the heart of the home. 

“The kitchen was really a closed-off spot for a long time,” says John Petrie, president-elect of theNational Kitchen & Bath Association. “Now people want the kitchen to be an active part of the family home.” Although open-concept kitchens are by far the more popular choice today, some homeowners are embracing elements of the past — namely a separate, more closed-off layout. Could we be shifting back to the kitchens of yesteryear? 

We asked three kitchen experts for their thoughts on the two kitchen styles, and how you can decide which one is right for you. 

How the Walls Came Down

Twenty years ago the term “cocooning” arose in the home design world. Home life shifted as people spent more time at home. “Home was a safe place, a refuge and where you wanted to be,” says Petrie.

The desire for a cocoon fueled the open-concept kitchen, allowing homeowners to spend more time with family and friends while cooking and cleaning. “It also showcased a shift to a more casual lifestyle,” says Andrea Dixon of Fiddlehead Design Group. “People weren’t afraid to expose reality — i.e., a messy kitchen.” 

“When the walls came down, the kitchen became an integral part of the home,” says Petrie. Kitchens soon became the center of the house — the room that everything else revolved around. 

Today this layout has become the go-to kitchen style, particularly for families. The combined layout allows for optimum multitasking — parents can prepare dinner, watch the news and help with homework at the same time. “I’m a huge open-concept-kitchen fan,” says Anthony Carrino of Brunelleschi Construction. “I find that the benefits far outweigh those of throwing the kitchen into another room. Ninety-nine percent of our clients ask for an open-concept kitchen.” 

The Case for a Closed Kitchen

The kitchen is already the most expensive room in the house to remodel, and turning a closed kitchen into an open plan can add to the cost. Tearing down walls means dealing with plumbing, electrical and structural work on a huge scale. Sometimes the added expense means compromising in other areas. 

For homeowners who’d rather invest in other parts of their kitchen — appliances, materials or cabinetry — reworking the layout may not be worth it. “You have to think about what’s best for you,” says Petrie. When it comes to allocating your kitchen budget, which is more important, he asks, “an efficient, functional kitchen with better appliances? Or an open layout that connects to the rest of your home?” 

While most of Dixon’s clients ask for open-concept kitchens, some prefer a closed-off space. “There will always be some people who are uncomfortable with letting guests see their ‘unmentionables,'” she says. “It’s definitely a more formal layout, but it ultimately comes down to personal preference.” 

If you want to leave your smells and mess behind when serving meals, a closed layout could be for you.

“You can get creative with a closed kitchen, too,” says Carrino. If space allows, a small booth, fold-down table or rolling bar can make a closed kitchen more of a social space.
Cons of a Closed Layout
Of course, a closed-off kitchen’s isolation also can be its main downfall. This layout doesn’t allow for direct access from the kitchen to the dining table, or vice versa. And it’s difficult to interact with friends and family while whipping up meals, since most of the room is reserved for the work triangle.
Choosing What’s Right for You
There’s no set formula that can tell you which kitchen layout will work better in your home. Part of having a conversation with a designer is trying to figure out what’s best for you. Start with a list of needs and wants, and go from there. “You’ve got to consider the way you live in your home and the way you use your home,” says Carrino. “How do you use your kitchen? How do you foresee using your new kitchen?”
Everyone’s needs are different, so don’t let yourself sway with trends. “A family with kids that need supervision might decide to do an open-concept plan with a large multifunctional island,” says Dixon. “But a couple who loves to entertain might opt for a closed-concept space so they can prep courses ahead of time and not spoil the surprise. It totally depends on your lifestyle.”  


Go for the Glow: Mother-of-Pearl Shines Around the Home

Article By: Ines Hanl

Mother-of-pearl has been used since ancient times to make people and their homes more beautiful, but today’s manufacturing techniques have made this product even more accessible and economical. “Mother-of-pearl” is the common name for iridescent nacre, a blend of minerals secreted by oysters and other mollusks and deposited inside their shells; it coats and protects them from parasites and foreign objects. 

Now we can use this wonderful material in our homes in a wide range of products. Mother-of-pearl tiles, wallpaper and countertops can adorn a space with the same elegance that a pearl necklace adds to an outfit. It’s not cheap (mother-of-pearl tile starts at about $30 per square foot), but it can be just the splurge you need to set your project apart from the crowd.

Mediterranean Bathroom by Calgary Interior Designers & Decorators www.hughesdesines.com

Mosaic tile. Available in a wide range of natural hues, mother-of-pearl tile and mosaic blends are made from the nacre on shells like capiz, black lip, brown lip, paua and violet oyster.

White mother-of-pearl appears iridescent naturally, but it can be artifically tinted to almost any (sometimes shocking) color.

Contemporary Kitchen by Tel Aviv Architects & Designers Rina Magen

This is a beautiful example of mother-of-pearl on a kitchen backsplash. This shell tile is often thin, unless it’s mounted to a thicker substrate, so if it’s combined with another tile, it’ll need to be built up to look flush.

If you’re not sold on a shell product but love the iridescent look, look for manufacturers that produce iridescent glass mosaics. White iridescent glass can look quite similar to mother-of-pearl tiles.

Traditional Bathroom by Tampa Tile, Stone & Countertops Europa Stone

Flooring. What a elegant mix of natural stone and mother-of-pearl! This application is a great example of layering textures in a white-on-white application. Note how the simple act of creating a border around a well-proportioned floor tile strengthens the grid pattern.

Mother-of-pearl can be used for walls, floor surfaces (make sure to check with the manufacturer) and sometimes outdoor applications.

Contemporary Bathroom by Charleston Interior Designers & Decorators Melissa Lenox Design

Accents. If you are craving the glow but don’t have the budget for a full iridescent wall, use mother-of-pearl mosaic tile to add a bit of sparkle to an accent. Mirror frames, side tables and table lamps can all shine with mother-of-pearl tile.

Mediterranean Living Room by Miami Furniture and Accessories Jalan Jalan Collection

Inlay. Mother of pearl is a very suitable product to be cut into shapes. The cut shapes, called tesserae, are often used as inlay on furniture and other decorative home accessories.

Traditional Bathroom by Belmont Interior Designers & Decorators Julie Mifsud

Sinks. Shown here as a semivessel model, a mother-of-pearl mosaic sink, like those fromLinkaSink, can be cleaned with mild household cleaner or soap and water. The grout can be cleaned with grout cleaner; it should be sealed once or twice a year for maintenance.

Contemporary Dining Room by Hillsborough Interior Designers & Decorators Lisa Silverman/ Decorator Guru

Furnishings. Mother-of-pearl cabinetry faces utilize shell panels, rather than tile. These panels are laminated shell tiles and come in a variety of shell types, colors and sizes

Contemporary Buffets And Sideboards by Los Angeles Furniture and Accessories Nusa Furniture Penida Nusa Furniture

 often uses mother-of-pearl in combination with coconut on its furniture. The dark chocolate of the rough textured coconut and mother-of-pearl’s creamy iridescence make for a delicious mix on this storage cabinet!

Contemporary Dining Room by San Francisco Interior Designers & Decorators Kendall Wilkinson Design

Wall coverings.Maya Romanoff, who specializes in luxurious wall products, offers a flexible tile that can be applied like a wallpaper. The tile is a thin capiz shell veneer applied to backing paper with a topcoat for easy maintenance. York Wallcoverings and Franco Ferrucci offer similar products.

Maya Romanoff’s wallpaper starts at $45 per square foot (plus installation). Candice Olson’s mother-of-pearl wallpaper starts at about $110 per double roll (about 60 feet of wallpaper).

Kitchen Countertops by Brooklyn Design-Build Firms IceStone IceStone Hot Colors

Countertops.

Icestone uses mother-of-pearl as one ingredient in its countertop products. A cementitious base product mixed with recycled glass shards and mother-of-pearl creates beautiful color blends

Contemporary Spaces by Seattle Architects & Designers Beley Design, pllc

Mother-of-pearl accents bring a wonderful glow to Icestone countertops, enlivening a space in a calm way. The use of small pieces of glass doesn’t feel as aggressive as in some other products. 

From personal experience, I recommend using Icestone only in areas where there’s no risk of staining the surface. I’ve used Icestone quite successfully in bathrooms and laundry areas.

Icestone countertops are comparable to mid- to high-end granite in cost. Allow for about $150 per square foot (including installation) in you.

Go for the Glow: Mother-of-Pearl Shines Around the Home

Contemporary Bathroom by Charleston Interior Designers & Decorators Melissa Lenox Design

Bathed in Color: When to Use Black in the Bath

Article By: Jennifer Ott, LEED AP, Assoc. AIA

Black is admittedly an unconventional color choice for a dominant color. Making it work in a bathroom can be extremely tricky, especially one that is cramped or underlit. But when done well, it can look stunning and sophisticated, as evidenced by the selection of black bathrooms featured below. 

Here you’ll find tips for how to work with black in a bath, along with a selection of black paint colors to try in your own space.

Look for subtle differences in undertones when selecting a black hue for your bathroom. 

Some have a warm tinge; others are cooler. 

My favorite blacks have a little bit of blue or purple — this gives them a cool, clean feel that contrasts nicely with wood tones and warm neutrals.


Black-hued walls don’t have to make a space feel dark and confining. 

Take a tip from this elegant bathroom and pick a blue-black for one or two of your bathroom walls. 

Cool colors recede, so the far wall here feels more distant than it actually is, giving the impression of a larger space. 

The black wall color also coordinates nicely with the dark veining in the marble.


If you decide to go all in and use black on most or all of your bathroom surfaces, think of ways to circulate light so the space isn’t too dark. 

The wide mirror (with its integrated light) and the wall of windows help to lighten things up in this bathroom. The lighter color of the sloped ceiling makes the room feel more open, too.


What a fun, fantastic bathroom! It’s proof that a black and white palette need not be boring. The wall covering is such a strong visual element in the room that not much else, adornment-wise, is necessary.


Play with shades of gray and black for a stylish, debonair space. I like the use of materials and textures here. 

The bulk of the colors in the space are dark, but because of the variety of materials and textures, it doesn’t feel like a black abyss.


If a limited palette of black, white and gray feels too cold to you, add some warm wood into the mix. These dark gray and black tiles provide a nice backdrop for the sculptural plumbing fixtures. They really pop out and take center stage.


If black walls aren’t your thing, try putting the hue on your floor. Black absorbs light, so incorporating plenty of reflective surfaces helps to bounce light through the space.


Those fortunate enough to have tall ceilings in their bathroom can easily pull off a palette that includes black without having the space feel cave-like and claustrophobic.


This sleek, contemporary bathroom is a knockout with its interesting mix of materials and textures. The black tile on the shower walls has a nice texture and sheen that allow light to bounce and reflect off of it, unlike with a light-absorbing matte black surface. This helps lighten up the space immensely.

How to Pick a Kitchen Backsplash That Wows

Article By: Vanessa Brunner

A kitchen’s backsplash works much like jewelry. Simple or snazzy, it can bring a whole look together; the right backsplash helps your kitchen reach its potential. Our in-depth guides, rounded up here, can help you find the backsplash material and color that fit with your kitchen’s look, your cleaning style and budget.


Modern Kitchen by Bristol Architects & Designers DHV Architects


Find Your Inspiration

The Kitchen of the Week series is great fodder for remodeling and renovation inspiration. Learn about the back-painted glass shown here and nine more favorite backsplashes from beautiful kitchens on Houzz. 


Choose Your Material

Tile. The good news: You’ve finally settled on a tile backsplash. The bad news: The selection process has just begun. Cement, subway, mosaic, patterned or laser cut? This guide will give you the pros and cons for each one, along with styling tips. 


Mirror. Additional visual space, a variety of styles and a relatively affordable cost make mirror a great backsplash choice. See how this flashy backsplash material can work in almost any kitchen design. 

Recycled tile. Whether salvaged or containing recycled material, recycled tile can add a unique element to your kitchen that’s easy on your conscience. 

Window. Planning on making some structural changes to your kitchen? Consider a different kind of backsplash: a new window. A beautiful view, more light and fresh air could improve your kitchen’s style and functionality. 


Tin. Take an old-fashioned approach to your backsplash and use simple tin tiles. This time-tested material is durable, beautiful and affordable. 


Unique materials. Maybe you feel like your classic kitchen needs a different touch. Or maybe you’re just ready to embrace the unusual. Either way, one of these unique backsplash materials can help you get the statement-making look you want. 

Installation Considerations

Half backsplash. If you have your heart set on a marble backsplash but can’t afford the counter-to-ceiling application you envisioned, don’t give up your dream just yet. Cut your backsplash in half — or more! — to reduce cost without sacrificing efficiency. 


DIY. Think you’re ready to put in your own backsplash? If you have experience setting tile and want something simple in your kitchen, take a look at this guide. A DIY backsplash installation could help you save some serious money. 


Architecture, interior design, and more ∨

From Shabby Chic home decor to contemporary furniture and mirrors, browse thousands of decorating ideas to inspire your next home project.
Hire a residential builder in your area to renovate or install a new fireplace.


Strategies to Create Color Flow Throughout a Home

Originality and creativity are having a moment: eclectic, colorful spaces are all the rage. But though many are over matchy-matchy furniture and one-size-fits-all paint colors, some consistency throughout the home isn’t a bad thing. Done right, color coordinating leads to better flow and a polished, cohesive interior design. 

Model-home interior designer Mary DeWalt from Austin, Texas; creates designs to appeal to buyers, and one of the ways she does does that is by maintaining color flow throughout. “For us, picking colors is all about memory,” she says. “People are more likely to remember a home with a particular color scheme, because it’s different from all the rest. If buyers are looking at several homes, that all-turquoise one will stand out in their minds.”

DeWalt’s savvy color-coordinating strategies can help turn a disjointed, choppy sauce into a flowing thought-out masterpiece, as this model home design demonstrates. Pick and choose the ideas that might work for you, too.

Photo: Colorful House in Portland via Flickr

As you make your color choices, go with what you love, not just what is trendy. DeWalt suggests picking one neutral and two accent colors to carry throughout every room. Accessories provide the color in rooms with neutral walls and grouping accessories in threes keeps tabletops interesting yet clutter free. 

Not every room needs to include every color. Cohesion is key, but that doesn’t mean you can’t experiment with materials. When accessories aren’t enough, add a wow factor, or what DeWalt calls a punctuation mark. 

Even if you love your color scheme, be cautious with big purchases. “Don’t commit to large, colorful furniture, because if you get tired of the color, it is much more expensive to replace,” DeWalt says. Game rooms and kids’ rooms are great spaces to take chances in; consider going bold with a brightly painted ceiling. In a transitional room, such as a hallway or an entryway, don’t feel the need to go big with color just a hint of your palette can be enough. 

Don’t limit your color scheme to the interior – bring it to your pool or patio with matching tile. For those whose budget doesn’t include a pool renovation (or even a pool), something as simple as colorful outdoor cushions can ensure that your outdoor and indoor spaces pair perfectly.

Choose Paint Colors With a Color Wheel

Color Wheel Guide


Big-Wheel.jpg

Photo: The Color Wheel Co.

Picking out paint colors can be a confusing experience, leaving you racked with indecision as you peruse swatches from paint companies intent on re-creating all of the 7 million colors distinguishable to the human eye. Trying to figure out which of those colors will mix harmoniously on your living room wall is enough to make you turn straight to the ecru-and-eggshell-white family and never leave.

One way to go, however, is to use a complementary color scheme. Proving the rule that opposites attract, these pairings can always be found at opposite ends from each other on a paint color wheel. When put together, they bring out the best in each other, making both colors look cleaner and brighter than if either were mixed with, say, a neutral gray or a different shade of the same hue.

An essential tool for paint pros everywhere, the color wheel is constructed to help you see the relationships between different hues. The bases are thre primary colors: red, blue and yellow. These are then combined to make the three secondary colors: orange, green, and purple. Finally, the remaining six colors on the wheel are known as tertiary colors and are mixes of the secondary colors, including such hues as red-orange and blue-green.

Familiarizing yourself with the color wheel can help you understand how to best mix and match a cool color with a warm one, for a naturally balanced room. Here are some examples of how to use these color pairings effectively.


red-green.jpg

Photo: Deborah Whitlaw-Llewellyn

Complements: Red and Green

When considering paint colors, remember to figure in the finish of any woodwork in the room. In this rustic Colonial-style kitchen, the green hues brushed onto the walls and lower cabinets complement the red tones of the mahogany beadboard and upper cabinets. 


red-orange-blue-green.jpg

Photo: Mark Lund

Complements: Red-Orange and Blue-Green

The two colors you choose don’t have to have equal prominence in the room to work. You can use one as the main color as an accent, or bring small colored accessories into an already painted room to see how you feel about the pairing. Here, the energetically bright orange-red towel and glass pop against the cool, blue-green walls without overwhelming the soothing hue.


blue-orange.jpg

Photo: Laura Moss

Complements: Orange and Blue

Keep the furniture you already have in mind when considering a new paint color. The cool blue milk paint on this wall accentuates the bright burst of orange on the blank chest in front of it – a scheme echoed in a more muted fashion in the bedroom rug beyond the doorway.


yellow-orange-blue-violet.jpg

Photo: Laura Moss

Complements: Yellow-Orange and Blue-Violet

Bright colors can breathe new life into traditional woodwork and work especially well in casual living areas. Here, glossy violet-blue pantry doors in a mudroom pop against the yellow-orange of the adjacent wall. When working with more saturated hues, remember that the colors will often appear more intense on the walls than they do on the strip. 


yellow-violet.jpg

Photo: Laura Moss

Complements: Yellow and Violet

If you’re a bit timid about suddenly splashing a couple of cans of color onto your walls, consider using two complementary colors as accents in the same room. In this 1950s kitchen the yellow window casing and violet countertop show nicely against the neutral beadboard and white cabinets. 


yellow-green-red-violet.jpg

Photo: Gregg Segal

Complements: Yellow-Green and Red-Violet

Make sure the intensities of the tones you use are balanced. In this kitchen, the pale yellow-green trim and pantry door meet their match in the subdued reddish-violet paint on the walls.