FREE DESIGNS AND ESTIMATES

10 Upgrades for a Touch of Kitchen Elegance

Article by:

“Elegant” “sophisticated,” “simply beautiful” — are these words you would use to describe your dream kitchen? Even just adding a coat of paint, new lighting and carefully chosen decorative details can bring your current kitchen a bit closer to that dream. Here are 10 upgrades to consider.

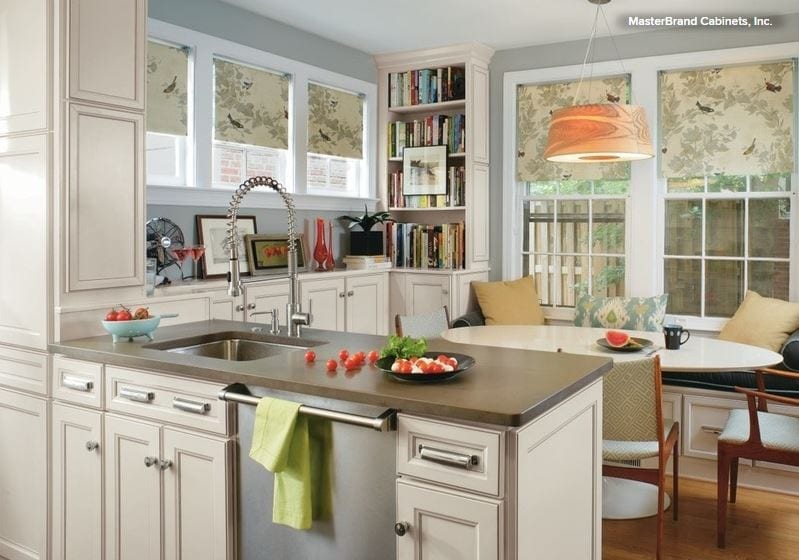
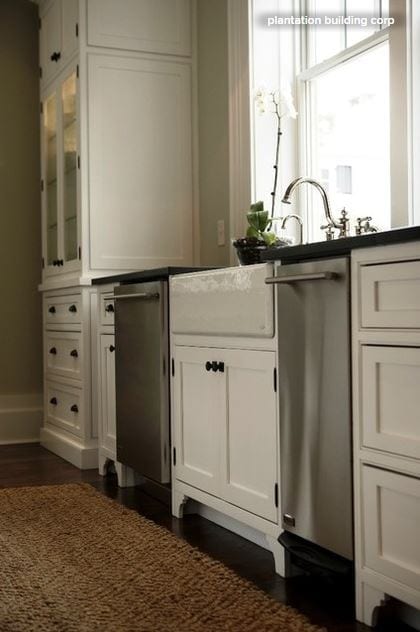
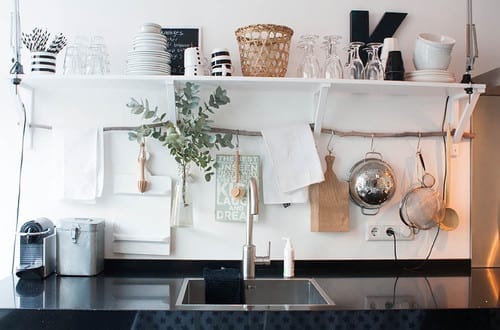
1. Roman shades. Covering the window with a classic Roman shade gives the kitchen a finished look. Go with a color and a pattern that coordinate with your cabinet and wall color, or stick with natural linen, which goes with everything.

2. Topiary. A pair of topiaries flanking the sink is an elegant finishing touch. Use a vintage champagne bucket as a cachepot, or wrap a simple pot in burlap and tie on a velvet bow. If your kitchen gets a good amount of natural light, by all means get real plants — but if not, there’s no shame in picking up a couple of high-quality fakes.


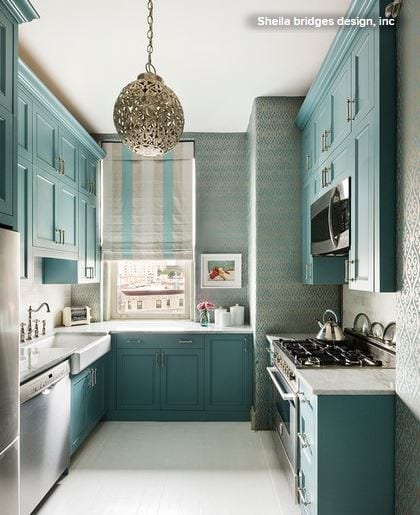
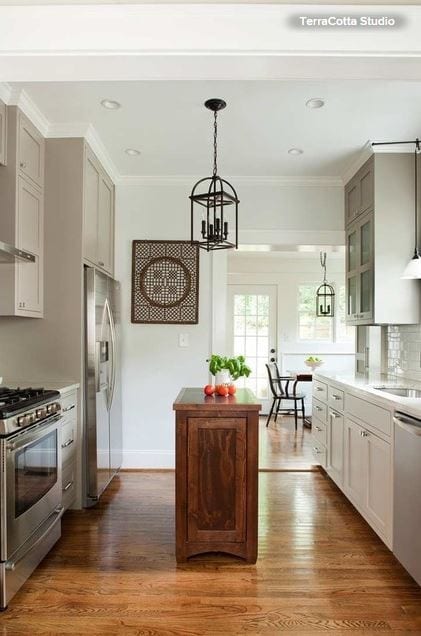
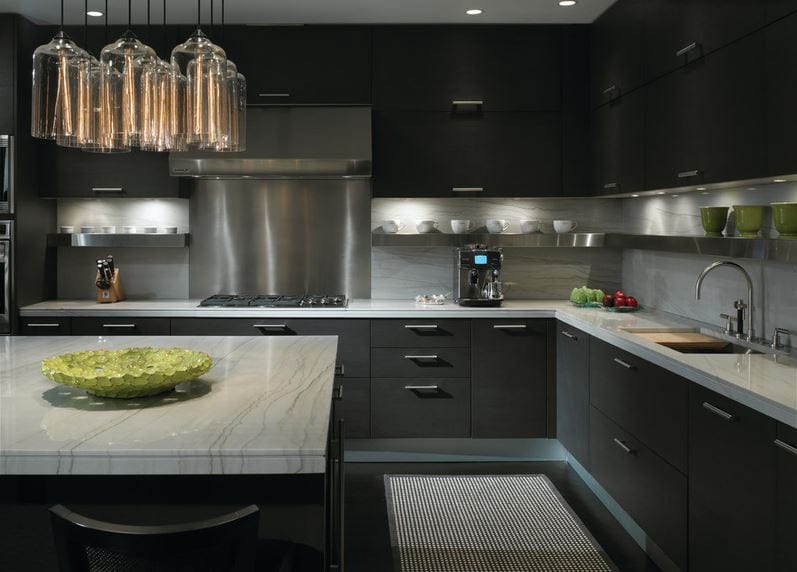
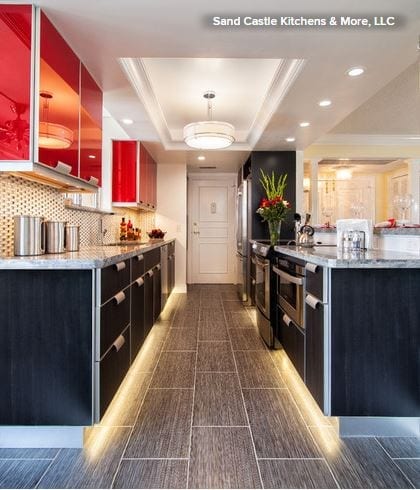
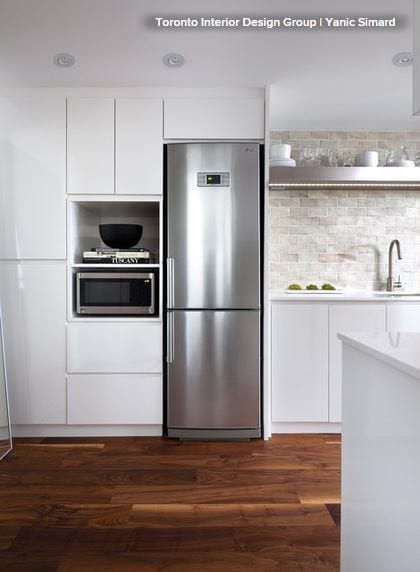
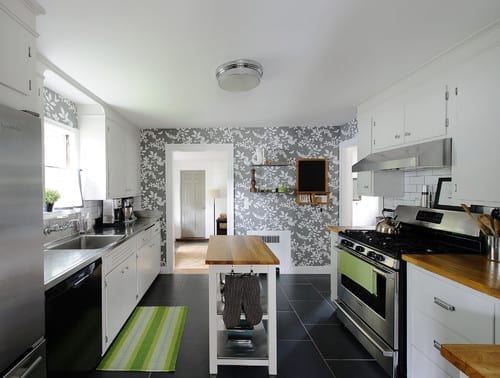
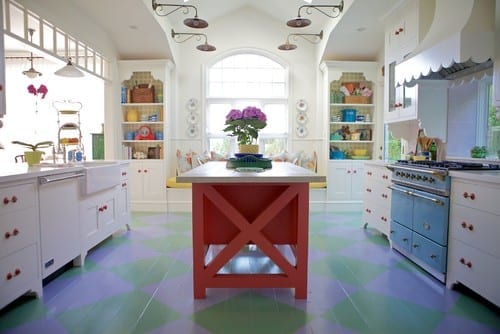
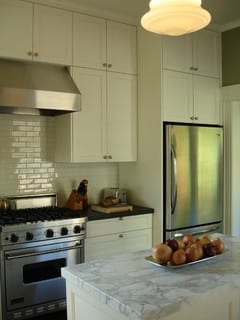
3. Pendant lighting. Swapping out a plain ceiling light fixture for something with more style can be done quickly — and your new pendant light can become the focal point of the room. Don’t be afraid to go big; even in a small kitchen like the one shown here, a sizable pendant looks striking, not overpowering.

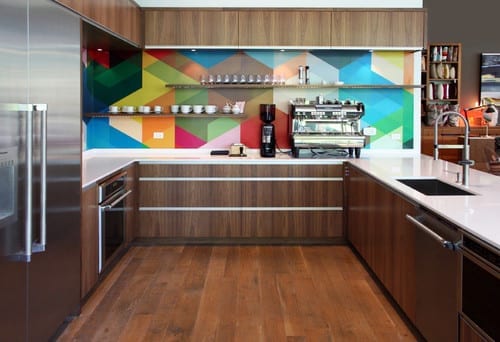
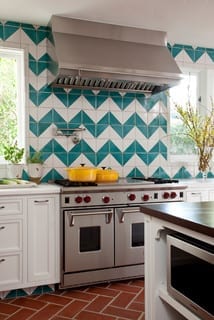
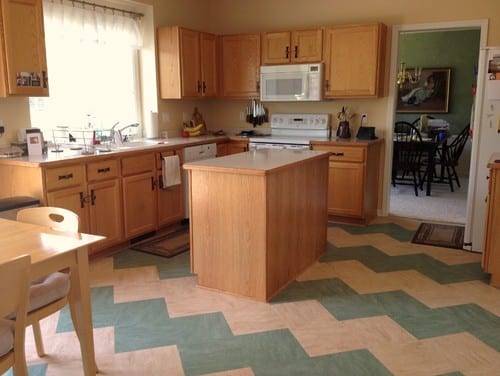
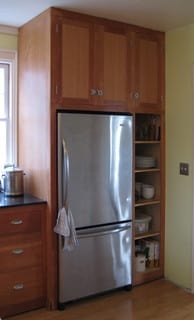
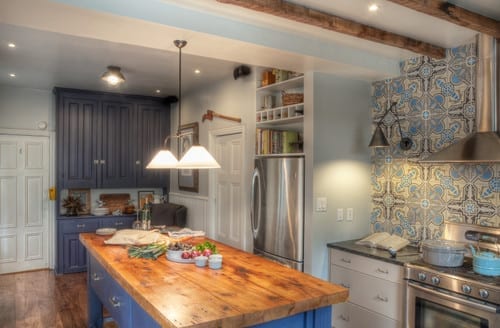
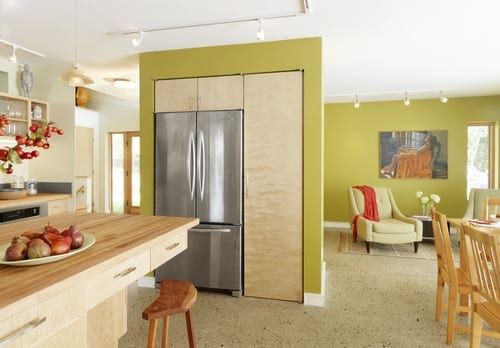
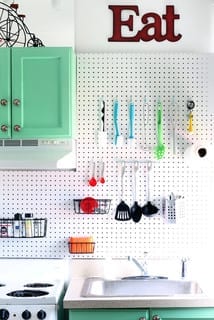
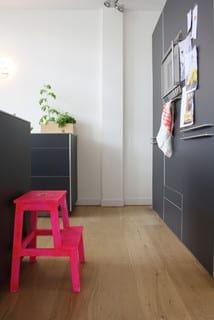
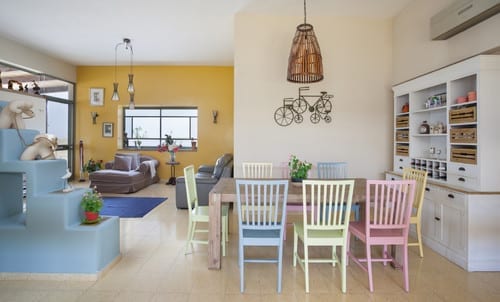
4. A rich cabinet color. Whether you paint your cabinets or stain them a natural wood tone, a rich color is a high-impact, low cost way to change the look of your kitchen. Try a saturated hue like the blue-green shown here, or a chic gray or slate on just the lower cabinets.


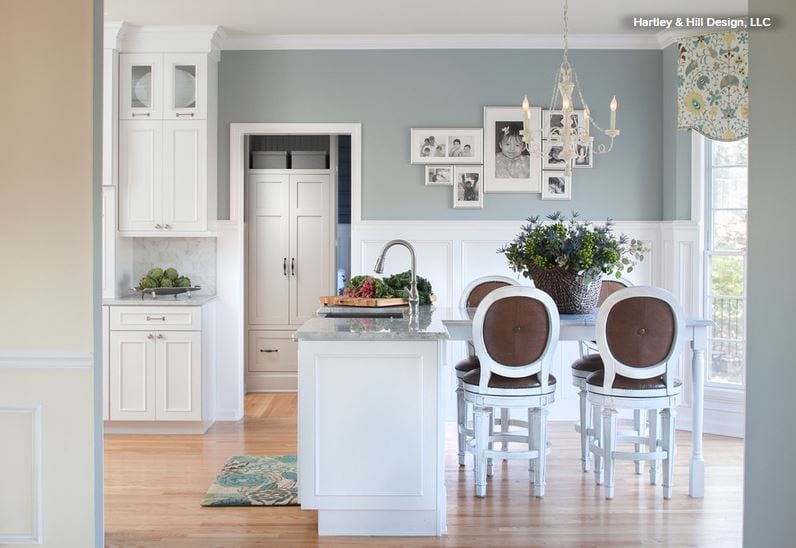
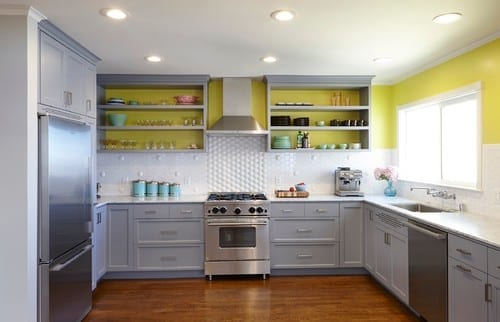
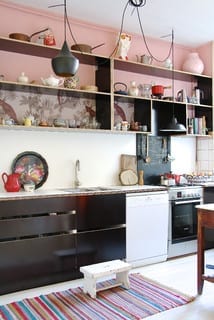
5. Wall paint. If you don’t want to repaint or restain your cabinets, another way to bring in color is by painting the walls. With all of the appliances and cabinetry, kitchen wall space is often fairly limited — which means not only is it quicker to paint, but the color is less likely to overwhelm than in, say, the living room. Try a smoky blue, rich “greige” or warm mocha.

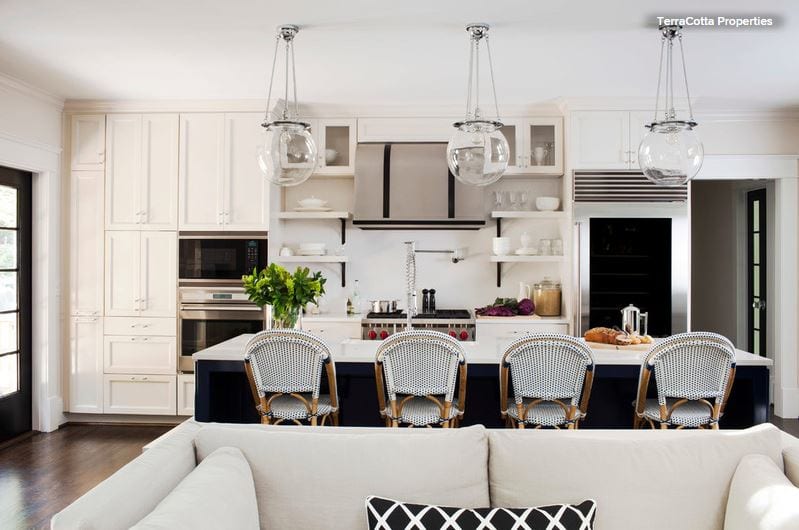
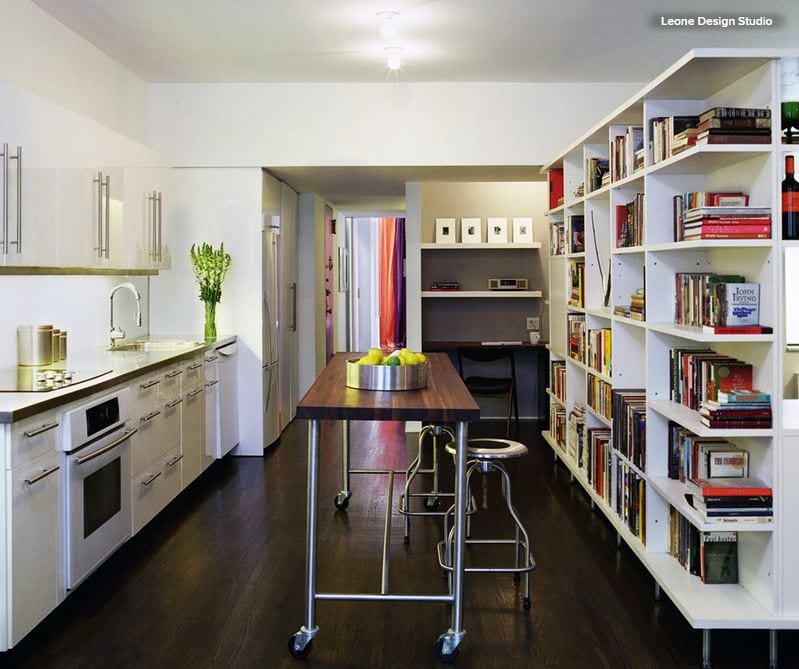
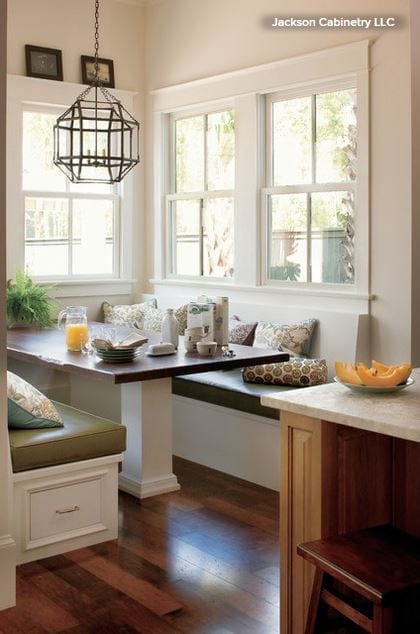
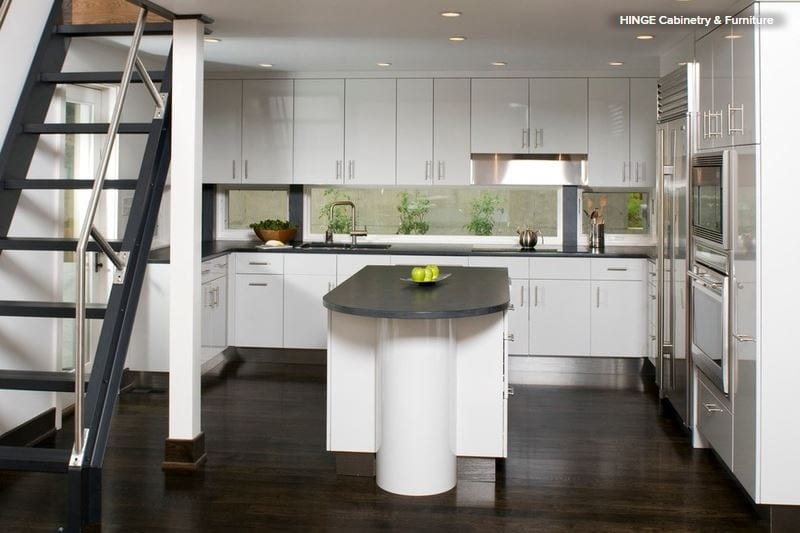
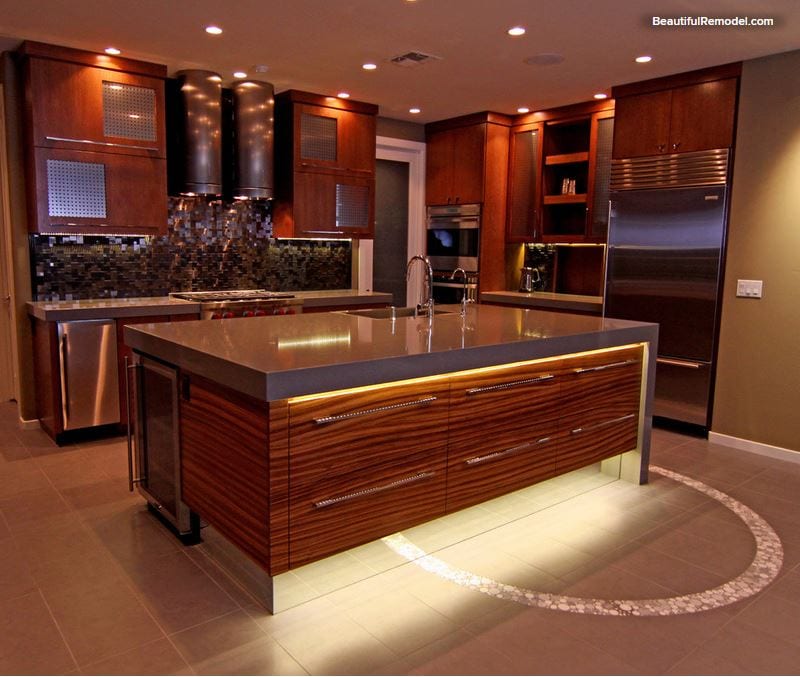
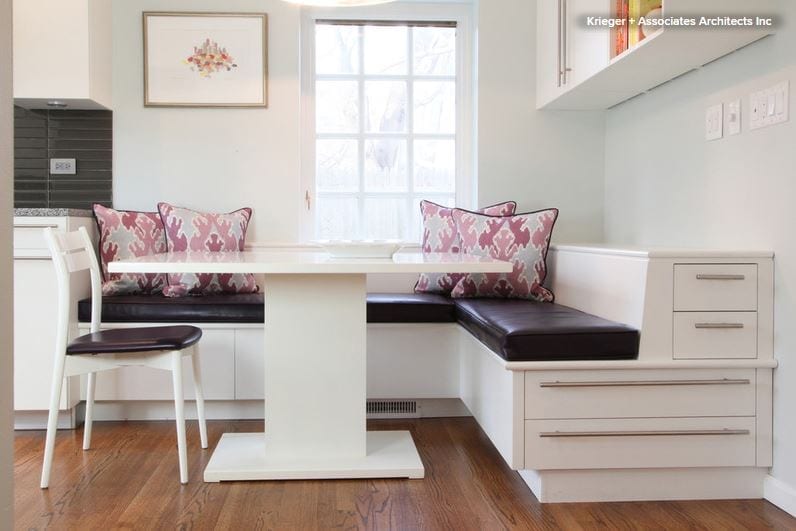
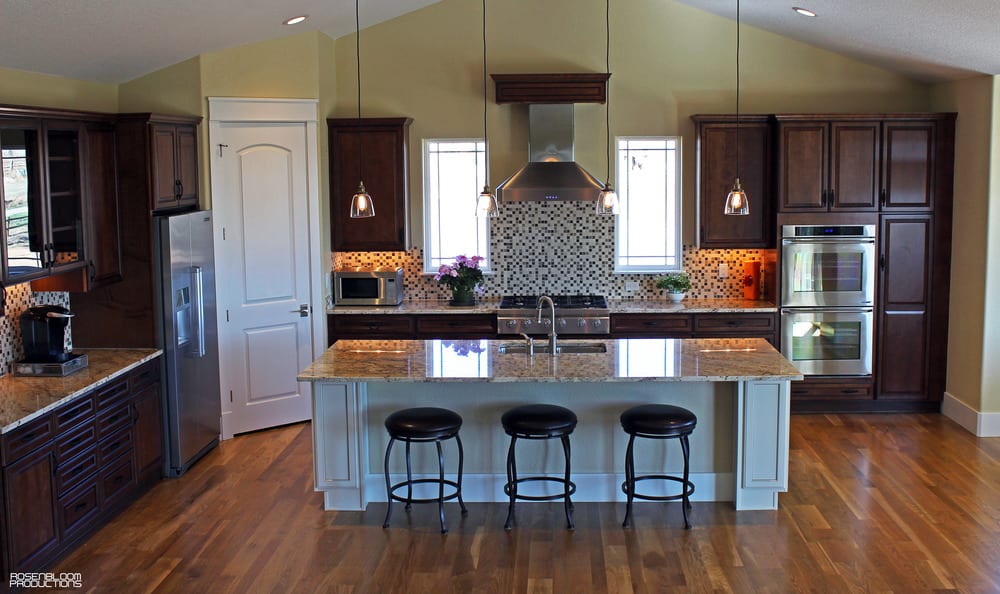
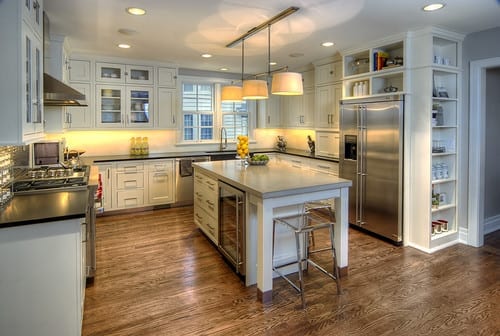
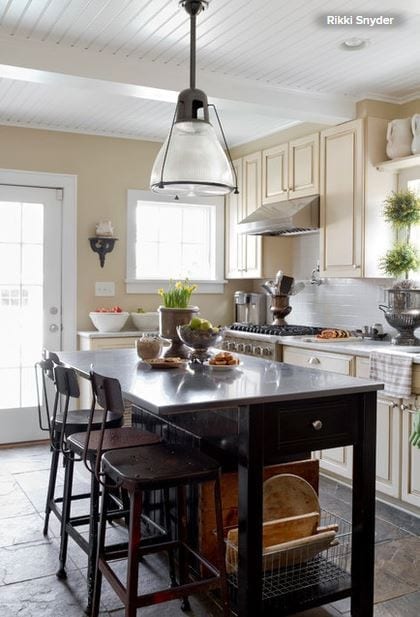
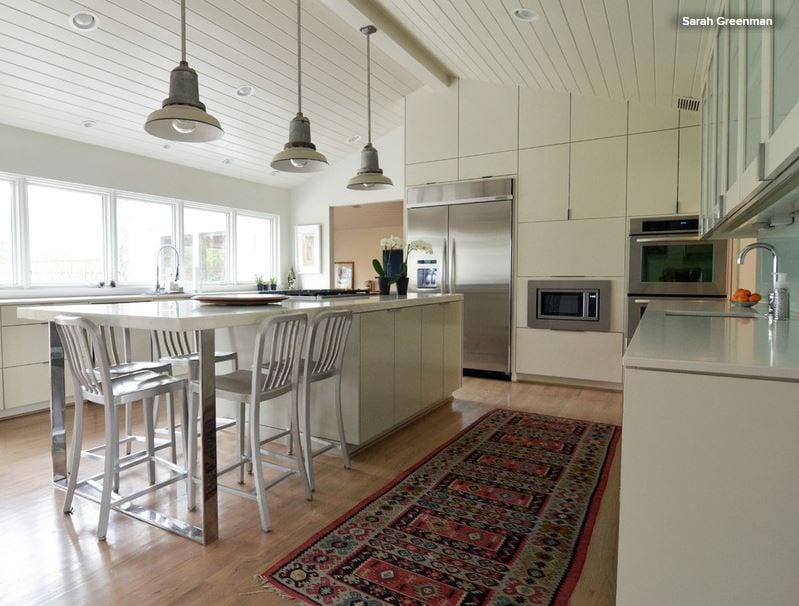
6. Upscale counter stools. There are so many options when it comes to kitchen counter seating that there’s no reason to stick with plain bar stools, unless you want to. Try classic bistro stools (like the ones shown here), sculptural wooden stools or sleek Lucite ones.

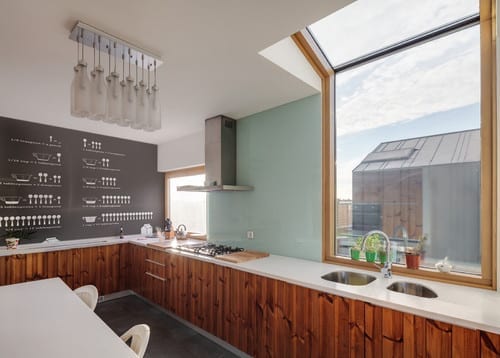
Also notice the pendant lights in this kitchen — if you have a long counter, placing a row of three large-scale pendant lights above is a great way to bring focus to the space. Glass pendants like the ones shown here are elegant and maximize light.

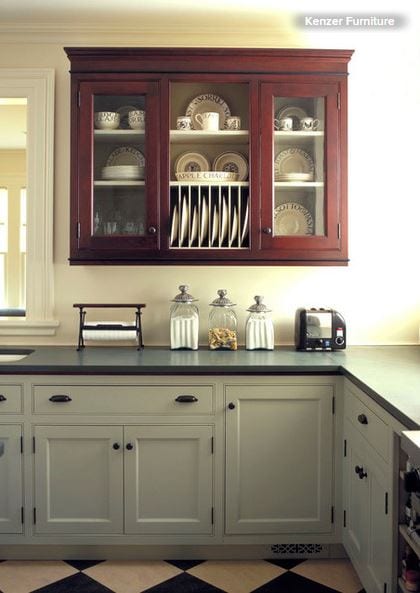
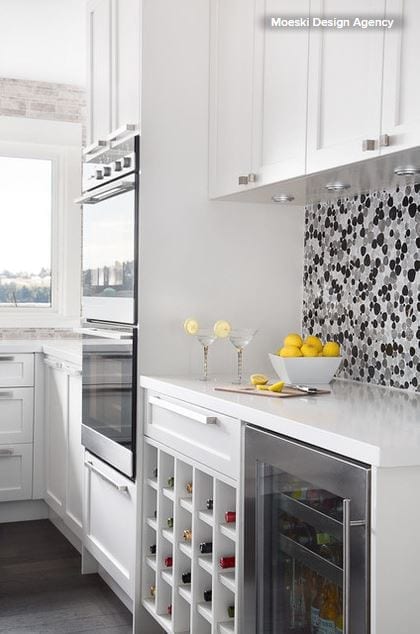
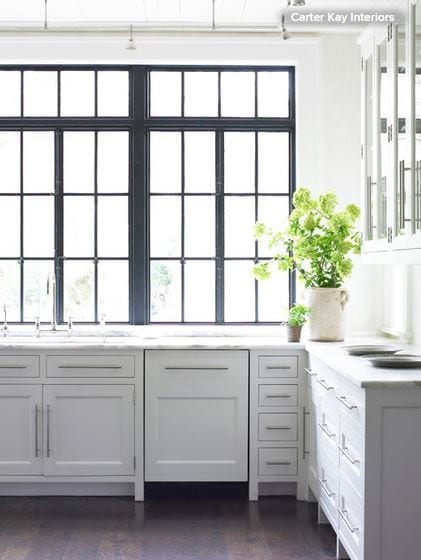
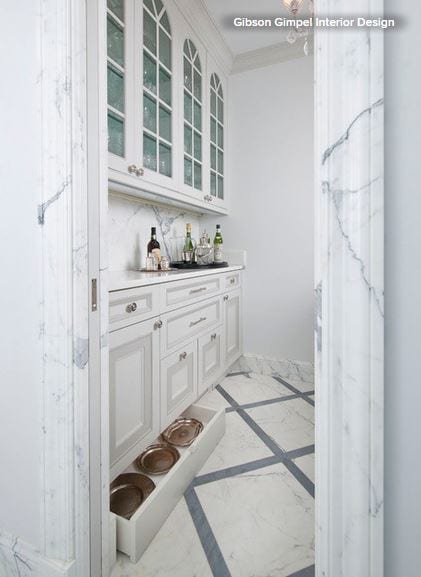
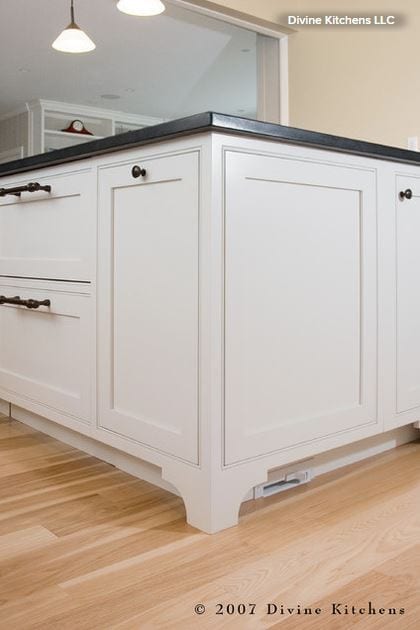
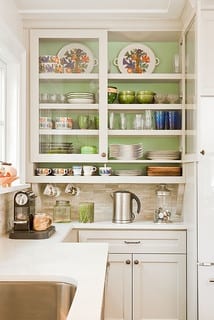
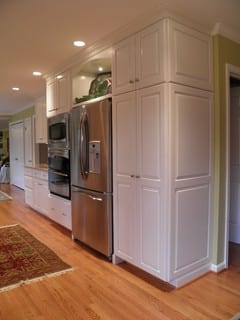
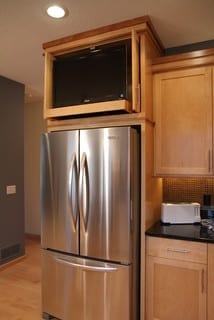
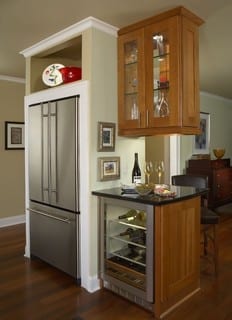
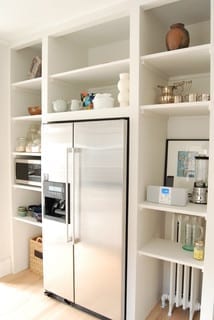
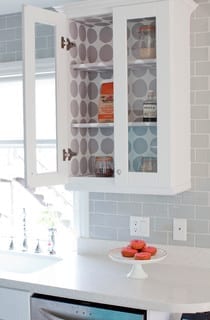
7. Glass cabinet fronts. Update old cabinets by having several of the doors replaced with glass fronts. This costs far less than replacing full cabinets and can completely change the look and feel of your kitchen. Remember, whatever is in the new glass-front cabinets will be visible at all times, so choose just a few cabinet fronts to replace and commit to keeping the interiors orderly.


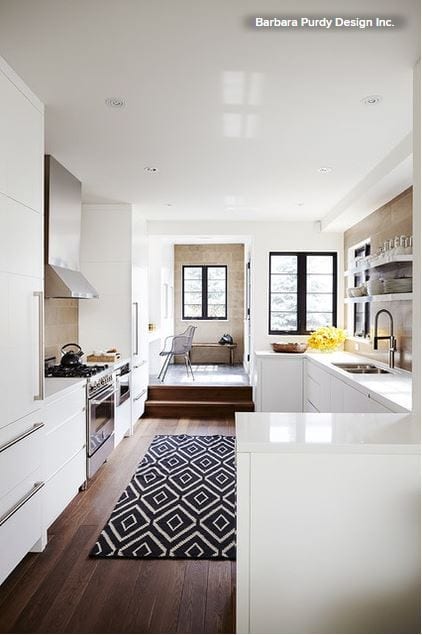
8. A chic rug. If you’ve shied away from using a rug in the kitchen for fear of spills and stains, try a chic indoor-outdoor version. These rugs come in beautiful colors and patterns now, and no one has to know about the stain-fighting powers.


If you’re not frightened of spills, lay down a beautiful (but not priceless) Oriental carpet. Rugs made from wool and other natural materials are quite forgiving when it comes to stain removal, as long as you act promptly.

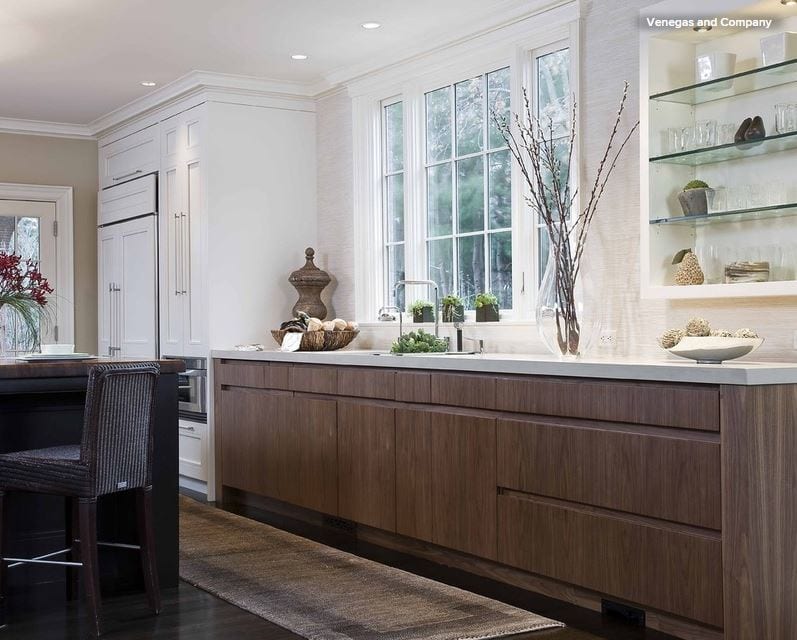
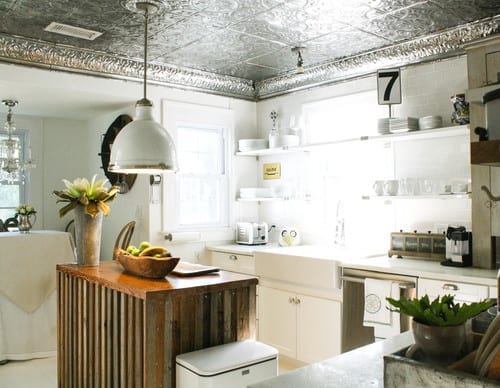
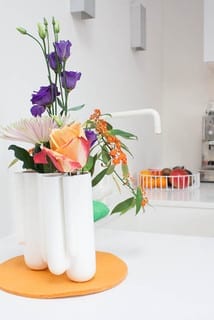
9. Branches in a tall vase. Branches last far longer than cut flowers — but more than that, they exude elegance. An armful of seasonal branches plunked in a tall vessel is an easy way to instantly boost the ambience in your kitchen.

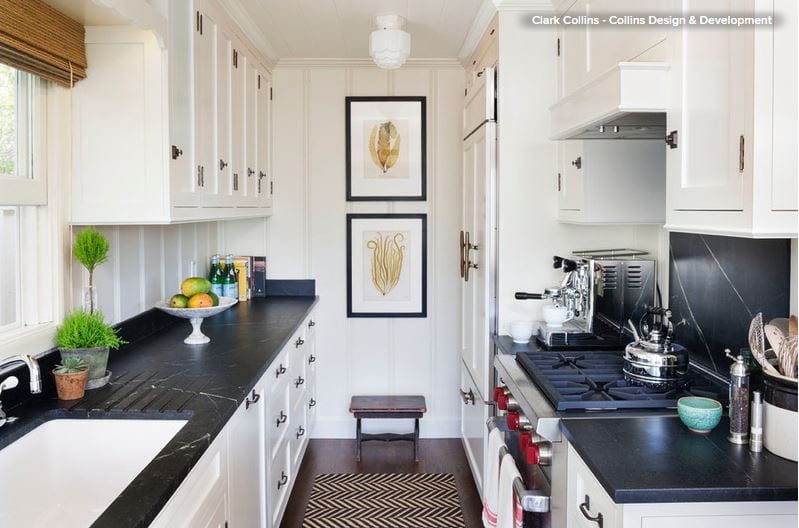
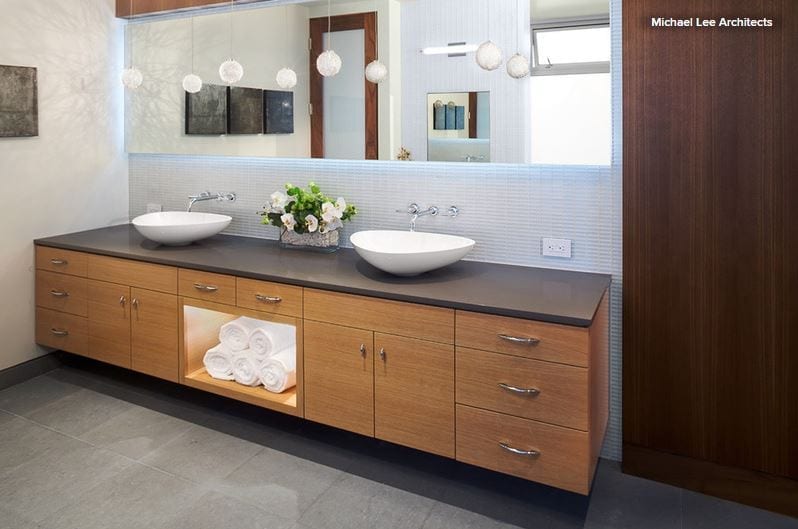
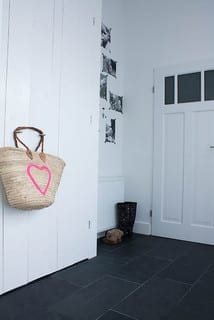
10. Decorative details. Framed artwork on the wall — and not just “kitchen” art but art you could just as easily hang in another room — can add polish to any kitchen.

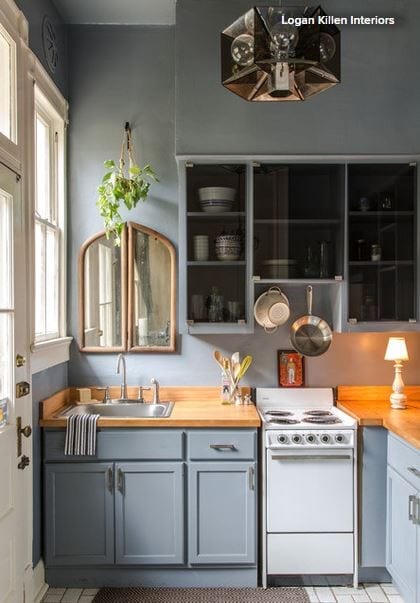
Mirrors are unexpected in the kitchen, and just like in other spaces, they can be a wonderful way to boost light. A small table lamp tucked onto the counter brings a warm glow that makes a kitchen feel more welcoming.

Not a Big Cook? These Fun Kitchen Ideas Are for You

Kitchen design tends to be centered around the presumption that you will be spending loads of time in your kitchen cooking. Not so earth shattering, right? But the fact is, not everyone loves to cook. Not everyonecould really use a supersize fridge, dual ovens and an enormous island. So what do you do when it’s time to think about a kitchen design, when all you’ve used your oven for is storage? While it makes sense for certain basics to be in place (sink, stove, dishwasher) even if you rarely cook, there is plenty of room for creativity. From wine storage to a library wall, here are a few ideas to consider.


BigCook1.JPG

Wine storage. If you don’t have a large collection of cookware to house, it makes sense to shift some of that storage space to something you do use. 

Oenophiles may want to add a temperature-controlled wine cellar cabinet for bottles that need to be aged, in addition to open shelving for ready-to-drink bottles.


BigCook2.JPG

You could even create your own home wine bar experience with wall-mounted bottle storage, paired with a “tasting bar” attached to the wall.


BigCook3.JPG

Fancy coffee station. Love your morning latte or cappuccino? Splurge on a top-notch espresso maker so you can whip up your morning beverage of choice at home. Since you’re not spending as much on fancy knives and cookware, why not?


BigCook4.JPG

When less work is what you want, look into a fully automatic coffeemaker. With the push of a button, you can have a cup of delicious coffee or even an espresso drink, depending on the model you choose.


BigCook5.JPG

Library wall. If books are one of your great loves, consider dedicating a kitchen wall to bookshelves. You can house a good portion of those books that seem to multiply when you’re not looking, while keeping kitchen storage options flexible. As long as the shelves are large enough, a future owner could just as easily use them to store dishes, cookware or cookbooks.


BigCook6.JPG

Cover (but rethink) the basics. Even those who rarely cook should include a few basic appliances in the kitchen. You never know if you may one day decide to cook at home more often, and even if you don’t enjoy cooking frequently, most people occasionally need a kitchen stocked with the basics. 

A fridge and freezer, a stovetop, an oven, a sink, a dishwasher, a toaster and a microwave are the bare bones for most kitchens. That said, these pieces do not need to be massive to get the job done. In fact, going overboard on appliances may just make cooking in your kitchen seem more intimidating.


BigCook7.JPG

If your kitchen is small and you rarely cook, one alternative to the classic big oven is a separate cooktop paired with a compact oven, or even a convection toaster oven, for cooking (or warming) food.


BigCook8.JPG

And if you really have no use for a giant fridge and freezer, consider instead a few handy fridge and freezer drawers. They can be tucked into small nooks and don’t overwhelm a space like a full-size fridge can.


BigCook9.JPG

Delightful seating area. When you don’t need to worry about maximizing cabinet space, some fun possibilities open up; a lovely little seating area in the kitchen is one great option. After all, even if you don’t spend hours cooking, you likely do want to be able to sit down in a comfortable space and enjoy a cup of coffee in the morning, or a simple supper (even if it’s takeout) after a long day.

The Kitchen Storage Space That Hides at Floor Level

The humble toe kick is an often-overlooked design detail, and maybe for good reason: It stands practically underfoot, serving in fact only to give our feet a place to rest while we’re working at the counters and cupboards above. However, whether in the kitchen, bathroom or elsewhere, there is much you can do with a toe kick, so it’s worth taking a moment to think about this small design detail. Here are a few helpful design tips for the last place you’d ever think about looking.

Toe kicks are, as a rule, typically 3 to 4 inches high, and recessed 3 inches underneath a cabinet. This gives you room for your feet — or your toes, anyway — while you’re standing at the counter without wasting cabinet space or creating a pocket that’s too deep to clean.


However, a toe kick doesn’t have to be wasted space. Drawers for extra storage are the perfect use for this overlooked space.


They work great for wide, flat items, like specialty pans you don’t use every day …

… or a stepladder for when you need to reach those tall upper cabinets.

A toe-kick drawer can also house your pet food if you prefer to keep it out of the way between meals — or if your pet is a bit of an overeater!

Get a clean, classic look by matching the cabinets to avoid a visual break (especially perfect with statement wood floors).


For a richer, traditional look, add faux feet to the cabinet fronts to give built-ins a furniture-inspired feel.


Stainless steel (especially with stainless steel appliances) will let your toe kicks make a subtly modern statement.

Or you can use a hint of color or repeat a beautiful tile — both work great in darker spaces to add some life.

Underlighting isn’t just for cabinets. Glowing toe kicks look great in a space with other modern LED light sources (like in a ceiling alcove).


To make toe kicks disappear, try painting them black or using a dark material …

… or give them a mirrored finish, and your cabinets will appear to float.

Want other uses for your toe kick? Try a modern central vacuum system. You can incorporate a hidden suction port in the toe kick so crumbs and dust can be swept away without your even bending over.


And a toe-kick heat vent will keep you toasty during a meal in your breakfast nook or banquette.

Your guests (and you) will appreciate the extra effort, even if they have no idea that your toe kick packs such a design punch!

8 Kitchen Design Tips for Foodies

Article by:

I cut my culinary teeth in a tiny apartment where a janky oven meant that cookies took twice as long to bake, and seared scallops nearly sent dinner guests home with smoke inhalation.

The upside of all that making-do meant I knew exactly what I wanted when the time finally came to move to a larger space and remodel the kitchen. I spent hours poring over solutions for everything from pot storage to dishwasher space, and while not every idea worked for our space, the fixes I found heavily influenced the end result.

Here are eight great tips to help your dream kitchen work beautifully.

1. Buy the right vent hood. Vent hoods are rated by the cubic feet per minute (CFM) of air they can suck from a room. While formulas for determining how much power you’ll need vary, you’ll want to start by acquainting yourself with the basics. 

  • There’s no point in buying a hood that’s larger than your range. It won’t really suck more smoke out, and it won’t look right either.
  • Gas ranges generate more heat than electric ones, and thus require more powerful vent hoods.
  • Maxxing out the CFMs isn’t always a good thing. For example, a 1,000-CFM vent hood will suck the air from a 10-by-10-by-10 room in about a minute, then will lose suction unless you have an HVAC system or an open window. So have your room dimensions handy to show the vendor when it’s time to buy.

2. Invest in proper knife storage. If you love to cook, chances are that you’ve spent a pretty penny on at least one good kitchen knife. But leaving it to rattle loosely in a cutlery drawer will dull and damage its blade – and pose a serious threat to your fingers.

Kitchen knives should be stored in a way that keeps them separate and organized, with their blades horizontally oriented so the knife never rests on its blade. 

While my knives are currently housed in the block they came in, I plan to commandeer a little-used drawer and add a knife block like this one.

3. Pull out your pans. This ingenious pullout eliminates messy stacks of pots.

4. Stash pot lids in a rollout. Pot lids can be the bane of any home chef’s existence, jamming drawers and preventing pots from stacking properly. To solve this problem, use a shallow rolling drawer to neatly stash lids for the pots below.

5. Keep cooking utensils off your countertop. Keeping spatulas and whisks in a countertop jar may make storing these awkwardly shaped utensils easy, but it also creates clutter. Consider replacing a narrow cabinet near your stove with a custom pullout to keep utensils close at hand.

6. Create extra prep space. This small San Francisco kitchen was in desperate need of extra prep space. The solution: a custom rolling cutting board and base cabinet that can be pulled out should the sous-chef need some extra elbow room.

7. Make your faucet a soaker. I was wary of a soaker hose’s high profile poking up above our breakfast bar, but my husband talked me into it. And boy, am I glad he did! It blasts water off dirty dishes, cools pasta in no time flat and ensures that every corner of our sink is sparkling clean.

8. Consider a dishwasher with a utensil drawer. The last thing I want to do when I entertain is to disturb guests with the clatter of hand washing dishes, but I don’t want to wake up to a mess either.

Choosing a dishwasher that can comfortably accommodate a heavy load was very important to me. The model I chose has a narrow utensil drawer that slides out above the top rack, freeing space below for unwieldy pots and large stacks of dishes. A year later I can definitely say this was one of the best decisions we made.

Key Measurements to Help You Design Your Kitchen

Article by:

Whether you are moving into an existing kitchen, remodeling the one you have or building a new one, understanding a few key measurements and organizational guidelines can help your culinary life run more smoothly. 

Kitchens provide storage for your food and cookware, give you room for prep and cleanup, and of course also provide a place where you can cook and bake. When it’s thoughtfully arranged, these functions operate logically, making work in your kitchen a better experience. Here’s how to get the ideal setup.

Ideally, refrigeration and dry-goods storage should be located nearest to the kitchen’s entry point. The cooking area should be located toward the dining spaces, and the sink is best positioned between those two functions. This creates what’s called a work triangle. The best work triangle is less than 21 linear feet (6.4 meters). Work triangles that exceed 26 feet (7.9 meters) make moving from one function to another inefficient in most cases.

This cutaway plan illustrates arrangements and dimensions for a modest-size kitchen. Note that the preparation area is split between the island with the sink and the corner of the kitchen. The work triangle is compact. There will always be a few tradeoffs in any space. 

Let’s take a look at the three main functions of a kitchen:

1. Storage
2. Preparation
3. Cooking

Everyone has personal preferences for what works best, so consider this a guide and not a rulebook.


Storage. As noted, designers recommend putting refrigeration and dry-goods storage at the kitchen entry point. Putting your pantry on one side and a countertop that’s 15 to 24 inches (38 to 61 centimeters) on the other is a good idea. This will allow you to easily set down items that have been taken out of the freezer and refrigerator.

The pantry can hold dry goods plus brooms and supplies like paper towels. Use drawers in this area to hold plastic bags, foil and anything that can contain food to be stored. For the cabinets in this area, you will want to have mixing bowls, cake pans, measuring utensils and any other items that aid in assembling meals.

Preparation. Ideally, prep and cleaning space is best located around the sink. Within these areas will be everyday glasses and dishes, along with trash receptacles and the dishwasher. Allow 18 to 36 inches (45 to 92 centimeters) of countertop space on one or both sides of your sink.

Preparation areas are best kept clear of other items, since you will always be taking out bowls, plates and utensils there. Allow at least 36 inches (92 centimeters) of uncluttered countertop space for preparation in a small kitchen. Larger kitchens will have much more. This is one reason that islands are so popular. They provide broad and well-lit surfaces on which to perform the majority of kitchen tasks.

Cooking. The cooking centers should be arranged around the range, cooktop and wall ovens. Place pots, frying pans and baking sheets in the vicinity around your burners and ovens. It is a good idea to place small appliances such as toasters and coffeemakers in this area also, as it will leave your preparation areas unobstructed.

Allow 21 to 36 inches (53 to 92 centimeters) of countertop on either side of your cooktop. If possible, place wall ovens with a free countertop immediately next to them so that you can set down hot food immediately. Place seasonings, breadboards and potholders in nearby drawers and cupboards. Keep serveware toward the dining area.

Recommended Dimensions of Kitchen Elements

The dimensions of all the pieces in your kitchen are important to get right to make the best use of your space. A common refrigerator width is slightly less than 36 inches (92 centimeters). The problem is often the depth. In recent years some manufacturers have designed them to be much deeper than a 24-inch (61-centimeter) base cabinet. You can still buy shallower freestanding refrigerators, but you have to pay close attention to the dimensions listed in its specifications to be certain. The other option is built-in configurations, but they are significantly more expensive. 

Look for a depth of 30 inches (76 centimeters) or less, excluding handles, unless you can design your kitchen space to accept a deeper unit. Another thing to consider is the swing of the refrigerator door. Always examine the swing direction to see if it will meet an obstruction.


Here you can see how the height of the cabinets plays an important part in the configuration. Upper cabinets are normally positioned at 18 inches (46 centimeters) above the countertop and are 30 to 42 inches (76 to 107 centimeters) in height. Consider that your average maximum reach over and into an upper cabinet is 70 to 80 inches (178 to 203 centimeters) above the floor. Cabinets set at above 7 feet will likely need to be accessed with a step ladder. Cabinets above 8 feet are not practical for the majority of people; however, they may serve as storage for seasonal or decorative items, to be reached with step stools and ladders. 

The standard dimensions for base cabinets are 24 inches (61 centimeters) deep and 36 inches (92 centimeters) high. In general people are getting taller, so some homeowners are bumping up the counter height to 38 inches (97 centimeters).


Another important dimension to consider is the distance between cabinets. Entry points can be as little as 36 inches (92 centimeters) when there is a cabinet on only one side. Stay at least 42 inches (107 centimeters) from the face of a cabinet to the one on the other side; 48 inches (122 centimeters) is even better, but going beyond 60 inches (152 centimeters) is too wide in most cases. However, if it is a U-shaped kitchen, you could get away with up to 96 inches (244 centimeters).

Top 10 Reasons to Remodel Your Kitchen

Article by: Ann Johnson


Whole_Kitchen2_LR.jpg

For many households the kitchen is the center of the home and the hub of activity. Remodeling the kitchen can be a major undertaking. It is not just the expense, but also the inconvenience to the household that gives many homeowners pause when considering such an undertaking. In spite of this, homeowners continue to find good reasons to proceed with a kitchen remodel. Reasons for remodeling vary, and your neighbor may not share your top reason for the project.

1. Deterioration

The kitchen might simply be falling apart. Cracked tiles, peeling countertops, broken or missing cabinet doors and outdated appliances don’t inspire gourmet cooking or family gatherings. The deteriorated kitchen has simply outlived its usefulness and needs a remodel.

2. Value

Homeowners often remodel their kitchens to increase the value or marketability of a property. A remodeled and attractive kitchen will appeal to prospective home buyers more than a boring and outdated one. The homeowner may or may not recoup the investment of the remodel; this will depend on a variety of factors, such as the degree of the remodel and current market prices.

3. Energy Savings

Energy savings might be the prime motivation for a kitchen remodel. Adding skylights brings in more sunshine, reducing the need for artificial light. Energy-efficient appliances and solar water heaters cut the utility bill and place less stress on the environment.

4. Modernity

The kitchen can be pristine yet outdated. If the kitchen says 1950s, but you want to live in the here and now, it is time to transform your retro kitchen environment into a room for the 21st century.

5. Lifestyle

The kitchen layout may have worked great for the previous homeowner, but not for you. Perhaps it lacks a breakfast bar, and your family wants to gather informally in the kitchen to enjoy coffee or grab a quick meal without going to the dining room table. Whatever the reason, one motivation for a kitchen remodel is to arrange the room to best suit the family’s needs.

6. Special Needs

It is sometimes necessary to remodel the kitchen to better accommodate the needs of disabled family members. For example, if one of the family is in a wheelchair or no longer able to reach high cupboards, a remodel can make the room more usable.

7. Financial Incentives

The prime motivation behind a remodel might simply be financial incentives, such as energy-saving rebates offered by government entities or vendors. Financial incentives include sales at home improvement centers, cash rebates for trading in outdated appliances, remodeling grants and low- or no-interest loans.

8. Change

Some homeowners simply want change. The current kitchen might be functional, updated and attractive, yet no longer appeal to the homeowner.

9. Home Improvement TV

Watching home improvement shows on cable television inspires many homeowners to remodel their kitchens. They may never have considered such a project until a home improvement program showed them the possibilities for their kitchen.

10. Gourmet Kitchen

For a homeowner who enjoys preparing fancy meals and considers himself a gourmet cook, the prime reason for a remodel is the desire to create a dream kitchen. A gourmet kitchen with fancier amenities than most accommodates the cook’s needs.

Choosing New Cabinets? Here’s What to Know Before You Shop

Article by:

With all the options available, choosing cabinets for your kitchen or bath can be an overwhelming experience. Aesthetics aside, there are lots of factors that might not be readily apparent that will impact the cabinet’s performance and price. Understanding those factors will give you an advantage in making your selection.

There are three basic structural components to a cabinet: the box, the shelves and the drawers. Each can be constructed in a number of ways. Cabinets generally come four ways: boxed and ready to install in standard dimensions, boxed and ready to assemble, semicustom and custom.

To get a better understanding of the way cabinets are made, I visited two manufacturers: Canyon Creek Cabinet Company in Monroe, Washington, which makes semicustom units, and O.B. Williams Company in Seattle, a 125-year-old woodworking shop that builds custom cabinets. 

Boxes 

They look just like they sound: rectangular and ready to be filled up with shelving and drawers. Boxes are typically built in one of three ways: with plywood, particleboard or MDF (medium-density fiberboard) and a base that is later covered with a finish piece called a toe kick. There are pros and cons to each of these materials. 

When plywood is used, it’s typically ¾ inch thick and has a maple or birch veneer. Plywood is made from layers of wood laminated together, and has the benefit of being a fairly stable material that performs well over time and in areas with higher humidity and the chance of contact with water. The panels can be glued, nailed or screwed together, and are usually installed (as is the case with most cabinets) by screwing them into the wall. Plywood’s main downside is that it is relatively expensive.


Particleboard’s draw is its low price. Made from pressed bits of wood bound together with adhesives, particleboard can be covered with a veneer of wood or melamine, or a paper veneer printed to look like wood. The interior can be white or a wood tone. 

The downside to particleboard is that it can be sensitive to moisture and is more prone to coming apart at stress points — where hardware is screwed in, for instance. Ask about how the veneer will hold up with small amounts of water (glasses not completely dried, for instance) or something more serious, like a spill that sits for a while. 

Some cabinet manufacturers, like Canyon Creek, regularly have the particleboard they use tested for performance, so ask if there are different grades of material from which to select, and what you can expect in terms of durability. 


MDF is also less expensive than plywood; it has a more uniform surface than particleboard. MDF is often used for paint-grade panels, rather than thinly milled solid wood, because it’s such an easily paintable material. 

Manufacturers of semicustom and mass-market cabinets tend to have better/best or good/better/best options for their cabinet boxes, which may consist of one or a combination of all three materials. Custom shops tend to stick with plywood and MDF, or just plywood, for construction, because of its strength and performance. 

On boxes that will have European-style doors and drawers (where the doors and drawers completely cover the box — also known as full overlay), making sure the box is completely square is essential. That can be accomplished with a clamping system, or in a custom shop by using individual clamps. This ensures that when the fasteners are installed, the box will be perfectly square.


Drawers and Shelves
 
Drawers and shelves are also made from particleboard, MDF or plywood, and can be assembled in a number of ways. The most common and least expensive method of drawer construction is gluing and pinning (stapling) the ends together.


A step up in cost and longevity is dovetailconstruction: Small pieces on the ends are routed out to key into one another, making a connection that is very difficult to dislodge.


The sides of the drawers are usually made from ½ inch of material with a bottom panel that’s ¼ inch thick. This is another place construction can vary, with thinner or thicker materials all the way around.


You can make a decision about drawers based on performance or aesthetics. Ask to see different drawer construction options so you know what you will see when you open them — on the tops and inside — and how they will look when they are extended. 

What you see has a lot to do with how the cabinets are edge banded. More on that in another installment in this series.


Shelves can be installed fixed, or they can be adjustable, with pegs that fit into rows of holes on each side of the cabinet. While shelves are typically made from the same material or wood species as the rest of the cabinet box, an exception would be if the cabinet has a glass front or the shelves themselves are glass. When the interior of the cabinet is visible, making the shelves and box interior the same wood species as the face, or painting it the same color, is a common practice.


One more note on the drawers and boxes: Larger-production cabinetmakers tend to build their drawers and boxes at the same facility where all of the cabinets are assembled. Some smaller shops, including many custom cabinetmakers, send out their boxes and drawers to be built by a company that specializes in this. The box and drawer companies can build them relatively inexpensively, leaving the custom shop to focus on the parts of the cabinets that make them truly custom — the doors and drawer faces, and the millwork that finishes out the cabinets. 

Indoor Air Quality 


One final thing to think about is how the materials are made — and particularly whether they include urea-added formaldehyde, a substance known to have an impact on human health. Many manufacturers have removed urea-added formaldehyde from their manufacturing process, making the cabinets NAUF (no added urea formaldehyde) compliant. However, there is still the possibility of the material’s containing other volatile organic compounds (VOCs) that will off-gas over time. And formaldehyde is a naturally occurring compound, so there may still be traces of it. 

California has been a national leader in air-quality initiatives, so you may see a mention of the materials in your cabinet being CARB Phase 2 compliant. CARB is the California Air Resources Board, which has created requirements to limit VOCs in cabinets, furniture and other materials used in homes. The requirements focus specifically on plywood, particleboard and MDF. The U.S. Environmental Protection Agency is working on nationwide requirements based on CARB’s standards that may go into effect as early as 2014. 

There are a number of claims made and opinions offered about the relative “greenness” of plywood and particleboard, and not all are manufactured in the same way. If this is an important consideration for you, you might need to do some extended research. It also means you’ll need to ask detailed questions when pricing different cabinets, to understand how they are made and with which materials. 

Bottom line: Cabinet prices are wide ranging and directly correlate to materials and construction methods. Expect a basic unit to include particleboard, melamine and stapled drawers, and everything else to be an upcharge.

12 Ideas for a Knockout Kitchen

Article by:

Bored with plain white subway tile and “greige” walls? Tired of making design choices based on what you think a future buyer might want? These 12 ideas prove that kitchens don’t need to be cookie cutter — in fact, they’re a lot more fun when you personalize your space exactly the way you want it. Let them satisfy your craving for color and creativity. 

1. Geometric backsplash. Bright, bold and eye catching, a feature like this is sure to be a centerpiece. You can achieve a similar look with mosaic tile or by carefully applying paint. 

2. Bright color behind open shelves. Anyone can do this — just remove the doors from your upper cabinets and paint the backs a bright hue. Match the wall color, as shown here, for a seamless look. 

3. Chevron backsplash. A simple chevron pattern looks especially fresh and fun in vibrant turquoise and white. The yellow pots on the stove here really pop against the blue and white tile — and the palette would work equally well the opposite way, with turquoise pots against yellow and white tile.


Contemporary Kitchen by Other Metro Architects & Designers yellow office architecture 

4. Chic decals. White measurement decals on a black wall look refreshingly clean and simple … and they’re useful, too! You can easily find more decorative options too. 

5. Magnet wall. Stainless steel refrigerators are so common these days, we’ve lost the most convenient place for displaying notes, postcards and children’s art. Why not install a giant magnet board in the kitchen to take over? The sleek metal looks cool and just begs for creative personalization. 

6. Wallpaper. Wallpaper is so unexpected in the kitchen, and it’s a treat to see an interesting pattern on the walls instead of flat paint. Many wallpapers are not as delicate as you might think, but if you use one near the stove, it’s best to protect it with a sheet of Plexiglas or a specialty finish. Wallpaper is especially great in small kitchens  the pattern fools the eye into thinking the room extends farther than it actually does. 

7. Color and pattern mixed. Why stop with color orpattern when you can have both? This creative kitchen mixes it up with a warm pink hue applied behind half of the upper cabinets and the upper part of the wall, and a bold wallpaper design behind the bottom half of the upper cabinets.


8. Fridge matched to an accent wall. This petite kitchen is bursting with personality — a small pink Smeg fridge is tucked neatly into a nook in the buttery yellow cabinets, and there’s a fun scrap-wood backsplash. To get a similar look, track down a fridge or stove in a hue taken from your wallpaper, accent wall or backsplash. 

Contemporary Kitchen by Other Metro Interior Designers & Decorators Urban Home 

9. Chalked-up concrete. Take sidewalk chalk to the kitchen with a writable cement backsplash, and have fun creating a rotating display of sketches, doodles and lists. A concrete floor can be treated the same way, depending on the finish used — so you can let the kiddos draw on the floor! 

10. Zigzag linoleum. What a fun way to use plain, supercheap linoleum tiles. Simply apply tiles in two colors you like together in a zigzag pattern rather than in straight lines. 

11. Painted checkerboard floor. Like the classic black and white checkerboard floor, but updated in soft green and blue, this floor is lovely — and it’s a fairly easy DIY project. Mark the pattern carefully on a primed floor, paint in one color and allow it to dry fully before filling in the next. 

12. Pressed-tin ceiling tiles. This Florida cottage kitchen proves that big style doesn’t need to break the bank. Simple Ikea floating shelves, basic cabinets and a reclaimed-barn-wood island save cash and allow the amazing pressed-tin ceiling tiles and marble counters to take center stage. You can find new ceiling tiles in well-stocked home improvement stores, and vintage sets at salvage yards or on sites like eBay.

Get the Look of a Built-in Fridge for Less

Counter-depth refrigerators are popular appliances for new kitchens. Their appeal is that they save precious aisle space by sitting flush with the cabinets rather than sticking out. This makes the kitchen look smooth, custom and visually organized. These models can also be finished with matching cabinet doors for an even more cohesive look. 

The downside is that they are very expensive. They can cost two to three times more than a regular freestanding refrigerator, and must be wider to incorporate the same cubic-foot storage. If you want this look without the extra expense, design your kitchen and cabinets so that your regular-size refrigerator sits flush with your cabinets. 


Freestanding refrigerators come in many sizes and configurations. While typical base and tall cabinets are 24 inches deep, freestanding refrigerators can be 30 inches deep or deeper, with varying widths too. Therefore, you should select your refrigerator early in the planning process. 

To get that flush look, you can either recess a freestanding unit several inches into a wall or have your cabinets furred out several inches to meet the refrigerator.

In this kitchen, if you look carefully, you’ll see that the 24-inch-deep base cabinets that extend to the left are recessed behind the oven cabinets. The appliance portion of this wall, therefore, has been furred out. Note that the side cabinet panel on the right has been ordered in a larger size to accommodate the depth of the refrigerator, which is greater than 24 inches.

In this case the refrigerator door sticks out beyond the base cabinets. But because there are deep side panels and a deep cabinet overhead, the refrigerator looks incorporated into the cabinetry and built in. A deep cabinet above the refrigerator is a good place for tray storage or even a TV, as shown here.


Here is another kitchen where deeper cabinets accommodate the greater depth of a freestanding unit. This refrigerator is a bottom-freezer model.


Here the homeowners built a wider set of deep cabinets, which include some open shelves for display.


Another way to “build in” your freestanding refrigerator is to actually build it into the wall, rather than cabinets. If your kitchen plan will allow it, this is probably the easiest and most cost-effective way to get the look, because you can make the opening the exact width and depth you require. You also won’t have any cabinet modification costs. 


This is particularly nicely done. The very linear refrigerator fits neatly into the opening and is trimmed out with house molding. The display shelf above draws the eye up. With a wine refrigerator next to the main refrigerator in a small peninsula cabinet, this is a good area for dispensing drinks.


This kitchen utilizes a very effective way to incorporate a deep refrigerator: The cabinets are stepped, for a very custom look. From the corner to the left of the refrigerator, the cabinets are typical sizes: 12 inches deep on top; 24 inches deep on the bottom. Next comes the upper cabinets and the appliance garage unit, probably 15 to 18 inches deep. The deepest cabinet is around the refrigerator, with display cabinets above. 

On the end is a tall open cabinet that creates an interesting visual display as one enters the kitchen. Note that this cabinet is actually pulled back a few inches from the refrigerator depth, so it continues the stepped look and also makes that corner a little less intrusive. 


Cabinets and a refrigerator sandwiched within stud walls create a clean and contemporary look here. The cabinets were probably furred out within the walls. 


This refrigerator is the centerpiece of an open display area. This would be a very cost-effective way to house a refrigerator and small appliances while using a short wall. (This treatment even accommodates a radiator.)

10 Creative Ways to Give Your Kitchen a Boost

Article by:

After the flurry of holiday decorating and baking is over, the kitchen can seem a bit forlorn — but if one of your New Year’s resolutions was to eat healthier or cook more meals from scratch, it’s important that your kitchen supports and inspires you. These 10 doable project ideas are meant to revive your kitchen and make it an inspiring space that you can’t wait to spend time in. 

1. Use a found branch for hanging storage. If you have open shelving in your kitchen that rests on brackets, as shown here, extend their usefulness by sliding a thoroughly cleaned branch through the base of the brackets. Use simple S-hooks to hang small pots, spoons and other implements from the branch. You can even hang a small vase or a mason jar filled with flowers — just wrap the mouth with twine or wire to form a loop, and hang it from an S-hook. 

2. Try a pegboard in the kitchen, à la Julia Child.Julia was onto something when she designed the now-famous pegboard pot rack on the wall of her Cambridge, Massachusetts, kitchen. You can do the same by hanging basic pegboard on your kitchen wall and using S-hooks to hang cooking tools. Paint the pegboard to match your walls for a seamless look.


3. Paper the interior of a glass cupboard. This is the perfect place to use up any wallpaper scraps you may have lying around. If you don’t have wallpaper, pretty shelf paper or even quality gift wrap can be used instead.


4. Glam up your shelving. Another easy way to spice up basic wall shelves is by coating the brackets with gold paint. Or, for a similar effect with less fuss, pick up a roll of copper tape at the hardware store and carefully apply it just to the edge of your shelves — this works best if your shelves are the same thickness as the tape, so measure first. 

5. Bring in fresh blooms. You probably buy fresh flowers for other rooms in your home from time to time; why not snip a few for the kitchen? A vase with slots for individual blooms, like the one shown here, is ideal because it is so easy to fill.


6. Add a splash of unexpected color. Transform a plain step stool with a lick of vibrant color, paint the interior of your pantry, or line your drawers with polka dot paper. A bit of color or pattern where it’s least expected is especially welcome when it’s gray outdoors.


7. Give a plain basket a neon makeover. French market baskets are some of the most useful little accessories to keep around the house. Spruce one up with a simple painted-on star or heart in a neon hue and use it as a mini hamper for dirty dish towels and cloth napkins. For an even easier (and temporary) take, simply cut and stick on neon-colored tape.


8. Borrow baskets from the living room for produce storage and display. Have some lovely woven baskets just hanging around with nothing in them? Put them to work storing long-lasting produce like potatoes and onions, or colorful piles of lemons and limes.

9. Hang food magazines on a painted ladder. If you refer to your favorite food mags for recipes and menu ideas, keep them handy. A short ladder leaning against the wall is a perfect spot for stashing a rotating selection of your favorite foodie magazines — and in a pinch, even smaller cookbooks could get slung here, too.


Mediterranean Dining Room by Other Metro Architects & Designers Echo Design 

10. Paint your breakfast-table chairs in a rainbow of pastels. Love pastels? I say, go for it. After all, why shouldn’t your breakfast nook be the cheeriest spot in the house? And if you don’t feel up to painting the entire chairs, even giving just the legs or seats a dip in pastel hues would make a big impact.