FREE DESIGNS AND ESTIMATES

15 Ways to Warm Up Your Bathroom for Winter

Article By:

Oh, that dread — you wake up in the middle of the night to take a trip to the bathroom, but you know that cold tile will chill all the toastiness right out of your feet. Or you come in from a chilly football game longing to take a luxurious soak in the tub, but the thought of shedding your layers of fleece stops you in your tracks. Soon it will be that time of year when you want your bathroom to raise your body temperature. Here are 15 suggestions that range from something you can do in minutes for a few bucks to dream-space renovation ideas. 

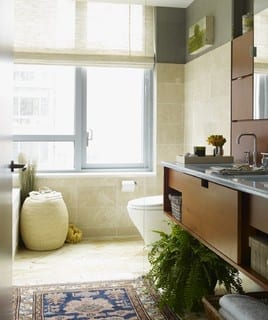
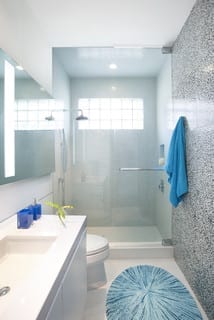
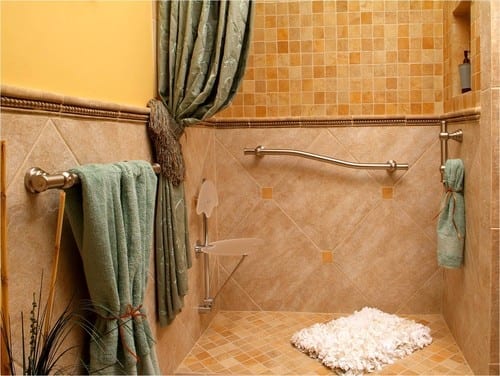
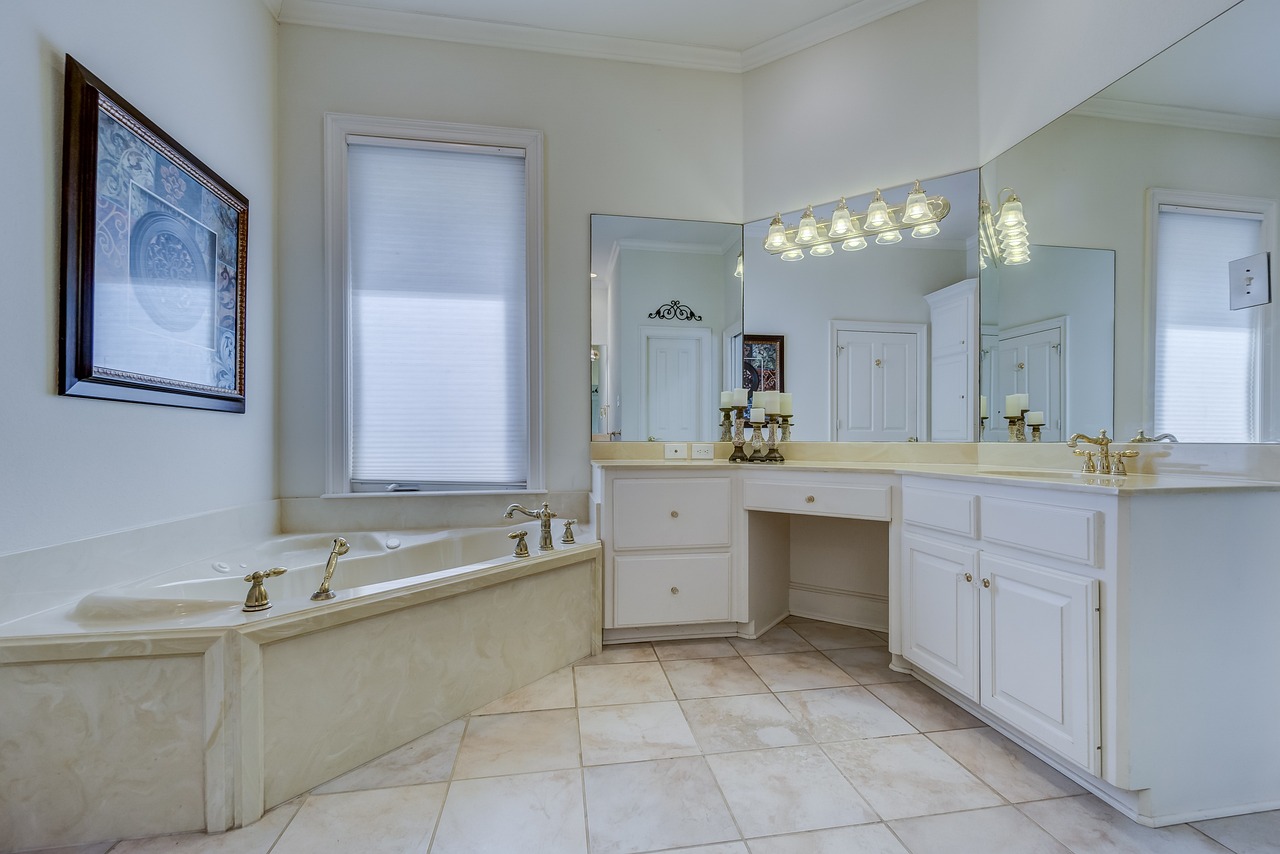
Add a cozy rug. A bath mat does not have to be a shaggy little rectangle. Add an Oriental rug to enjoy underfoot during fall and winter. The rich colors will warm up the look of the room as well.

Be sure to add a rug pad or rug tape that will grip the floor underneath any bathroom rug to prevent slips.


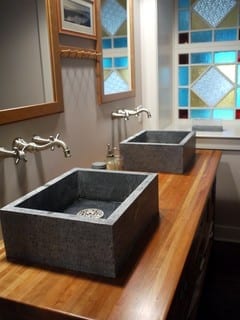
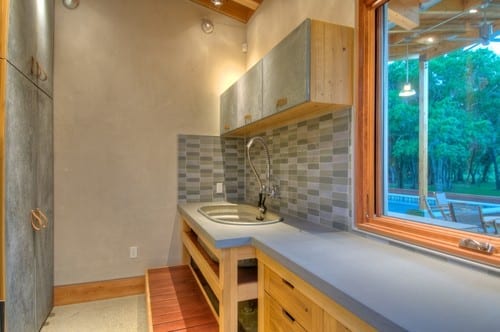
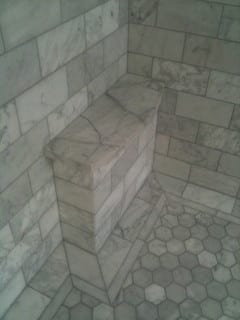
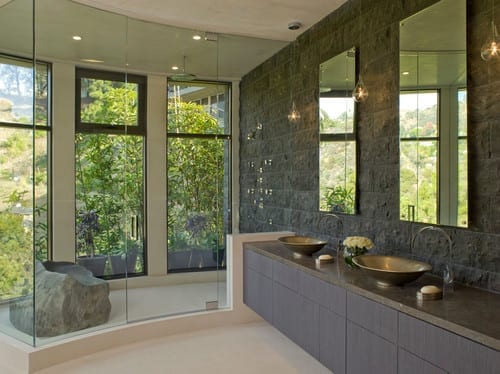
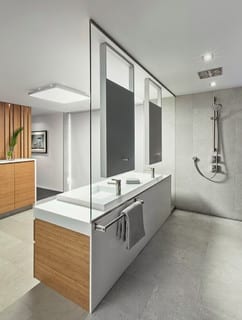
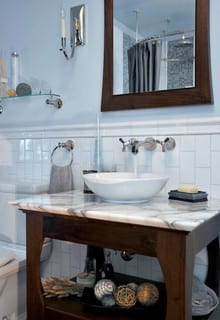
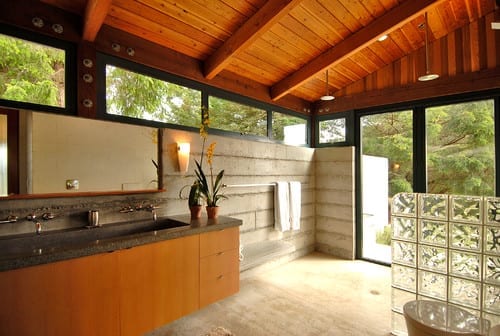
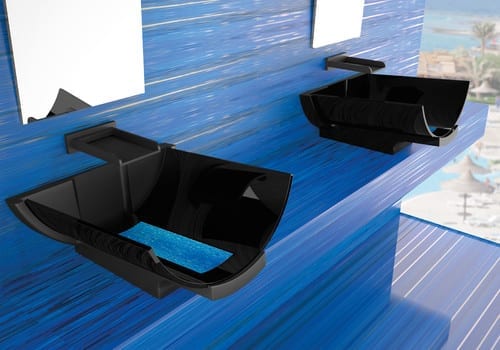
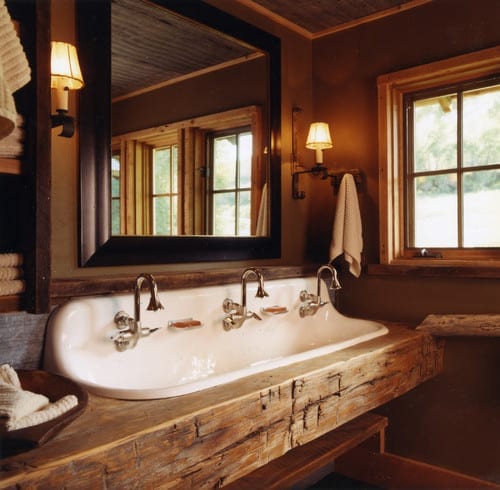
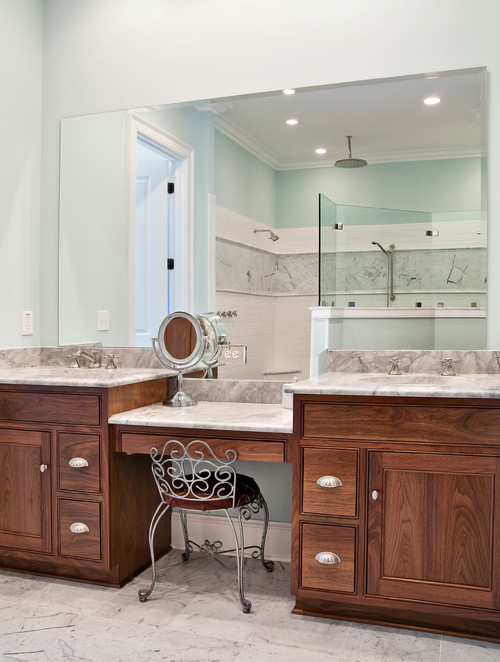
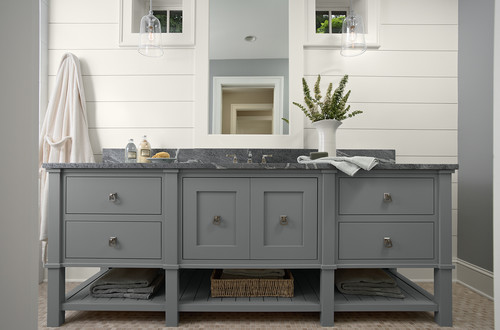
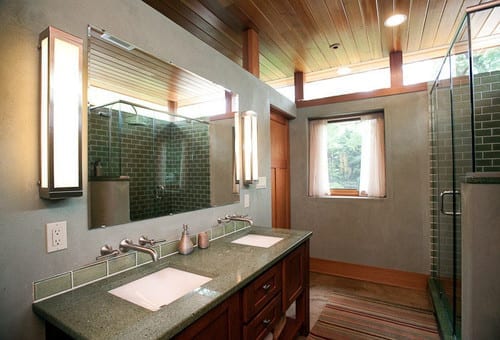
Blend beautiful natural materials. Soapstone sinksatop wood countertops add so much warmth to this bathroom. The look reminds me of the natural beauty of a rock outcropping in the woods.


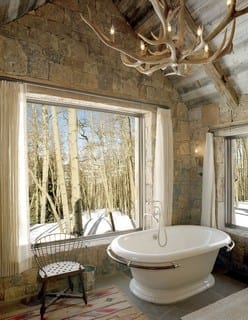
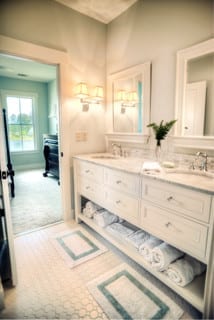
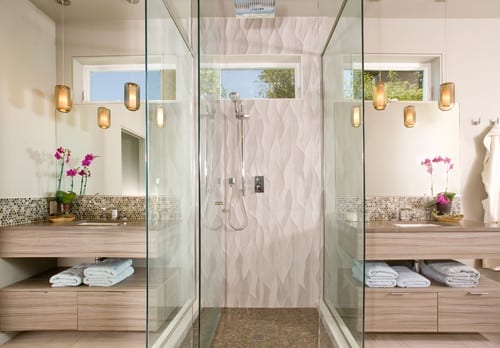
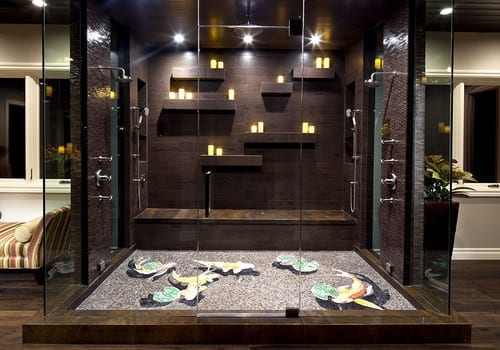
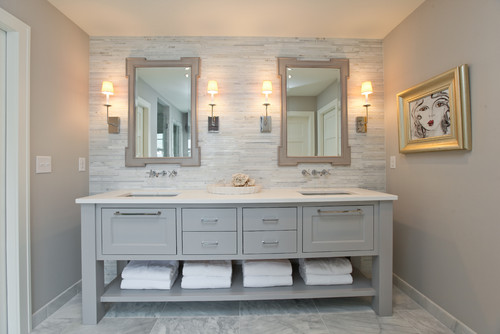
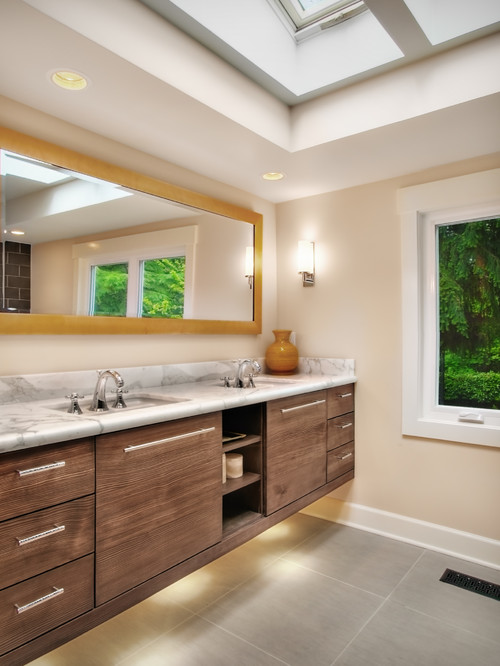
Take a different approach to lighting. We tend to think there is a certain type of characterless light we need to choose for bathrooms, like those flush-mount “boob lights.” This is not true; open your mind and browse the type of lighting you would usually associate with a foyer or dining room. 

If you are installing a hanging chandelier or pendant light in a bathroom, work with a licensed electrician who knows the codes inside and out. A chandelier cannot be within reach of someone standing in a bathtub full of water; the fixtures will also need to be properly grounded, and you’ll need a high ceiling.


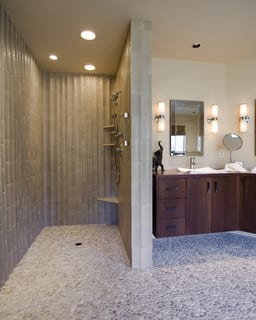
Consider heated floors. One of the most luxurious things you can do to make your bathroom toasty in chilly weather is invest in radiant-heat flooring. If you are planning any renovations, learn more about what this entails and what the payoffs are.

If you don’t have room in the budget for such a large investment, talk to your electrician about installing a bathroom-safe heater you can turn on before your bath or shower. Again, I stress, working with licensed pros is a must; you don’t want to scrimp on safety with electronics in the bathroom. 

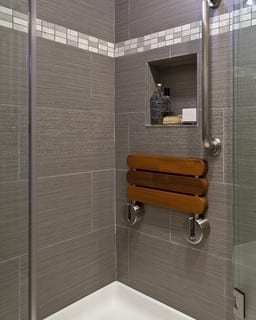
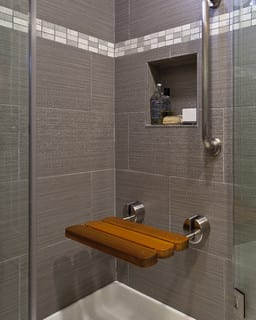
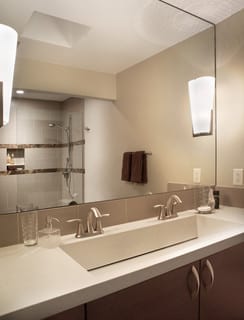
Get your towels toasty. Heated towel bars add luxury to the bath, giving you a wonderful way to wrap up when you step out of a steamy shower.  

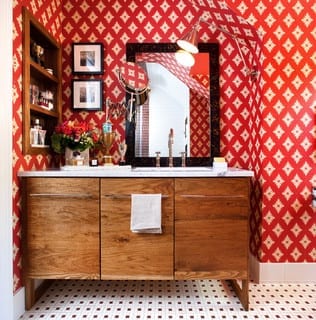
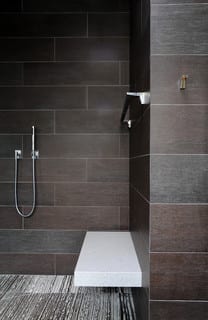
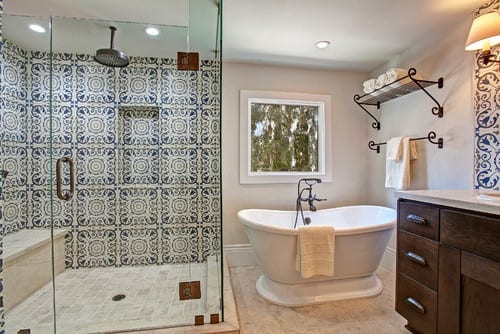
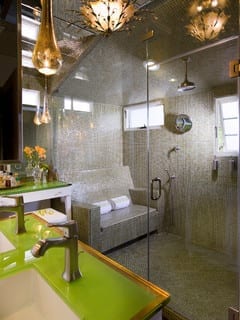
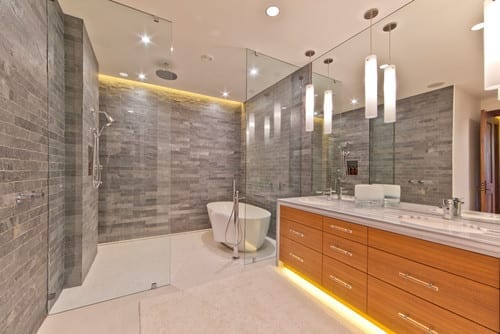
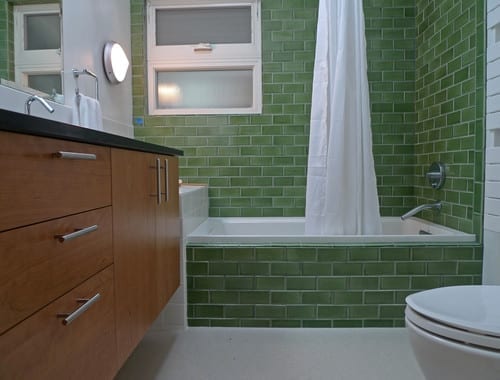
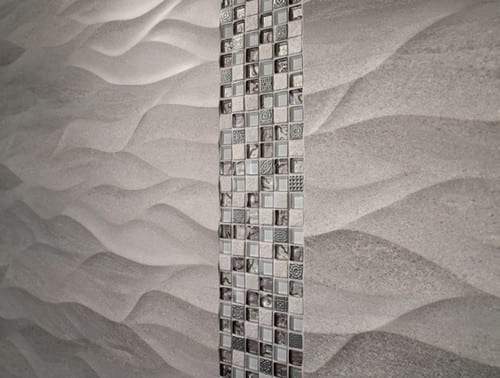
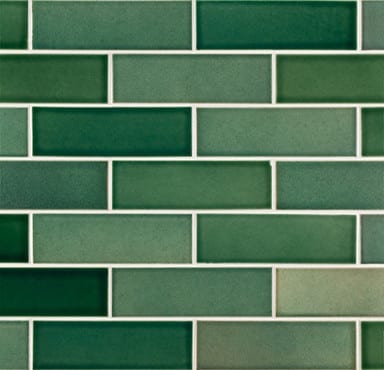
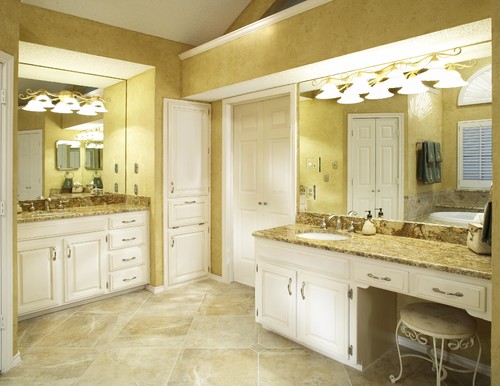
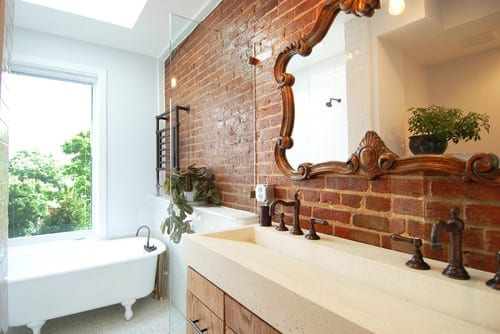
Rev up the wall color. So many of today’s most beautiful bathrooms are crisp and white, but that’s certainly not a requirement. Whether working with wall coverings, paint or tile, think outside the usual bathroom color palettes if the thought of white marble leaves you cold.


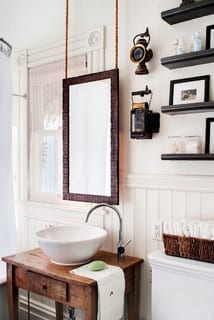
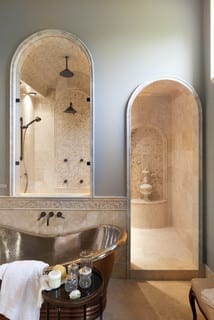
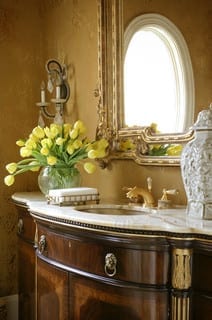
Incorporate antiques. The well-worn patina of this table-turned-vanity and the eclectic miners’ oil lanterns add warmth and personality to a white bathroom. There are even votive candles in the lanterns for cozy light that creates a relaxing ambience.


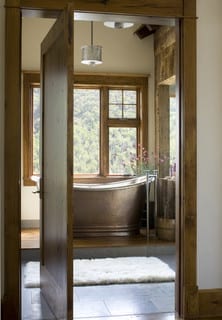
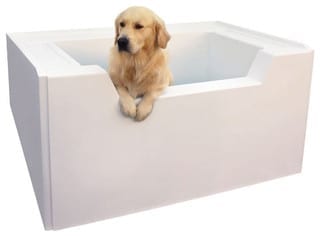
Invest in a bathtub that helps retain heat.Materials like copper, brass, volcanic limestone and soapstone retain heat and will help to keep that hot bathwater warm while you enjoy the entire new issue of People

Am I the only one who gets a People in the mail and thinks, “Sweet! It’s People and bath time for me tonight”?Just wondering.


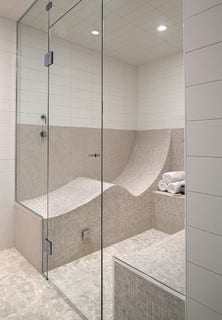
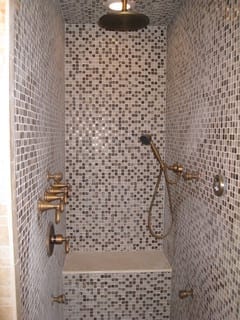
Install a steam shower. This is a big-ticket dream-space item, but everyone I know who has one seems to think they can no longer live without it. I did get a chance to test one out at a vacation rental once, and I can report that it was heavenly.


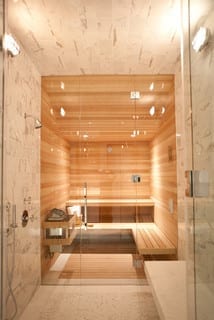
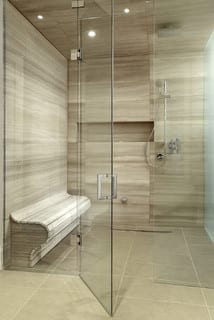
Consider a home sauna. Historically much more common in countries like Sweden, saunas are becoming more popular in the States. 


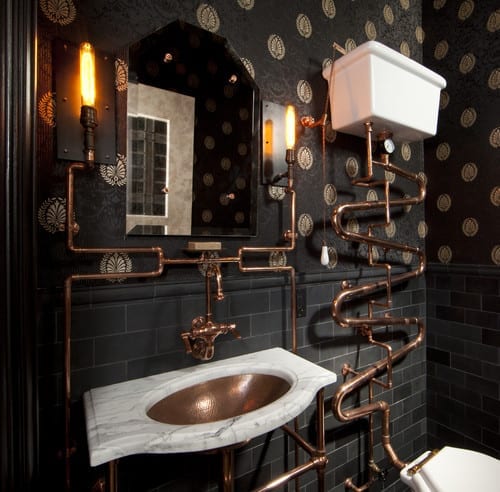
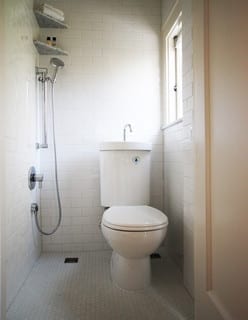
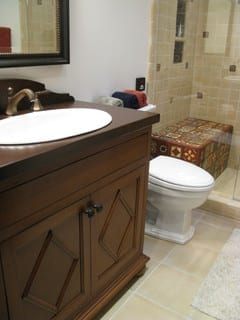
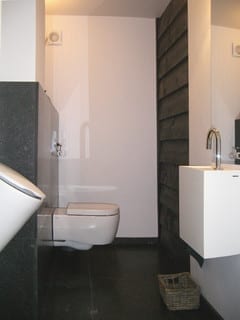
Think steampunk. Winter brings dark, moody days. Instead of fighting the moodiness, this designer celebrated it, stunning us with copper pipes and that old-fashioned high toilet tank. (Remember how awesome you thought those were at TGI Fridays in the ’80s?) 

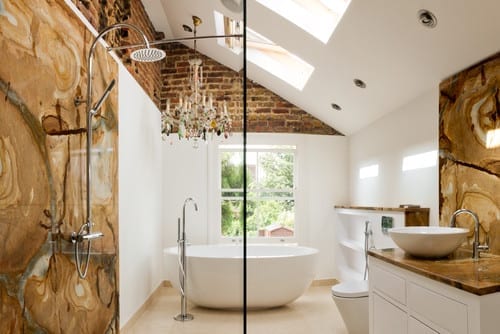
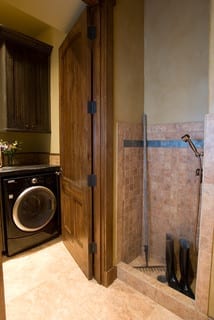
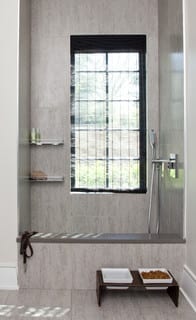
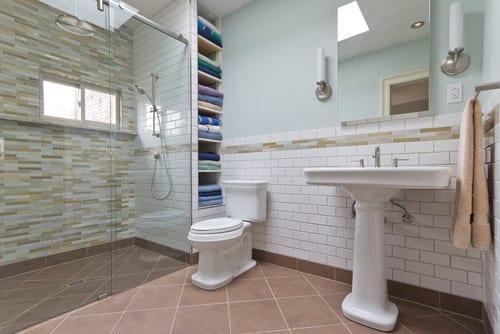
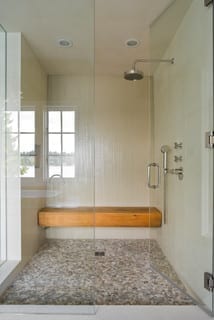
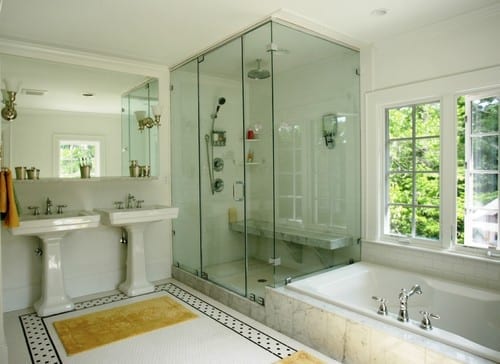
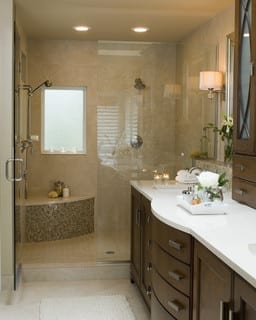
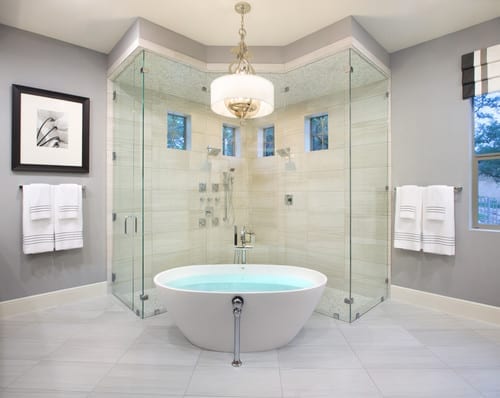
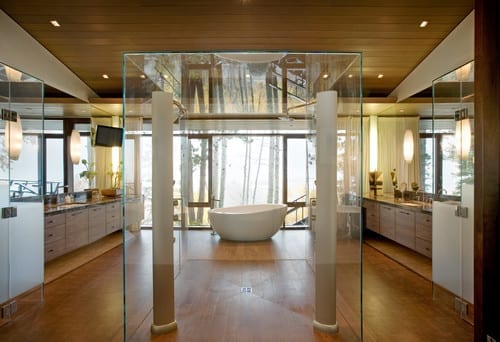
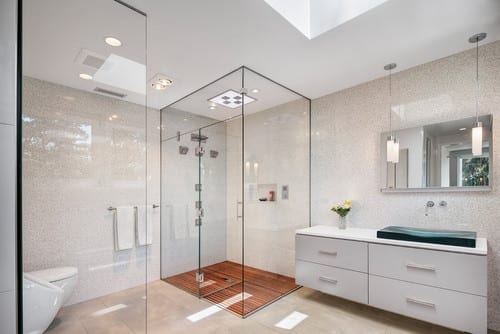
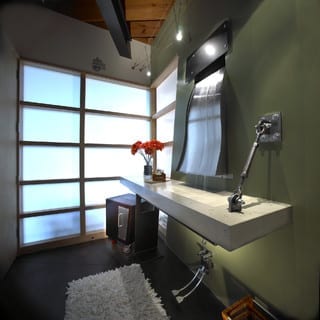
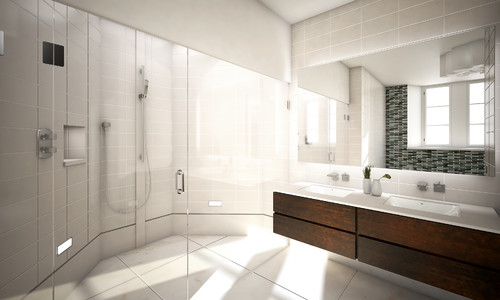
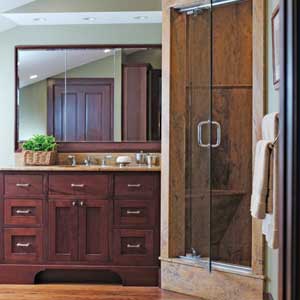
Let in the light. Windows, skylights and a clear glass shower surround make the most of natural light. If your concern is privacy, explore using transoms, acid-etched glass and clerestory windows. 

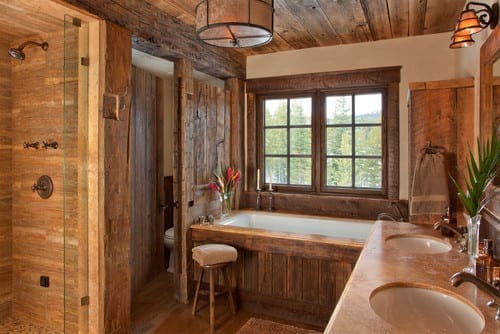
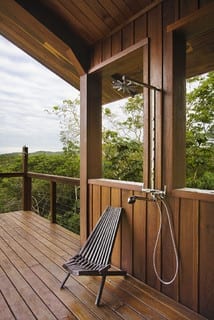
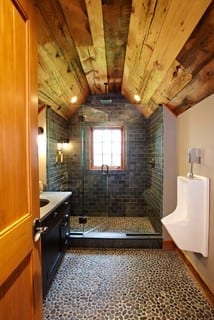
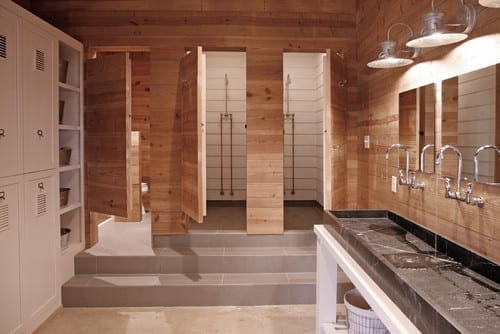
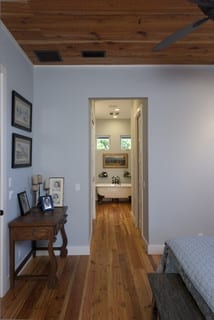
Get woodsy. In a ski house, cabin or lake house, it’s part of the experience to go full-on woodsy in the bathroom. If you love the look, go ahead and do it at home, but do think about whether or not you’ll tire of it, especially during the summer. 

Eclectic Bathroom by Denver Interior Designers & Decorators Ashley Campbell Interior Design 

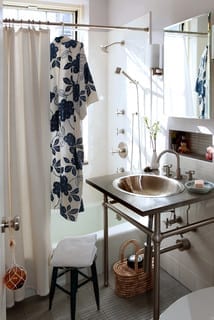
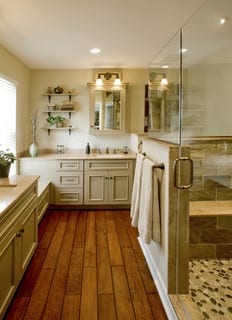
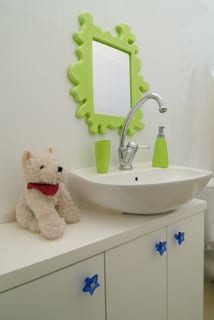
If you want to go “woodsy light” instead, give the forest a nod instead of a bear hug. Knotty pine walls are not a requirement — you can get your woodsy on with beautiful fabrics that show trees and branches, plus a wood-framed mirror and other small accessories.


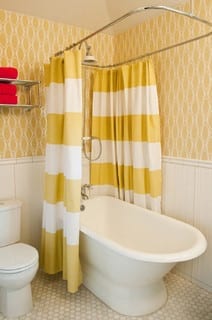
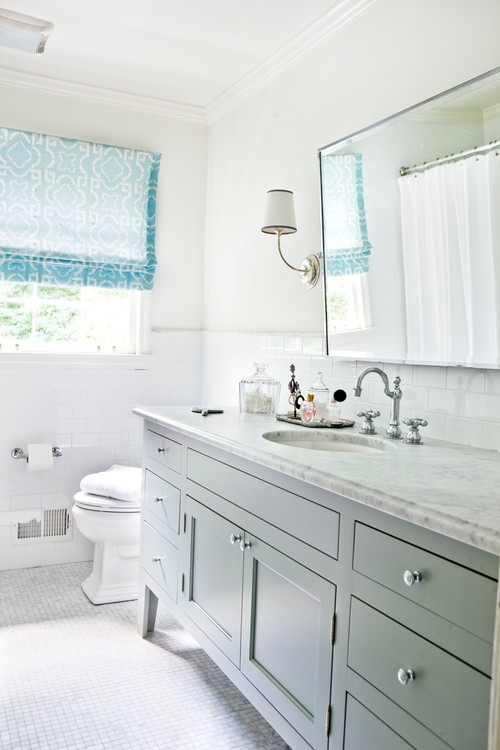
Add a sunny shower curtain. Yellow will perk up a dark winter’s evening.


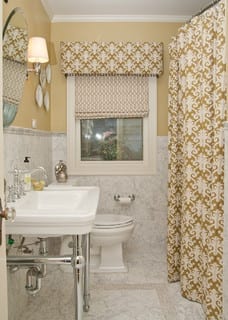
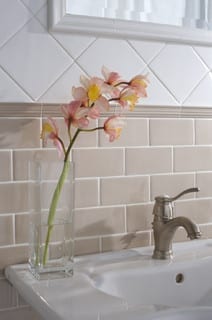
Likewise, patterns can cozy up the bathroom.


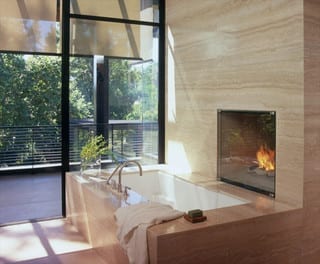
Add a fireplace. This is one of the most luxurious bathroom features I can imagine. The first time I ever saw one or heard of it was in a house that had belonged to a Harlem Globetrotter. (And now I’m doing their whistle …)

15 Doggone-Good Tips for a Pet Washing Station

Article By:

This is going to sound harsh, but your dog stinks. Don’t feel bad — it’s natural, and you are nice to let him swim in that creek and run in the mud and roll around in yucky things. You don’t notice anymore, because your schnoz is used to it. But when I come over to visit, the smell of your dog’s bed and the smell on my hand after I pet him is very noticeable, so chances are, the same smell is in your carpets, car and any furniture Fido lounges on. 

You probably mean to wash the dog more often, but it’s a pain in the neck. Large dogs are tough to get into bathtubs, the big shake afterward makes a mess, and the whole thing can be quite an ordeal. 

Now that we’ve got that out of the way, a home pet washing station isn’t looking so crazy. In fact, you can use them for other things, too. A builder who’s been adding them for years, Vincent Longo, says that one client uses his pet care station for cleaning dirty golf clubs, gardening tools and even the kids after a busy day making mud pies. 

Whatever your thoughts about pet wash stations, there’s no denying their popularity. If you’re thinking about adding one, here are some ideas to consider. 

Incorporate the washing station into the mudroom. Mudrooms are a very popular spot for dog wash stations. Dogs enter from the back or side door, and their muddy paws never make it into the rest of the house.


Traditional Laundry Room by Chicago Design-Build Firms Orren Pickell Building Group 

Include a handheld showerhead or sprayer. Not only will it help you get your dog’s entire bod nice and clean, but it will also let you do a quick paws-only wash.


Be prepared for the big shake. Anyone who has ever washed dogs knows that afterward they shake off the water with gusto and get the entire area wet (including the person doing the washing). Having a surround and floor that can stand up to water will keep the big shake from damaging drywall and floors. 

If your dog is the type that runs around the house in crazy circles after a bath, all I can recommend is shutting the mudroom door until Sparky dries off and calms down, or else letting him into the garage for the runaround.


Go bigger with the drain. Longo recommends using a 3-inch drain in a pet washing station. It will handle dog hair better than the standard 1½- to 2-inch shower drain. He also recommends adding a hair filter over the drain.

Clearly, this dog loves the pet wash station and is just begging for a rinse. 

Consider an elevated dog bath for smaller pets. It will be easier on your back and knees in the long run, as long as your dog is willing and able to jump into it, or you don’t have a problem lifting your pet into place.


Step it up. In this clever design, the counters double as steps up to the basin. The middle step serves as a drying station and has room for a cozy pet bed underneath. 

For smaller dogs a large utility sink plus a sprayer is all you need. 

Use what the pros use. You can find professional bathing stations complete with ladders or ramps at places like ProGroom. 

Combine gardening and pet grooming. Pet washers are also great places to water plants, rinse off mucky Wellies and clean your gardening tools.


Incorporate your own style. This custom dog bath utilizes vintage tiles that the homeowner had been collecting for years.


Have drying towels handy. An overhead drying rack is a handy spot for drying dog towels as well as laundry. If you utilize this kind of system, be sure to remove your people laundry before the big shake. 

Embrace the theme. This area celebrates dogs in the wallpaper and has plenty of shelves for dog supplies.


Consider going high-end. Do you and your pet have luxurious tastes? If so, try a dog-specific tub. When family-owned company Hydro Systemsdecided to dip into dog bath design, the owners collaborated with their groomer of more than 20 years, adding features like skidproofing to prevent slips and slides, and even an optional jetted whirlpool system. 

Is your dog the spa type? Do tell, because this idea is certainly new to me, and I can’t quite wrap my head around it. Unless the dog’s name is Zsa Zsa. Then it makes sense. (Seriously, though, the folks who designed this tub and added the spa option say it’s a matter of personality on a case-by-case basis.)


This model is for smaller dogs. I included it because a photo of a dog sitting in its own personal bath wearing a bling-bling necklace simply must be shared.


Think about storage for supplies. Just like a human shower area, this one has handy shelves for dog shampoo and sponges.


Take it outside. Homeowners are increasingly incorporating pet washing stations into their outdoor showers. All it takes is a handheld sprayer or showerhead that can reach down to the ground. Rinse off muddy paws here before they can get inside and muck up your rugs.


Provide a clean path to the door. A concrete, gravel or stone walkway will prevent your dog from dirtying up his paws on the way in from an outdoor wash. Unless, of course, the dog breaks free and does that crazy circle thing out in the yard.


5 Common Bathroom Design Mistakes to Avoid

Article By: Dylan Chappell

Adding to or remodeling your house is one of the most exciting and creative processes you can go through. But with all that responsibility comes pressure to make informed decisions that will last for decades. How can you make sure to get the right design for your lifestyle, stay within your budget and maximize the return on your investment? Start with a great design for every room in your house — including (or especially) the bathroom.

Bathrooms, whether big or small, should always be well thought out and carefully located, and should function with multiple users in mind. We’re long past the era where there was one bathroom for every three bedrooms in the house, and everyone had all the time needed to use it. Today’s bathrooms need to be beautiful, use space efficiently and serve the users functionally. Avoiding the common design blunders below can help you be happier with your bathroom for the long haul.  

1. No view out. No one likes a dark, damp bathroom with bad circulation — it’s no fun spending time in a space like that. If you’re building or relocating a bathroom, try to site it on an outside wall with windows. If windows are not an option, installing an operable skylight can allow for the fresh air and natural light needed to make the space feel comfortable.


2. A clear view in. I once worked on a large remodel for which the existing design had a bathroom in the dining room — seems kind of like a conflict of interests, right? Whenever possible, avoid locating the bathroom directly off one of the home’s public rooms — like the kitchen, living room or dining room. 

This doesn’t necessarily mean you have to put in long hallway, but create some sort of formal separation to break up the line of sight. The last thing you want is to be sitting in the living room with a glass of wine and looking straight into the bathroom at the toilet.


3. Making it all about the toilet. That leads me to my next blunder: Avoid making the toilet the first thing you see in the bathroom, and avoid any sight lines to it from adjacent rooms. I like to put the toilet and shower in their own room while keeping the sink separate. This allows someone to take a shower while someone else gets ready at the sink. In the bathroom floor plan here, the wall between the two rooms adds only a couple of inches to the overall size of the bathroom but doubles the room’s functionality. 

Eclectic Bathroom by Brooklyn Artists & Artisans Green Mountain Construction & Design 

4. Curbed-shower enthusiasm. curbless shower makes a bathroom feel bigger and look cleaner — plus, it’s very practical for aging-in-place homeowners, since it adheres to universal design principles. This look is fairly easy to achieve in a new bathroom or a remodel — just make sure you mention it to your architect or contractor prior to construction. 

5. Thinking bigger is better. That’s right: Bigger isn’t better; better is better. Whether you’re designing a large master bathroom in your dream home or trying to figure out how to squeeze in an extra bathroom for your growing family, the most important aspect of your new bathroom is that it has a great design that functions efficiently for your specific lifestyle. 

The truth is, great design is less about how a bathroom looks (although it’s always nice when it looks fantastic) and more about how it works. Great design translates to a house that functions better, costs less to build, is more efficient to maintain and gets you more for less.


Outfit Your Shower With the Right Bench for You

Article By: Tiffany Carboni

A shower bench is a wonderful thing. Should your shower stall be large enough to include a seat, it’s sure to add function and comfort to your everyday cleansing experience. There is an art to getting shower seating right, however. I asked bath designer Joy Wilkins of Custom Kitchens by John Wilkins to share some tips of the trade. These suggestions will help steer you toward what works best for your stall and your body. 

Types of shower benches. There are three kinds of permanent shower benches: built-in, floating and fold-down. You can also use a freestanding bench, but for this ideabook, we’re sticking with shower seating that’s permanently affixed to the wall. 

1. Built-in bench. This is a trade term describing a seat that is framed into the shower wall and floor. This type of seating can run the entire width of a shower enclosure, like the one shown here, or may be limited to a corner. It can have squared angles or be semicircular.

Tip of the trade: “One of the easiest ways to incorporate a built-in bench is with a product like the Laticrete Hydro Ban preformed seat,” Wilkins says. “The seat or bench is installed, then waterproofed and tiled in for a custom look.”


2. Floating bench. A floating bench is firmly secured to the shower walls but is open underneath. It can be made of waterproofed wood, like this one designed by Laura Bohn Design Associates.


Or it can be made from a single slab of stone, like this one installed by Devlin/McNally Construction. 

Though floating benches may look simple in form, careful engineering is required. This task is best left to seasoned professionals.


Braces were installed under this near-floating stone bench by Plantation Building, ensuring that the bench can support both its own hefty weight and that of those who sit on it. 

Traditional Bathroom by Atoka General Contractors Professional Construction Solutions LLC 

Another option for a floating bench is to tile it to match the rest of the shower. 

Tip of the trade: For this sort of tiled corner seat, Wilkins suggests using a product called Better-Bench. “It’s designed in several shapes and comes with the appropriate fasteners for the chosen shape,” she says.


3. Fold-down bench. This is a space-saving solution for smaller showers or universal design showers. Wilkins’ company installed this fold-down bench by framing in special blocking between the stud walls.


Here’s the same bench in a lowered position. When choosing seating, select the style that can best accommodate the weight it will need to support. This one, for example, is designed to hold no more than 250 pounds. 

Tip of the trade: “This teak fold-down bench is aMr. Steam product rated for steam showers,” notes Wilkins, “but we also use it in regular showers, as it is designed to withstand water penetration and moisture.”


Heavier individuals might want to go with a built-in bench. This is where a conversation with your contractor, designer or architect becomes especially important.

Heavier individuals might want to go with a built-in bench. This is where a conversation with your contractor, designer or architect becomes especially important.


Regardless of the type of bench you choose, Wilkins says, “the top needs to slope slightly, so water runs off instead of pooling.” Pooled water not only feels icky on a naked body, it promotes mildew.


A word about size. The size of your shower — not to mention the number of people who intend to use it at one time — will help determine the most appropriate bench size for your needs. Keep your desired function in mind, too. A narrow bench, like this one, makes shaving legs a dream, but it might not be the most comfortable spot for kicking back and relaxing.


Setting the right height and depth. The height and placement of any bench must be determined prior to installing the backer board and tile, so that the bench’s armature can be securely fastened to the blocking. 

Tip of the trade: The height of any bench, says Wilkins, “is generally determined by each individual customer. Some like a higher perch — around 21½ inches from the shower pan — which is easy to push oneself off of, especially for a taller person. Some people like something similar in height to a chair, around 17½ to 18 inches. This may work best for those who are shorter and prefer to sit on the bench rather than perch.”


The depth of a bench is also negotiable, depending on what suits the bodies for which the bench is being built, and what the stall will allow. Wilkins says a comfortable depth ranges from 12 to 21 inches.


This shower bench in a Hollywood Hills, California, home falls into the built-in category — but in its own unique way. “It’s a 2,000-pound lava rock that required extra steel engineering to keep it from falling through the floor,” says designer Lori Dennis, who describes this approach as “The Flintstones meets The Jetsons.” 

The rock was carved onsite, and it took seven men to it haul into place. “It’s carved and smoothed to comfortably fit two rear ends,” the designer notes. 

This built-in bench by SoCal Contractor was created for a fashion industry executive who travels most of the year. The custom love seat re-creates the spa experience the owner loves at the boutique hotels she frequents. The tiled, ergonomic design features a sloping seat and a recessed channel that drains behind the “cushions” so water can’t puddle.


A bench alternative. Not all showers are as large and as lavish as some we’ve seen here. Nor might they be large enough to accommodate a bench sized for an actual tush. If that’s your scenario, don’t despair. Wilkins suggests adding what she calls a toe grip. This is a small recess in the shower wall or a triangle of tile in the corner that takes up very little space, but still helps with shaving legs and washing toes.


8 Stunning and Soothing Shower Designs

Article By: Shane Inman

Modern amenities for the shower such as rain heads, body jets, steam showers and hand wands allow you to easily wash away the stress of the day. Take a look at these incredible spaces — from a stained-glass surround, to a soothing and meditative shower, to a Roman bathhouse-inspired space — to see how designers are taking advantage of today’s materials and accessories. 

Middle ground. Divide your master vanity right down the middle with a stunning shower, like this glass enclosure made of two floor-to-ceiling panels and a door at the end. The textural shower wall creates an instant focal point, too. 

All around. Have your shower give your tub a hug. This shower enclosure encapsulates a full array of body jets and shower heads, while the round tub sits snugly in the middle of the design. I love how the unique shower shape has doors on both sides! 

Behind closed doors. These stained-glass doors open into a heavenly shower experience enhanced by an oversized rain head. The light spilling through the colored glass could even become a form of chromotherapy, where colored light restores balance and energy.


All in one. Save time and space by positioning your bathtub inside your shower. The frameless enclosure holds both the shower and the freestanding bathtub in one stunning area. 

Ancient history. Repeat history and re-create a Roman bathhouse feeling with arched doorways and marble tile. A stainless-steel tub and a luxurious shower with multiple shower heads and body jets can soothe you just as much as an ancient spa, but with all the modern amenities.


Sleek and modern. This super-modern shower steps away from everything traditional. The vanity’s glass backsplash defines the entire space, separating the vanity area from the adjacent shower. With mirrors on one side and towel hooks on the other, the single piece of glass manages to serve both spaces effortlessly.


Soothing and meditative. The dark and cool color palette in this shower creates a serene feeling, reflected by the colorful koi mosaic floor. I love how the wall-to-wall bench allows you to soak in the jets, rain heads and steam in utter relaxation. 

Center stage. This bold shower immediately calls out as the room’s main attraction. Two vertical towers that hide the plumbing appear as columns to the eye. The seamless transition from the shower floor to the floor beyond is stunning — although it’s certainly not for the shy. 


Bathroom Surfaces: Ceramic Tile Pros and Cons

Article By: John Whipple

Often praised for its durability and variety, ceramic tile is a popular choice for bathroom finishes. If you’re drawn to color and texture, this material can deliver on both fronts. But the sheer variety of ceramic tiles is endless, which can make finding just the right tile very difficult. 

Because ceramic tends to cost less than porcelain and is much lighter, it’s often used for wall and ceiling installations. However, there are some major cons to this material, too: It’s not as strong as porcelain, so it doesn’t make the best walking surface. It can be very cold underfoot in the winter, and heavy tile can be difficult to install. 

Curious if ceramic tile will work in your bathroom? Here’s what you should know before making the purchase. 

The basics: Ceramic tiles are wide ranging; all are generally made from red or white clay that’s been fired in a kiln and glazed or finished. If you’re a tile nerd like me, ceramic tile technically includes porcelain tile too, but for this ideabook we’ll exclude that category. 

Cost: Ceramic tile is often priced below $2 per square foot. Higher-end tiles can easily run $20 to $40 and more per square foot. The average tends to be around $7 to $9 per square foot. 

Pros: Ceramic tile can be incredibly affordable, and there’s a ton of variety in styles, colors, finishes and textures. It’s also easy to customize it for details like chair rails, soap dishes and special edging and nosing, as in this bathroom.


Cons: Ceramic tile is not as strong as its cousin, porcelain tile, but what it lacks in strength, it makes up for in price.


Special considerations: Since ceramic tiles often have texture, you may want to consider this to add dimension to your bathroom. The eased edge on this tile adds a little extra something to a bathroom wall, but can make it difficult to figure out how to cut end tile. Consider using a tile edge profile, like a Schluter strip, to make the transition less awkward. 

However, today’s ceramic tile offers much more than an eased edge. This wavy tile from Porcelanosa is just one example of the texture and detail available today. 

This type of tile can make for a great accent in a bathroom, but I’d avoid using too much texture in a shower , since it can make for difficult cleaning. Try using it for a feature wall or feature corner instead. 

Maintenance: Make sure you choose a ceramic tile with a durable finish. How can you tell? Buy a sample, take it home and clean it to death. 

I recommend cleaning ceramic tile with a white nylon scrub brush and a little soap. You shouldn’t need much more than that. Ceramic is very durable, but it’s best to stick to mild household detergents and to spot test before using anything new. 

Installation: Installing ceramic tile is pretty straightforward; it could even be a DIY project if you have some experience working with tile. Many of today’s ceramic tile actually has directional arrows on the back side; make sure you keep them lined up the same way so you get the correct look. 


Wood in the Bathroom? Absolutely!

Article By: Mark Clement

The conventional wisdom is that tile is the go-to for bathroom surfaces. We see tile everywhere, from the bathroom at work to the subway, to everybody’s house.

I love tile, but just because it’s so popular doesn’t mean we have to design with it. And tile and grout aren’t as impervious as you might think and are not required for looks, durability or cleanliness in wet areas like kitchens and baths. 

In fact, you can do amazing things with wood, even in the bathroom. The way it feels, sounds and even reflects light is wonderful. It also offers color and depth, and can soften the look of hard ceramic finishes. 

While wood is a durable choice for bathroom floors, it’s also fantastic on the ceiling. It adds a sense of natural warmth in a space where, well, most of us are au naturel. 

Yes, this ceiling is above a shower. You can imagine the potential moisture problems. I always recommend using a fan in the bathroom, but adding a second barrier between the steam rising from the shower and what’s behind the ceiling might be smart here. I recommend sealing the wood surface with boiled linseed oil and/or urethane. I also recommend sheeting the ceiling joists with 15-pound tar paper (the black paper you see under roof shingles) before installing the wood. 

Tar paper is water resistant and will keep moisture that does make it through the ceiling (not much, if any) inside the room. The moisture will evaporate back into the room and dry with the rest of the air, especially if you’re using planks instead of a tongue and groove material.


Wood on an accent wall — in this case, beveled siding — softens and adds texture. Moisture is always a concern in a wet area, and the usual go-to bathroom coating is semigloss paint. 

When it comes to wood, I like the texture to be the star, so I prime the base coat with oil (it’s smelly, so do it outside) and make sure the end grains and backs get coated to thoroughly seal the wood. 

Installing wood is often easy, fast and cleaner than sanding drywall.


When you’re remodeling a bathroom, there are many materials you can use for the walls that’ll help battle ever-present moisture. Water-resistant drywall (often called green board) and cement board are popular, but they’re not necessary or any more durable than natural softwood planks like eastern white pine. 

Bare wood will stain, but coating it with a water-based urethane will help keep all that natural wood grain vibrant. And having different-colored wood cabinets and storage is a nice touch, with clean, horizontal lines drywall can’t touch. 

I recommend tongue and groove stock, as opposed to planks, to create a continuous barrier to minimize moisture migration into the walls. 

Think creatively. Wood is used on decks and docks, where it is constantly shifting between wet and dry (and getting snowed on). So why not use it the shower floor or another bathroom area?

This pallet floor is custom detailed for this shower assembly. An easily customizable pallet built from any number of widely available lumber species — pine, cedar, Douglas fir — could be designed for a standard shower with a poured and sealed shower pan in place of tile. Or it could cover tile, which is my preference, because I find it easier to clean. 

I also like the idea of creating a simpler element inspired by this design: a wooden bath mat. Wood is easy to seal and clean with basic household detergents, and it’s much less slippery than glazed tile.  

Using wood in the bathroom enables a mix of materials to create depth and warmth across different materials and styles. This concrete wall might have appeared cold and heartless were it not for the soaring rafters and V-joint roof decking above. Scale this feature down to convey the same effect in a smaller space. 

I’ve installed wood flooring in bathrooms. Not only does it deliver a sweet style, but it’s durable, in large part because urethane finishes are fantastic. I always put 15-pound tar paper down to protect the floor from any water that does get through.


Other reasons to use wood floors in the bathroom, besides looks, are ease and continuity. It’s easier to run flooring that exists in the other rooms of the house through to the bathroom. And it creates a flow, a feeling of continuity, that I find calming.


8 Fabulous Faucets for All Kinds of Bathrooms

Article By: Michelle Gann

Bathroom sink faucet options are limitless, and choosing one can be overwhelming. There are lot of different factors to consider, and every house has different needs. Do you need a faucet that’s easy to use for all ages? Is space an issue? Or perhaps budget?

Check out these eight types of faucets to get an idea of what to look for when you’re shopping for your bathroom. 

1. Waterfall faucet. With its clean lines and minimalist approach, this faucet lends itself to a more modern style. It’s most commonly constructed out of metal and glass.

Some waterfall faucets have beautiful colored designs throughout the glass, which give the bathroom a cheery feel. Others have LED lights, creating a colorful display when the water is flowing. 

2. Four-inch-spread faucet. A great budget option, 4-inch-spread faucets (measured from the center of one handle to the center of the other) offer value and functionality. Not only do they come in almost every shape, size and color, but they are also a good space-saving option for smaller vanity areas and can be used in almost any application.


3. Eight-inch-spread faucet. One of the most popular styles today, the 8-inch-spread faucet (also measured from one handle center to the other) comes in many styles and materials. From metal to marble to crystal, the options are almost endless. 

You can find an 8-inch-spread faucet in popular finishes (such as brushed nickel, oil-rubbed bronze and the ever-popular gold) and some not-so-popular ones (such as polished nickel and matte black).


4. Single-lever faucet.Single-lever faucets are very easy to use and are a great option for all styles of bathrooms. They come in a variety of designs from traditional to contemporary. 


Single-lever faucets are a popular option because of their simple design and the multitude of colors and styles available.


5. Wall-mounted faucet. Wall-mounted faucets offer the same functionality as countertop-mounted faucets without taking up any counter space. They also provide a great focal point whether you are mounting them on a sink or a backsplash. 

Wall faucet styles range from minimalist to traditional, and many different colors and finishes are available.

Spaces by Other Metro bornrich.org 

6. Digital faucet. Want a faucet that will always give you the perfect temperature? Digital faucets aren’t all about the sleek looks; they can detect each user and adjust the temperature according to preset comfort levels. Not to mention you can also check the weather and your email while washing your hands.


7. Motion-sensor faucet.Many faucets can be installed to work with a motion sensor. This not only frees up your hands, but it’s a great way to keep the faucet sanitary and to prevent water waste. Motion-sensing faucets aregreat for children as well; setting the faucet to a comfortable temperature will ensure that children never burn themselves. Also, this option is neat to show off at parties.


8. Foot-controlled faucet. Looking for a little convenience in the morning? This faucet operates without hands; foot pedals mounted underneath the sink area control it. Step on the left side for hot, the right side for cold or both at the same time for warm water. Foot controls are a handy option no matter the application and can work with many kinds of faucets.

Bathroom Design: Getting Tile Around the Vanity Right

Bathroom Tile Around The Vanity

Article By: John Whipple, Houzz

Tiling under your new vanity or custom cabinets can prevent shower or sink water from finding its way into your house. Extending tile all the way under freestanding or floating vanities can make a room look and feel larger, too. These vanities are popular choices in today’s bathrooms, so it’s important to understand the pros and cons of bringing tile all the way under your bathroom storage. 

See how these bathrooms combine vanities and floor tiles, and learn what you should specify when working with your bathroom contractor. 

Photo by ChaletLook for bathroom pictures

Traditional Bathroom by Denver Architects & Designers Chalet 

Making sure the floor is perfectly level is an important step for a vanity like this. Trying to level a vanity after tile installation can be a real chore. If you’re having a vanity custom built, designing adjustable legs can help get your vanity and vanity top perfectly level. 

Tip: Consider omitting extra legs in custom vanity designs and securing the vanity to the wall if needed. Getting eight legs to sit perfectly flat is much harder than four! 

Photo by Cinder Creek ConstructionDiscover bathroom design inspiration

If your bathroom floor is a little unlevel and you don’t want to spend the money or time making it perfectly level, a little shoe molding (the small strip of molding at the bottom of the vanity toe kick in this photo) on your vanity can visually even things up. Shoe moldings add a lot of charm to a vanity’s look and help protect the vanity from water damage. 

Tip: If you are going to use a shoe molding, plan to shim the vanity off the ground by about ⅛ inch or so, so that the only wood in contact with the floor is the shoe molding. If there’s ever a leak in your bathroom, the shoe molding, rather than the bottom of your vanity, will absorb the damage. It’s much easier (and more affordable) to replace shoe than the entire vanity.

Photo by Erica George Dines PhotographySearch bathroom design ideas

I love how this vanity has higher legs and extra foot room. Traditional bathroom and kitchen cabinets often have a smaller kick space (the little recess below the bottom drawers) with little to no room for your toes. If you like to get up close to your vanity and lean toward the mirror when getting ready, a freestanding vanity with extra leg height is a great idea. 

Tip: If you’re installing radiant floor heating, you’ll want it to go all the way under your vanity with a design like this. That way your feet will still stay warm when you’re up close to the mirror. We prefer cable heating systems rather than heating maps for this very reason; they allow for greater heat placement control.

Photo byLook for bathroom pictures

If you love open space, a floating vanity can help visually expand your room. Sometimes a vanity needs to float due to a room’s heating needs. In-floor heating requires a freestanding or floating vanity (rather than a fixed vanity) to avoid overheating.

Photo by ROSEMARY MERRILL DESIGN – More bathroom photos

Tiling under your vanity can help seal up any voids that might collect water and harm your home’s construction. Sink and drain lines can leak if not properly installed or prepared, and often this leak runs down the back side of a vanity and into the floor. 

Tip: Make sure all your water supply lines have trim collars inside the vanity. These collars act like little water deflectors and can keep water from running back along a pipe and into the wall. 

Photo by USI Design & RemodelingBrowse bathroom ideas

In a larger bathroom, the high cost of tile could be a big factor when you’re deciding whether or not to tile under a vanity. Usually we order a 10 percent overage in bathrooms, but for some large bathrooms I’ll just order 5 percent and use the off cuts under the vanity. This allows the client to get the benefits of tile under their vanity without added cost.

Tip: If your tile is crazy expensive, consider using a cheaper, similar tile under the vanity. No one will know but you.

Photo by REFINED LLCBrowse bathroom photos

Larger vanities with a solid countertop like this can add a lot of weight to a tiled floor. If you’re aiming for a similar look and style, considered the added weight your vanity will bring to the room and make sure your contractor prepares the floor for this kind of installation.

Tip: Curious if your floor is strong enough? Try this simple test for excessive floor deflection: Fill a drinking glass to the top with water, place it in the room before tiling and walk around the room. Move the glass to a few different locations and walk around each time. If the water spills from the glass anywhere, the floor most likely has too much bounce and might not be suitable for a heavier vanity.

Photo by RW Anderson HomesSearch bathroom design ideas

Adding some light under a vanity makes for a great night feature and brings another layer of lighting to the room. Some tile is so shiny that it acts like a mirror under the vanity, so make sure that the bottom of your vanity is not littered with job tags, addresses or overspray from finishing.

Tip: If you want a more even glow from the lighting, consider shining the light toward the back wall instead of straight down. This creates a little less light but a more even glow.

More:Bathroom Design: How to Pick Out a Vanity

See more from Houzz.

How to Design Small Baths So They Feel Roomier

Article By: Elaine Martin Petrowski

A small bathroom must contain all the elements of a large bath in less space. That’s why planning a new one or remodeling your existing one is so challenging. You have to think about function, appearance, fixtures and storage, along with how much room you have—and how much you can afford to spend on the project. 

When every inch counts, you might want to consider getting professional design help at a kitchen and bath dealer or from the design staff at a home center or plumbing distributor. Also contact the National Kitchen & Bath Association for a copy of “41 Guidelines of Bathroom Planning.” Then check your plans against the guidelines to be sure your bath looks and functions its best. We’ve distilled the NKBA guidelines to get you started. 

Stretching Strategies

To create a powder room, you’ll need at least 16 sq. ft.; a full bath requires a minimum of 36 to 40 sq. ft. The finished room must measure at least 5 ft. in one direction to accommodate a tub. Building codes typically require 32×32 in. (finished dimensions) for a shower; if you have the space, larger is better. Just make sure the shower is large enough so you-and all your family members-can comfortably raise your arms when washing hair or bend over to pick something up. 

Storage space usually is at a premium in small baths, so consider recessing an 8-in.-deep bath cabinet above the vanity. Install the vanity at a comfortable height—36 in. off the floor for most adults, 43 in. if you’re taller than average. Select a vanity with drawers or bins, or add organizers for toiletries and cleaning supplies to a unit that comes unequipped with these items. 

Photo: Francine ZaslowFinally, avoid pedestal sinks in a small, full bath. They look great but are impractical because they don’t provide storage. Save them for powder rooms where storage isn’t as crucial. If you must use a pedestal sink, include open shelves or a tile-lined niche behind or adjacent to it. Or consider using cabinetry 16 or 18 in. deep instead of the usual 21 in. A small-scale pedestal lav, available from every major plumbing manufacturer, is another viable option worth considering.

Once you’ve determined how much space you have, there are a wealth of ways to make it look bigger. For example, use a pocket, rather than a hinged, door. Choose as large a mirror as possible (use only one; more than one confuses the eye). And go with light-colored finish materials. Clear-glass shower doors stretch space visually, and you can unify the bath by using one finish for all trim and hardware. 

Keeping it Affordable

How much will a small-bath remodel cost? That depends on structural changes and the price of the components. The NKBA’s annual “Trends Survey” of certified kitchen and bath designers puts the cost of the average bathroom re-model done by its members at about $9,000. You can cut that figure by more than half by shopping at a home center and doing the work yourself. On the other hand, it’s easy to exceed that amount by picking high-end components. 

For example, a deluxe whirlpool tub costs $5,000, while a white cast-iron tub goes for $500. A sculpted one-piece toilet with a power-assisted flush will set you back $1,000; a basic gravity-action, two-piece model in white costs only $150. A sink with a custom-designed solid-surfacing bowl and pedestal is a $1,000 investment whereas a simple self-rimming, white china version costs $100. 

Another important factor in the final tally is the cost of labor. Because all the major building trades are involved in a bathroom remodel, sprucing up even a small bath tends to be expensive if you hire out all the work. 

Musts for Every Bath

No matter how small a bathroom you’re planning, it must include certain items. Ground-fault circuit interrupters (GFCIs) are required by code to protect receptacles in wet areas, such as bathrooms and kitchens. GFCIs quickly break the circuit, which can prevent a potentially fatal shock from a blow-dryer or electric shaver. 

Low-flow toilets, which use 1.6 gal. of water per flush, are required by law in all new and remodeled baths. Pressure-assisted toilets effectively clear the bowl with one flush, but make considerable noise in the process. Gravity models sometimes require two flushes to clean the bowl properly. For maximum efficiency, choose a bowl with a large water surface. And make sure there’s sufficient space around the toilet for comfortable access-ideally, at least 16 in. from the centerline of the toilet and walls or fixtures on either side. Also allow at least 30 in. from the front of the toilet to the nearest object. 

Proper ventilation will prevent moisture from getting trapped in the bath, which can lead to mold and mildew growth. This moisture can also destroy wallcoverings, harm wallboard and other building components and saturate insulation, rendering it useless. Extract moisture by installing a ducted exhaust fan on a timer. Most timers allows you to set the fan for 15 to 60 minutes to remove heat, steam and condensation. Choose a fan according to the cubic feet per minute of air it moves. To find how out much you need, divide the cubic footage of the room by 7.5. Look for a fan that generates 6.5 sones or less of noise. 

Adequate lighting is needed for shaving, applying and removing makeup and other grooming tasks. Include task-specific and ambient, or general, light. Multiple recessed ceiling fixtures are all but invisible and eliminate the locker-room look of a single ceiling-mounted fixture. Include a light fixture above the tub and/or in the shower. Flank the vanity or pedestal lavatory with a pair of decorative sconces or multibulb theatrical strips. And avoid fluorescent lights, which alter the color of your complexion. 

You also might want to place small low-voltage lights in the vanity toekick for drama and as a night-light. And, if you like to relax while soaking in the bathtub, install some of the bathroom lighting on dimmer switches. 

Finally, admitting natural light with skylights, etched glass, transom windows and glass block is an effective way to maintain privacy without taking up additional space. At a minimum, window area should equal at least 10 percent of the square footage of the room. 

A properly installed grab bar in the shower should be bolted directly to the studs. Do not simply screw the bar into the wallboard or glue it to the surface of ceramic tile. 

Also remember that a locking cabinet for medicines and cleaning supplies is an especially important safeguard against poisoning if you live with or are visited by young children.