FREE DESIGNS AND ESTIMATES

10 Smashing Black Kitchens

Article by: Becky Harris

White kitchens have reigned for several years now, but black kitchens are gaining ground. They can add a sleek touch, put the focus on a view and contrast materials like nobody’s business. Whether it’s used in an industrial space in Brooklyn, a fashionable apartment in Australia, a villa surrounded by forest in Sweden or a library-turned-home in Oregon, there are good arguments for going dark in the kitchen in all kinds of homes.

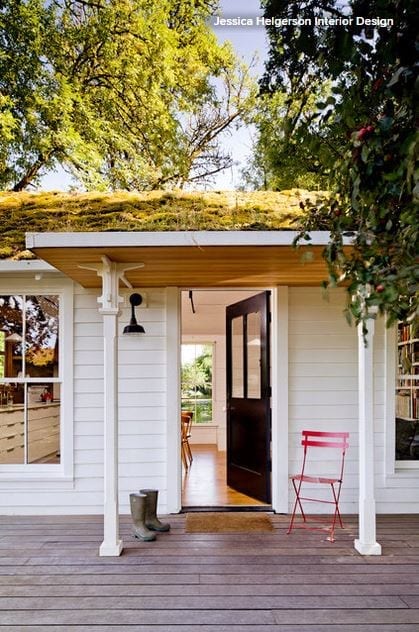
1. In this Oregon library-turned-home, the interior designers at Jessica Helgerson Interior Design let the kitchen recede into the background and put the focus on the fantastic windows, which were painstakingly replicated from the originals. Black was used on the trim and built-ins throughout the open plan. Between the open shelves full of cookbooks and the rolling ladder, one can see the library spirit is still alive and well in the home. 

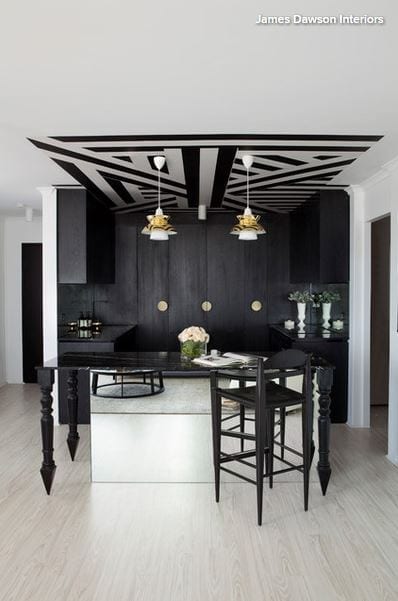
2. In this flawlessly chic Miami, Queensland, Australia, apartment, interior designer James Dawson had the freedom to go graphic. When facing in the opposite direction from the view here, you have a full view of a marina. When facing the kitchen, the eye goes up to an op-art “wallpaper” treatment on the ceiling. (Dawson drew the pattern, then had the wallpaper crew cut and apply the shapes.) 

Sleek black wood-veneer cabinets and black marble countertops keep a streamlined look, while mirrored backsplashes on either side bounce the light around. Using the black created a strong contrast that doesn’t compete with the view. 

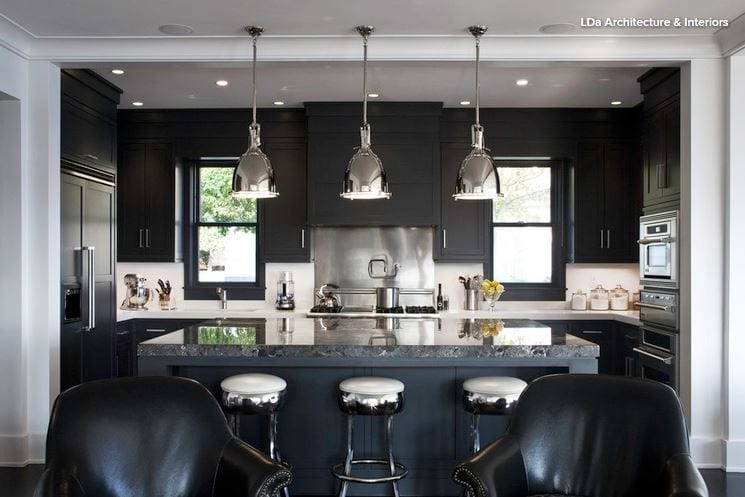
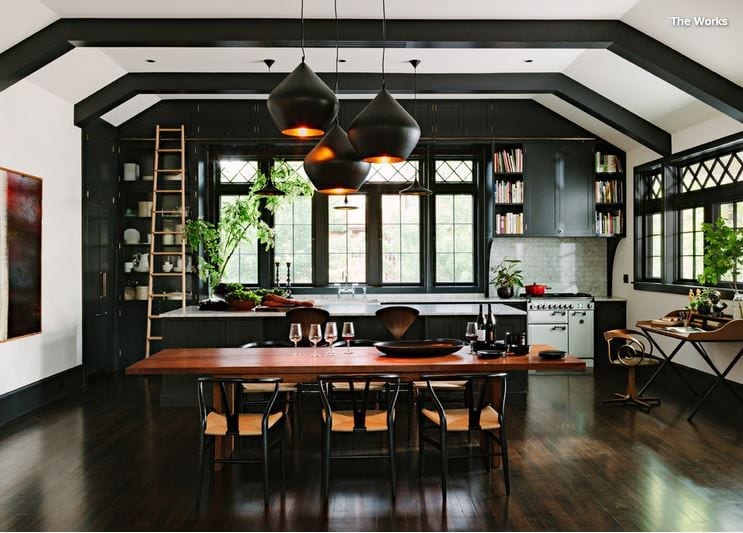
3. This black kitchen also opens to much lighter rooms with coastal views, so it recedes into the background in a sleek, sophisticated way. The designers at LDa Architecture & Interiors were inspired by the rocky Massachusetts coastline right outside the home when choosing the countertop. This large slab creates a stunning middle ground between the black and white. 

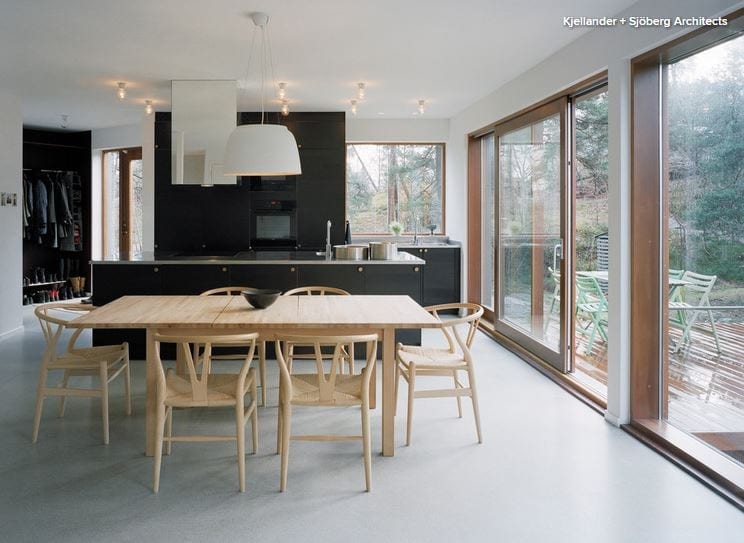
4. This villa perched in the forest outside of Stockholm, Sweden, emphasizes different views, that of trees and moss. (In fact, it is named Villa Vy, and vy is Swedish for view.) Suitably, the designers at Kjellander + Sjöberg Architects put the focus beyond the glass on the trees and the moss by creating a black kitchen. The color also helps the space look less like a kitchen within the open plan.

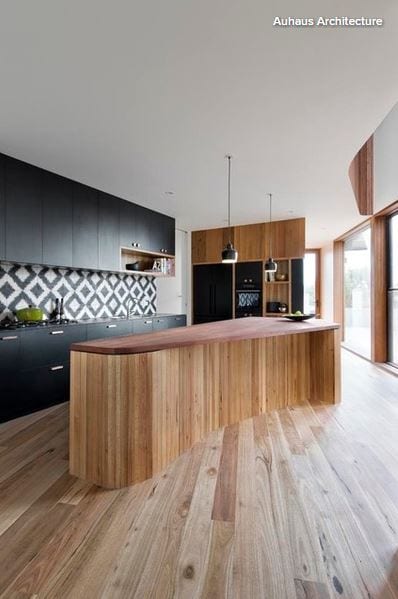
5. The Aussies certainly have the black kitchen thing down. Auhaus Architecture chose a matte black finish for the laminate cabinets here. The finish is just the right complement for all of the natural wood, which includes spotted gum flooring in a Bona Natural finish and an island top of grey box (a highly durable hardwood). Both the woods and the black laminate take a backseat to the stunning graphic Moroccan tile cement tile backsplash.

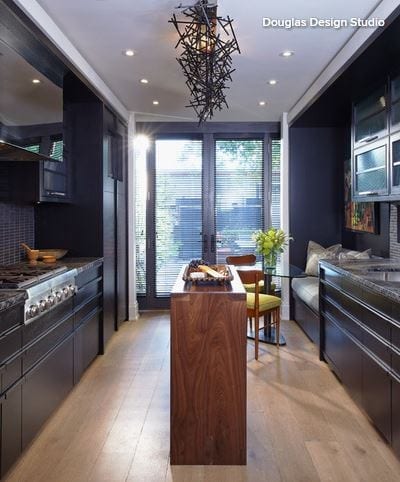
6. Jeffrey Douglas of Douglas Design Studio recommends making sure that a kitchen has good light showing through from different angles before going black. This kitchen gets plenty from the large windows and doors and another window in the backsplash (not shown). This is also a story of wood — the cabinets are Canadian red oak with a charcoal stain. Engineered white oak flooring, a light ceiling and a rich wood island add warmth. 

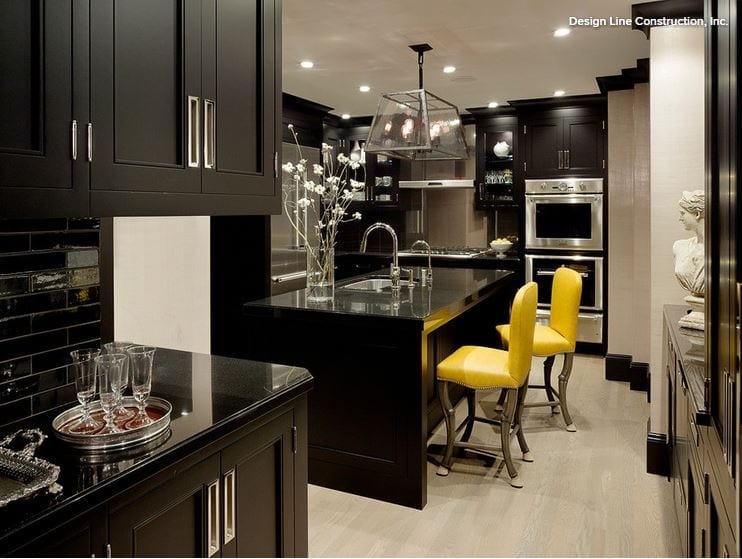
7. Interior designer Candace Cavanaugh specified black-brown when coming up with a custom color for these cabinets. The hue adds an unexpected warmth to the dark room. She then custom designed taxicab-yellow counter stools to add a playful dash of color. The overall look is glamorous and unexpected.

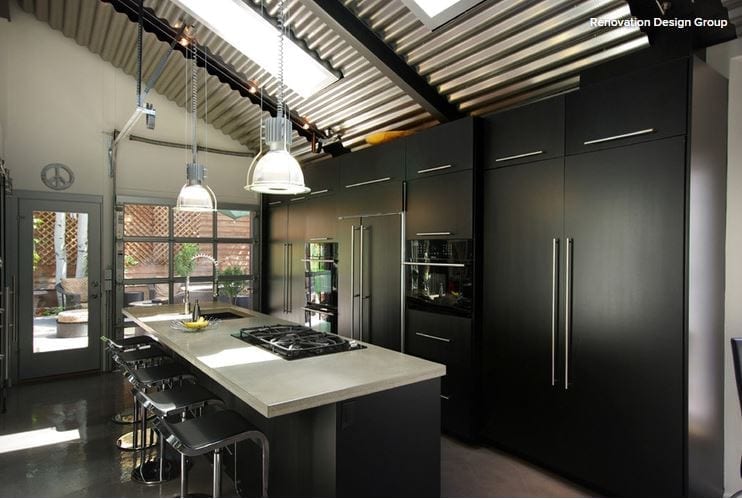
8. Renovation Design Group gave this bungalow the contemporary loft-like feel that the owner preferred. The black cabinets fit right in with the industrial-style corrugated ceiling, glass garage door, concrete countertops and stainless steel accents.

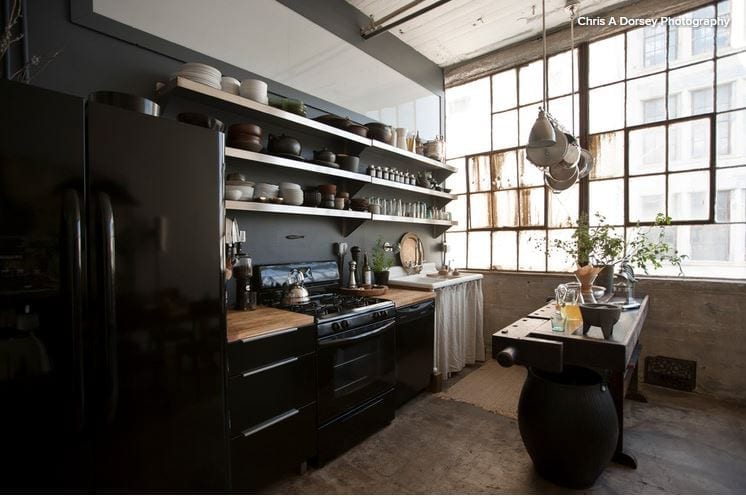
9. This industrial kitchen in Brooklyn, New York, used to be an industrial woodshop. Appropriately, the island is a well-worn vintage workbench. Dark cabinetry and appliances put the focus on items that homeowner Alina Preciado has collected on her worldwide travels, including spices and unique teapots. 

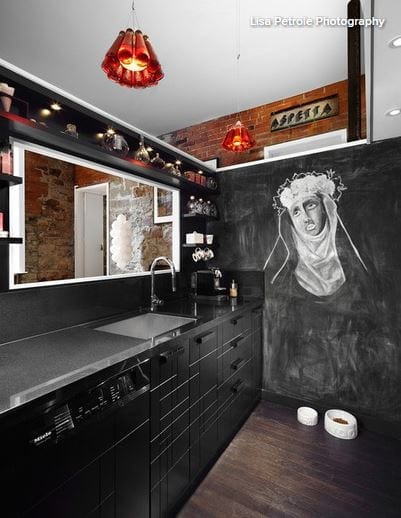
10. In this creative Toronto loft, the galley kitchen’s appliances and cabinets have a sleek, streamlined look, putting the focus on the exposed brick and unusual light fixtures. And, of course, on the chalkboard wall, which invites clever artwork (in fact, this made our chalkboard art hall of fame). Note the way the lighting helps highlight the objects along the top shelf. 

Colorful Ways to Make Over Your Kitchen Cabinetry

Article by: Nelly Reffet

As much as we love white kitchens for their timeless versatility, bringing in color with the cabinetry can add a wow factor or brighten up a tired scheme. If you are a renter or want to introduce just a touch of color, you can add it subtly with hardware or occasional furniture. And if you’re ready to go bravely into a more permanent change or a bold new look, you can splash color in or on cabinets. See what a difference color can make in the kitchens below.

Bravery Level 1: Change Your Hardware

For a change that’s not too dramatic but still effective, replace your knobs and handles. Ceramic knobs and handles come in many colors, shapes and designs, and replacing them can bring a subtle but welcome change to your kitchen. It’s quick, cost effective and totally doable in a rental. Just make sure you keep the landlord’s old handles to screw back on again. Never underestimate the smaller changes. The details and finishing touches are often what make a room sing.

Bravery Level 2: Paint Occasional Furniture

What if you are renting or you don’t feel like painting permanent fixtures, such as cabinets? You can paint occasional kitchen furniture, such as a butcher block, stand-alone pantry or kitchen island. 

The best result is when the chosen color contrasts with the rest of your kitchen. In this kitchen, see how the red stands out, strong and vibrant, against the blue floors and the white everything else? To make sure your painted piece doesn’t become the elephant in the room, try using the same color again for accent items and decorative accessories, such as the door handles.

Painting furniture can be a little bit tricky and messy, and the result can look far from spotless if you rush it. First, take your piece of furniture to a well-ventilated, well-lit space, and make sure there is plenty of space to walk around it while it’s drying. Remove any knobs, handles, drawers and even doors if you can. Use painter’s tape to mask areas you do not wish to paint, such as glass on doors.

Next, prepare the furniture. No matter how much the paint packaging claims sanding is optional, be sure to sand your piece of furniture thoroughly. Even if you can apply paint without sanding, doing so will improve the longevity of your work. After sanding, clean your piece to remove any wood dust particles. 

Depending on the paint you choose, and what the furniture surface is like, choose whether to use a primer before applying two coats of your finishing paint. Start by painting the frame. Then proceed with painting doors and drawers. Always make sure the paint is fully dry — not just touch dry — before you put the piece back in place.

Bravery Level 3: Dress Up the Backs of Your Cabinets

For cabinets with glass doors (or no doors), applying wallpaper or painting the backs of them is a fantastic way to add color and create a strong background to display your glassware against. For cabinets with only solid doors, adding color to the backs can be fun update that adds a little quirkiness and makes you smile every time you open the doors.

You can also paint the backs of your cabinets. For a nice professional finish, remove the shelves if possible, and apply painter’s tape to the frames and other surfaces you do not wish to paint. As I have an unsteady hand, I tend to opt for a wide tape — that way even if my brush slips a bit, my cabinets are still protected.

This kitchen scheme goes the extra mile, with a painted panel of sunny yellow above a white-tiled backsplash. This simple DIY trick really adds dimension to the kitchen.

Bravery Level 4: Paint the Shelves

Open shelving has made a strong comeback in kitchen design during the past couple of years. But more often than not, finishes are limited to white or wood. If you feel like adding an accent color, why not step gently out of the norm and paint your shelves a different shade of awesome? Don’t hesitate to go for a strong color — a shelf is reasonably small and is not going to overwhelm your space. It can easily be repainted if you grow tired of the color, so be brave and embrace that strong hue you have been dreaming of.

Bravery Level 5: Paint the Cabinets 

Perhaps the boldest change you can make to your kitchen cabinets is to paint them. While the process can be time consuming, the results can be striking and take your kitchen to a new level. Whether your cabinets are wood or laminate, you can find the right type of paint in a wide range of colors. My biggest tip is that no matter how impatient you are and how promising the paint is supposed to be, don’t skip on the preparation phase, which is even more important for frequently used cabinets than for occasional pieces. Thorough sanding and priming are essential for a smooth and long-lasting finish.

If you have a compact kitchen that doesn’t get much natural light, a bright color might be just what your space needs. These colorful cabinets have been paired with a graphic black and white tile floor. You could accessorize yours with superfunky pendant lights or gutsy artwork. Adding more boldness to the room will complement the cabinets while preventing them from overpowering the room, especially if it’s small.

If you have always had a neutral kitchen and are not quite ready for a dramatic change, opt for cool, timeless or light shades such as navy blue, sage green, duck-egg blue and mint green. The color will add dimension and interest without being overstimulating.

You don’t have to paint all of the cabinets, either — you can leave some white and paint others. For a partial color makeover, I often recommend that my clients paint cabinets that are already visually different from the rest — for example, a tall pantry versus standard cabinets or glass-door cabinets versus solid doors, and even upper cabinets (usually shallower and higher) versus base cabinets. The paint will enhance their differences, and since they are already different to start with, they might as well be really different and stand out.

How to Plan a Quintessentially English Country Kitchen

Article by: Lara Sargent

The super modern, stripped-back kitchen might look beautiful in the brochures — and if you’re disciplined enough to keep an all-white room spick-and-span, it can look fabulous in real life too. But if you crave something a little kinder to the chaos of daily life, you probably already have a soft spot for the quintessentially English country kitchen.

The relaxed livability of the painted cupboards, wooden countertops and stone slabs so familiar to this style exudes an irresistible warmth and charm, but there’s room for gentle updates, too. 

So harness the rustic look and make it work for the 21st-century home with these 10 country kitchen must-haves.

Read more

12 Breakfast Nooks Cool Enough for a Dinner Party

Article by: Susan Redman

Nothing brings a family or group of friends closer together than sharing a meal. It’s even better when they are comfortably rubbing shoulders as well. Kitchen nooks and dining alcoves are ideal for such intimacy, making the dining experience especially enjoyable. Here are 12 inspiring kitchen nook designs to install in your dream home.

1. First-class compartment. In keeping with the warm, minimalist elements featured elsewhere in this California ranch house, this nook has cedar ceilings, Sheetrock walls,exposed timber framing and structural steelwindows. The site for the house is edged with mature evergreen trees and opens to a field with views out to the Pacific Ocean. With its panoramic-size window and glorious outlook to a countryside vista, this sleek dine-in nook is a stylish way to eat at home. 

2. Norwegian wood. In this country kitchen, designed by architect Christine Fikseaunet, a simple window seat with an upholstered banquette cushion is paired with a wood table to create a casual dining setting. With the addition of a small screen in the corner of the nook, it also allows for communal television viewing among family members or friends.

3. Covered dining. This dining space has a wood alcove built up and over a table, creating an elegant dining space that looks like a private dining booth in an upscale bistro. The mix of materials, from the timber paneling to the channeled upholstery and stone table, adds sophistication to the alcove’s slick urban look.

4. Rough hewn. This industrial-style dining arrangement is easy to copy. Find a wood trestle table and some midcentury modern chairs, and fit them into a small area of your home, preferably with a window view. The tight space and brick and plaster walls give the dining area a congenial air.

5. Bright and breezy. This built-in banquette needs little more than a small table and a couple of light-colored chairs to complete a fine-looking and functional kitchen nook. The window bench extends from the end of the kitchen cabinets to create an ideal space between two big windows. The banquette can also double as storage with a hinged lid seat covered by cushions.

6. Budget box. Make the most of a breakfast nook by installing a complete compartment that keeps diners out of the way of the cooking action in the kitchen. Additionally, those on a budget will benefit from copying the style of the boxed-in nook pictured here. Inexpensive wood can be painted white to make the area bright. To add value, choose a more expensive tabletop and treat it with a good sealant oil to keep it looking good with use.

7. Geometric play. This small dining nook was designed by Kimball Starr Interior Design in San Francisco. Starr says her clients wanted the area off the kitchen to be used as an activity nook for playing board games with friends; she added a touch of grown-up glamour with impressive geometric pendants and a custom banquette upholstered in a playful fabric.

8. Cool and clean. This spectacular dining banquette is sited in the middle of a living space in a renovated 1960s apartment in Melbourne. It was decorated by interior design company Mr. Mitchell within a stand-alone, all-white cube. This “allowed us to introduce the macramé screen, which is a fun reference to the retro era of the apartment,” says Mr. Mitchell director Andrew Mitchell. 

The banquette is a focal point of the home, providing an intimate place for family gatherings or a quiet place for reading or working.

9. Retro kitchen and dining nook. This small eating nook would work well in a house with midcentury aspirations. It’s plain and simple but has been well decorated with a set of shelves that also acts as a divider. 

The wall map is a retro classroom touch that can encourage guests to share after-dinner stories of their world travels. Decorating the area with fun travel posters from faraway places can also encourage the exchange of personal travel stories and tips for future adventures.

10. Garden fresh. Children’s colorful artwork has been framed and hung to personalize this charming nook. This is a great idea for families, especially when a kitchen nook is also used as a homework and craft center. 

Installing a small U-shaped nook is a clever way to divide a kitchen with a generous expanse of floor. Take advantage of the extra room and install a nook big enough to accommodate plenty of dinner party guests.

11. Corner nook. Custom woodwork and banquette seating can create a sophisticated corner nook in the kitchen. In this L-shaped arrangement, the wood grain of the built-in banquette is matched to the kitchen countertops and complemented by a white table and cabinets. To add color and interest, it has been decorated with a variety of flea market finds.

12. Dramatic flair. In an all-white kitchen, introduce color and texture with bold and cheerfully patterned upholstery. Brighten up the nook with glass pendants, a colorful table setting and freshly picked flowers. Note how the pullout drawers under the benches provide storage — a perfect place in which to keep all your board, card and trivia games for after-dinner fun. 

Kitchen Ideas: How to Choose the Perfect Backsplash

Article by: Sophie Baylis

The humble backsplash has come a long way. Once upon a time, its purpose was purely functional: a tiled area behind the stove and sink to protect kitchen walls from stains and splashes. Today the availability of all manner of materials in a wide array of finishes means your backsplash can make more of a statement. To help you decide which material would work best for you, we offer expert advice on the 10 most popular backsplash materials.

Read more

9 Ways to Save on Your Kitchen Remodel

Article by: Kelli Kaufer

When you’re investing in a home remodeling project, you want to make sure that the results not only please you but add value to your home and save you money. Never is that more true than in a kitchen remodel, where costs can added up so quickly that your budget can all of a sudden seem like pennies in a jar. To avoid that and keep costs in line, and yet still get the kitchen of your dreams, here are a few of my favorite ways of getting the most out of a tight budget.

1. Go with ready-to-assemble cabinets. The biggest cost in a kitchen remodel is new cabinets. The most expensive option is going custom, for which the cabinetry is designed, built and installed to specifically fit your space. Exotic woods, ornate details and period styles will add to the cost and delivery time but result in a one-of-a-kind kitchen. Custom cabinets can cost $10,000 to $60,000, as cabinets can range from $250 to $1,500 per linear foot.

If your budget doesn’t allow for custom, but you need new cabinets, ready-to-assemble (RTA) is a good option. Ready-to-assemble or semicustom cabinets can sometimes be half the cost, from around $125 to $900 per linear foot depending on the material, style and cost of installation. If you are a do-it-yourselfer, you can assemble these yourself; if not you will need to hire a contractor. Semicustom cabinets are selected from existing designs and are prefabricated offsite in standard sizes, with limited options in terms of sizing, styles, materials and finishes.

In-stock cabinets are for customers who want to grab their cabinets right off the shelf and get going. These stock cabinets come in standard sizes, shapes and colors. Since the cabinet dimensions are not based on your kitchen, space-wasting fillers may be required to make the cabinets fit. These cabinets are very affordable for remodelers on a budget. Cabinets can range from $75 to $400 per linear foot.

Keep in mind, though, that costs will vary by location.

2. Keep existing cabinets if possible. If your cabinets are good quality and you like the style, resurfacing is a great option. It’s amazing how color can transform a kitchen and a few coats of paint can give life to a once-drab space. Resurfacing and painting make for the most cost-effective option, but ensure that you take the steps needed to get a beautiful finish. 

A simple paint job might cost a few hundred dollars. But for a more extensive refacing job, $5,000 to $15,000 is likely if new veneer is added to the face of the cabinets.

3. Choose open shelving where possible.Open shelving creates interest in the space as well as saves money. Using salvaged wood or painted planks from your local hardware store for shelving is a cost-effective and functional option to display everyday dishes (items that don’t spend enough time on the shelf to accumulate dust).

Open shelving can save a few thousand dollars, but while it may be tempting to do away with fitted cabinets altogether, they’re still valuable and efficient for storage, particularly if you have a small kitchen and a lot to pack into it.

4. Consider alternative countertop materials. There is a wide range of countertops to choose from — solid surfaces, recyclable products, concrete, tile, stone and more. Granite is still a popular choice for countertops, but at $50 to $100 or more per square foot installed, it can push any budget over the top. Consider using two different surfaces instead, such as making the outside perimeter butcher block and the island granite. This can cut the cost in half.

If granite is not in the budget but you like the look of stone, consider laminate, an inexpensive alternative. The costs ranges from $8 to $20 per square foot, including installation. Laminate has come a long way with its high-definition selections and new cut-edge profiles. The new laminates look so much like stone, you could be easily fooled. 

5. Keep appliances where they are. If your plan is to get new cabinets, think about keeping your appliances where they are. Moving the mechanics and electrical for appliances can be costly, not to mention the ceiling on the floor below and the walls may need to be cut into to expose the mechanicals. These are costs that many homeowners don’t think about when planning a kitchen remodel.

Keeping the appliances where they are will save you thousands of dollars. More often than not, moving an appliance 1 foot costs as much as moving it 6 feet, depending on where the mechanicals are located.

6. Look at different options for islands. A 6-foot island with new cabinets can run $800 and up. Instead of using cabinets for your kitchen island, think of repurposing a piece of furniture. An old table or a dresser is a great alternative to bring unique character into the space. Keep an eye on Craigslist, the Houzz Shop, salvage stores, estate sales and garage sales. Depending on how resourceful you are, you can save yourself hundreds of dollars.

Tip: When looking for a piece, make sure it is countertop height (36 inches).

7. Opt for a cutout rather than removing a wall. Many homeowners want to open the space between the kitchen and their family room to create an open floor plan. When removing a wall there are many things to consider. Is it load bearing? Does it have venting, water pipes or electrical running through it, which will need to be rerouted? After removing a wall, the ceiling, other walls and floor may need to be cut into and repaired.

A less expensive option to consider is a cutout. Not only does it open a room, but it can provide extra countertop space and an area for additional seating. You will still need to check for mechanics and plumbing, but the floor and ceiling will not need to be repaired, which will save you money.

8. Try track lighting instead of recessed lighting. Adding recessed lighting can become a bigger project than planned. Holes need to be cut into the ceiling, electrical wiring needs to be added, and there may be hidden costs in repairing the ceiling. The overall cost for a single recessed light is $100 to $150, including the costs for materials and an electrician. This can add up quickly.

To keep costs down, think about track lighting. There are many styles, shapes and finishes. They give off plenty of light for tasks in the kitchen and, when placed on a dimmer, give off a nice ambient light.

See a Complete Kitchen Remodel for $11,000

Article by: Mitchell Parker

Norma Rushton and her partner, Randy Dyke, really wanted a waterfront property in the Vancouver area but were quickly priced out of most places. When they lucked into a mobile home on the Stave River about an hour east of downtown Vancouver, they were thrilled at the great location right on the water at a good price. But that’s where their excitement ended. The home was in bad shape and needed major repairs.

BEFORE: Recently they started adding more storage and function to the original kitchen (shown here), which had been picked apart since it was built in 1970. For example, the backless cabinets had been cut up by previous owners to make room for a larger refrigerator and stove, leaving little storage. “The cabinets were starting to get useless,” Rushton says.

AFTER: Determined, Rushton, a high school theater teacher, spearheaded a complete gut and remodel, choosing all the materials, fixtures and appliances, while Dyke, a retired water taxi driver, did a lot of the work, including installing the drywall, molding, trim, backsplash (twice) and new window and patching the floor. The couple painted everything together. Professionals installed the cabinets and countertops. 

But best of all, the couple got discounted help from their contractor neighbor, Milan Vaclavik of Milan’s Home Renos, who took care of the plumbing, framing and electrical work at a friendly rate. 

Though the homeowners considered getting granite countertops, they ended up going with Formica instead. “Granite is too hard of a surface,” Rushton says. “I wanted something a little more forgiving.”

BEFORE: A bank of upper cabinets and a floor-to-ceiling cabinet made things a bit claustrophobic and blocked views between the kitchen and living room. “I wanted to be able to sit in the living room and see out the windows of the kitchen to the water,” Rushton says.

AFTER: They reduced the size of the upper cabinets and did away with the tall cabinet altogether, opening up the sightline between the two spaces. “Now you can actually chat with whoever’s in the kitchen,” Rushton says. 

The couple had a couple of remodeling disasters along the way. Rushton had found solid oak cabinets at a discounted price that she really liked, but when they arrived, they were the wrong model. With the renovation already under way, she had to make a tough decision and went with the different cabinets, which ended up throwing off all their measurements. 

The backsplash was another compromise. The first one that Rushton put up was “a horrible mistake,” she says. She had found peachy-taupey-colored porcelain tiles that looked great lying on the counter. But as soon as she installed them vertically on the wall, the angle of the light turned them green. A local tile guy informed her that artificial colors tend to do that and suggested a natural stone product instead. “It was either I live with it or let the money go,” she says. “I let it go and went and got marble tile instead.”

BEFORE: The washer and dryer were shoved into a storage closet in the kitchen, while an old cabinet did the work of storing bowls, platters and mail. 

AFTER: The homeowners replaced them with a stacking washer and dryer unit, an Ikea unit of sliding drawers for a pantry and a place for the vacuum cleaner. “It was all about getting what I need for putting things away,” Rushton says.

Sliding doors nicely seal off the laundry and pantry area, freeing up clutter near the pristine river view. 

Rushton says they budgeted about U.S.$8,000 but the actual cost came in at just over $11,000. 

Here’s some of the breakdown: 

Cabinets: $2,300
Cabinet handles: $170
Countertops: $675
Closet doors: $250
Washer, dryer, microwave: $2,000

Lighting: $335
New flooring (closet): $85
Wood: $85
Paint: $170
Backsplash: $335 
Sink: $250
Window: $60
Labor: $1,000

Ikea shelving: $300
Drywall, insulation, plumbing fixtures, electrical wiring, switches, plugs, power tools, screws and brackets, taxes and other miscellaneous expenses: around $3,200

Smart Ways to Make the Most of a Compact Kitchen

Article by: Joanna Simmons

We might all dream of a huge family kitchen, but most of us have to make do with something smaller. That said, whatever the size of our kitchen, the demands we place on it tend to be the same. We want it to function well for preparing and cooking meals. We might also like to be able to sit and eat in there, even if just perched at a breakfast bar. And we need space for a lot of different objects, from chunky appliances to silverware, dishes and food. The good news is, with some clever planning and great design, it is possible to have all these functions in one tiny space, as these inspiring spaces demonstrate.

Use every nook and cranny. It sounds obvious, but where space is tight, it’s essential to make use of all of it. This might mean commissioning custom units. Shelves or cupboards designed for your space, rather than bought off the shelf, can exploit even the most awkward corners or weirdly angled rooflines. Luckily, since the number of units you will be able to fit is limited by the small size of the room, a custom design often will be reasonably economical, too.

Enjoy a little rack n’ rail. Wall cupboards can eat into the space in a very small kitchen, but you can still make any wall work for you by adding racks, rails and slim shelves. These can hold things like saucepans, strung up on S hooks, mugs and pots holding cutlery, and even utensils. Covering the wall in blackboard paint helps it to multitask even more, as a place where you could write shopping lists and messages.

Make it streamlined. Chunky and mismatched pieces would eat into the space and make a tiny kitchen feel cluttered. Instead, opt for units with a minimalist look and, as here, a countertop that flows over all the base units and even extends to become a breakfast bar. The minimalist metal legs seen here keep sight lines open. This kitchen is flooded with natural light, so the color on the unit doors invigorates the space without encroaching on it.

Find another home for laundry appliances. It’s not uncommon to find washing machines and dryers installed in the kitchen, but, when space is limited, it’s a good idea to find an alternative home for them. A nook under some stairs can be a good place. Or consider putting a dryer — and perhaps a freezer — in the garage, if you have one.

Choose clever details. There are heaps of clever space-saving elements that can be built into a new kitchen, so if you’re starting from scratch, look for things like slim spice jar storage, knife drawers,toe-kick drawers and integrated chopping boards that can be slid over a sink or pulled out from the wall.

Try freestanding pieces. Freestanding furniture has its benefits in a small kitchen too. If you take the view that where room is tight, it’s important to make every item you place in it shine, then suddenly there is a logic to not building everything in. A freestanding piece containing an oven, sink and cupboards, like this one, looks like a beautiful piece of furniture that fits elegantly into the space.

Raise the ceiling. Rethinking the dimensions of the room and having some architectural work done can make a huge difference to a small kitchen. If yours is in a single-story space, raising the ceiling to expose a sloping roofline would add a huge sense of light and airiness. It also would offer the opportunity to install skylights, which pull in more light than vertical windows. Plus it would create a tall wall against which you can fit cupboards or shelves for maximum storage.

Build up to the ceiling. Floor space may be limited, but vertical space is often the same in a tiny kitchen as in a huge one. So make the most of it by building units that stretch right up to the ceiling — or just nearly. A small gap above tall cabinets can offer just enough breathing room to help keep the room from feeling cramped. Keep infrequently used items on the upper shelves and try using sleek handle-less doors, so the units look streamlined and seamless and don’t dominate the room.

Integrate appliances. You may yearn for a huge, freestanding range complete with five burners, but a small-scale kitchen is not the place to install one. Instead, integrate your appliances for a more streamlined look and a space-savvy solution. Building the microwave into a cupboard will free up countertop space, and why not go for a boiling-water tap to dispense with the need for a kettle?

Work in a portable mini island. In addition to built-in units, a small, movable butcher’s block with shelves, like this one, can prove incredibly useful. It would take up very little room while supplying additional storage and prep space. It would also create the relaxed, freestanding look you may have been craving but thought you couldn’t pull off in a small kitchen.

Kitchen Evolution: Work Zones Replace the Triangle

Article by:

When I began studying kitchen design many (many!) years ago, I learned all about the much-venerated kitchen work triangle — in which the refrigerator, range and sink are placed 4 to 9 feet apart, forming a roughly equilateral triangle. This design principle was developed back when most people had smaller, closed-off kitchens, where only one person prepared and cleaned up meals. It’s an efficient way to lay out appliances and the sink in a small closed or semiclosed kitchen. 

The work triangle is still useful today, but with kitchens that now run the gamut from tiny single-wall galleys up to large open-plan kitchens, it’s more useful to think in terms of work zones instead.

Work zones are really just the natural evolution of the kitchen work triangle. As kitchens grew in size and opened up to other rooms in the house, it became more of a challenge to place appliances in a neat triangular layout. We also have more appliances than ever before — dishwashers, extra sinks, microwaves, separate cooktops and wall ovens — not to mention more people working and socializing in the space. By sectioning off your kitchen into work zones, you’ll maximize efficiency in a larger space; more cooks, as well as their guests, will be better accommodated.

Group appliances and fixtures according to use.To set up work zones in your kitchen, think of the tasks you perform regularly: storing food, prep, cooking, baking, serving, eating, cleaning, making coffee, chilling wine etc. A work zone contains everything you use to perform each task. 

For instance, you should place your dishwasher next to your sink, with a compost bin and a garbage bin nearby to streamline kitchen cleanup.


Store what you need where you need it most. In addition to grouping appliances and fixtures according to use, give yourself enough storage in each zone for what you need to perform the task. 

This wood-topped baking zone is perfect for kneading bread or rolling out pizza dough. All the bread-making and baking tools can be stored in the cabinets below. Someone can easily work at this station while another person prepares food in another part of the kitchen.

Provide landing areas next to major appliances.For safety and efficiency, consider placing a countertop landing area next to your major kitchen appliances, especially the range, cooktop, microwave and wall ovens. 

You want to be able to quickly set down something hot without having to trek halfway across your kitchen. This will also give you a cooking work zone; you can store items like knives, cutting boards and pots and pans in the cabinets and use the countertops for chopping and cooking prep.


Create a kids’ zone. If you have children and a good-size space, set up an area in the kitchen where the kids can hang out, do homework and eat snacks. This will allow you to all be in the kitchen together without the little ones getting underfoot.


Consider a zone for guests. If you have an open kitchen and like to entertain often, you know how important it is to have an area where guests can hang out and chat while you prepare food and drinks. A large island or peninsula works well for this, since it can act as a barrier that keeps visitors from getting in your way while also giving them a place to perch while you work. Again, think about the items you use for serving and entertaining, and store them in the cabinets below so you can easily access them.

Widen the aisles. Whether you opt for the traditional work triangle or to break up your kitchen into work zones, pay attention to your kitchen’s aisle widths. The recommended minimum aisle width is 42 inches, but I prefer 48 inches, especially in kitchens with multiple cooks. If you cook and entertain often and have the space, you could go as wide as 54 inches. Wider than that, though, and your space will likely become inefficient, as you’ll spend more time walking than cooking. 

8 Little Remodeling Touches That Make a Big Difference

Article by:

When we did our remodel, our contractor suggested a thousand things I had never really thought about. They weren’t necessarily design considerations; they were more quality-of-life considerations — just little things you didn’t know you were missing until you had them. 

Here are eight little touches I didn’t know I couldn’t live without until I lived with them. What are yours?

1. A built-in dish soap dispenser. Because I don’t care how nice the bottle is; it’s just one more thing cluttering up your countertop.

2. Soft-close hinges. It is impossible to slam a drawer or cabinet in my kitchen. Each closes with a small whisper. It’s calming somehow.


3. Large kitchen drawers. Looking down into a well-lit space is much better than looking deep into a dark cabinet. In this kitchen large drawers have completely replaced cabinets. Just make sure they are all soft close.

4. Undercabinet lighting. I know this seems like no-brainer, but before I had it I never knew how useful it could be for task lighting and mood lighting. But spring for LEDs. We opted for fluorescent to save money, and we regret it.

5. Dimmer switches. Because there are a thousand stops between on and off.


6. A garage keypad. You will never be locked out of your house again.

7. A motion-activated porch light. You will never fumble in the dark for your keys again.


8. An automatic drip system. People told us, they did. But we didn’t listen, and because of that we killed a lot of plants over 12 years. Last year we finally had an irrigation system put in. The yard is nicer, the plants are healthier and life is easier.